-
1
1. Register Account
You need to create your free Employer account
-
2
2. Create Your Company Profile
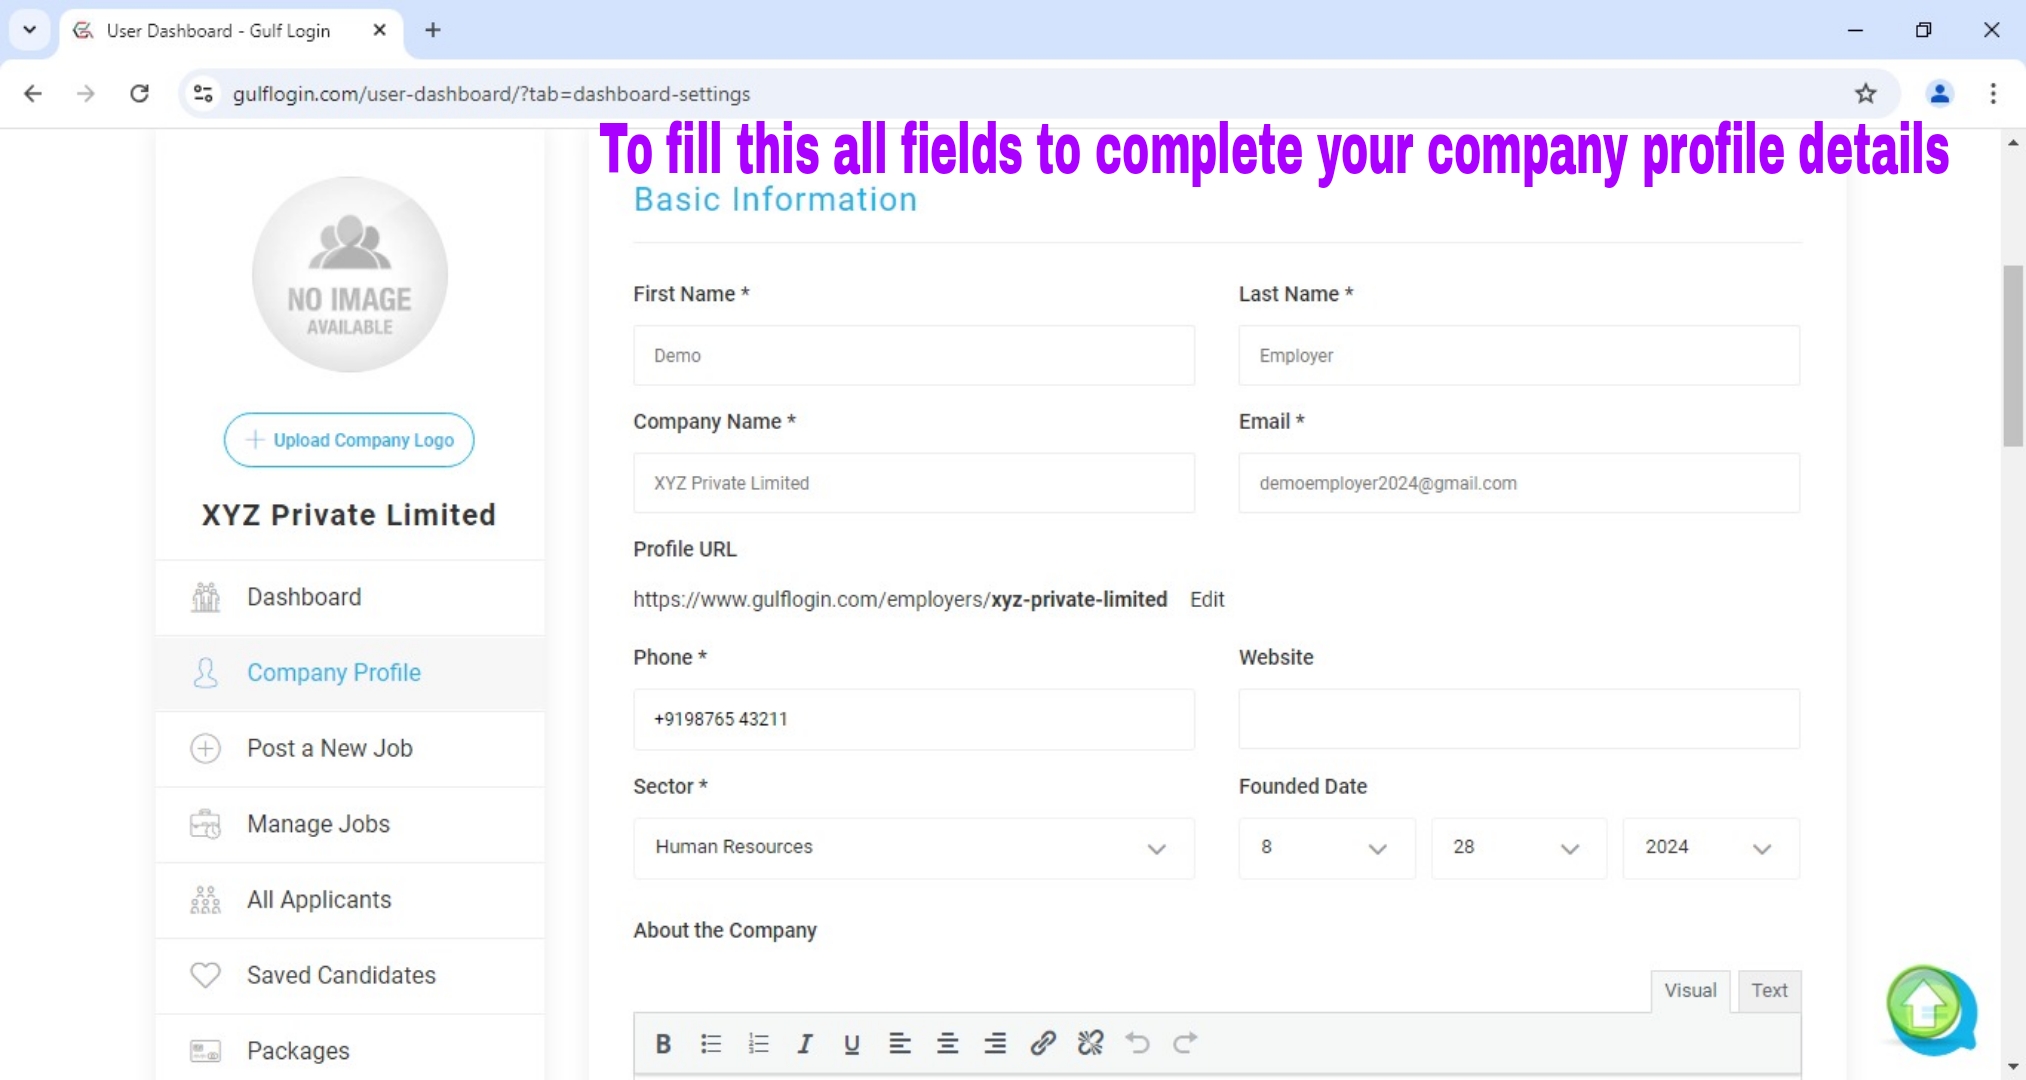
You must need to create and complete your company profile.
-
3
3. Fill a Job Post Form to Post Your Jobs
You must need to fill a job post form to post your jobs.
-
4
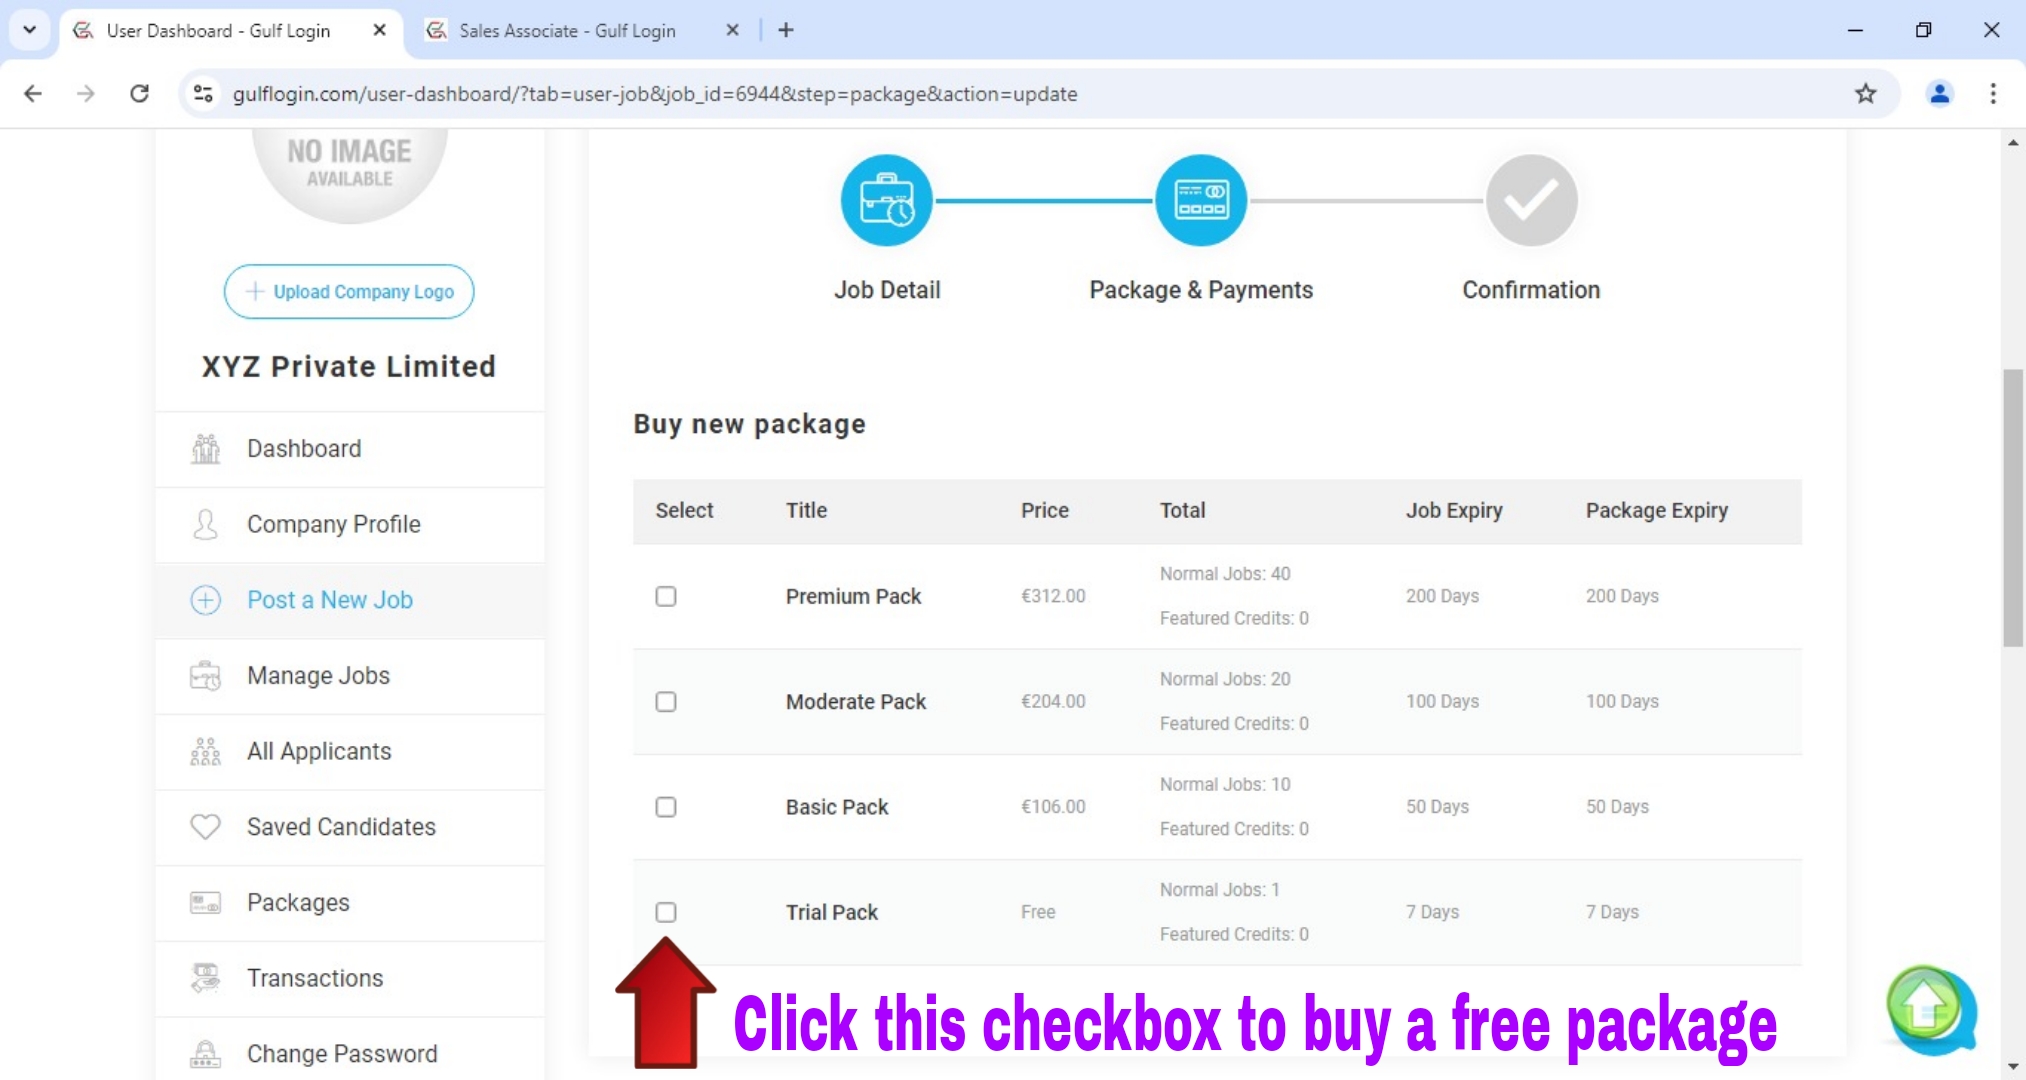
4. Buy Your Subscription Package
You need to buy a job post subscription package. Once buy your subscription package, then your package has been activated successfully.
-
5
5. Receive Applicants From Your Job Post
After get an approval of your job post, then you will receive applicants from your job post.
-
6
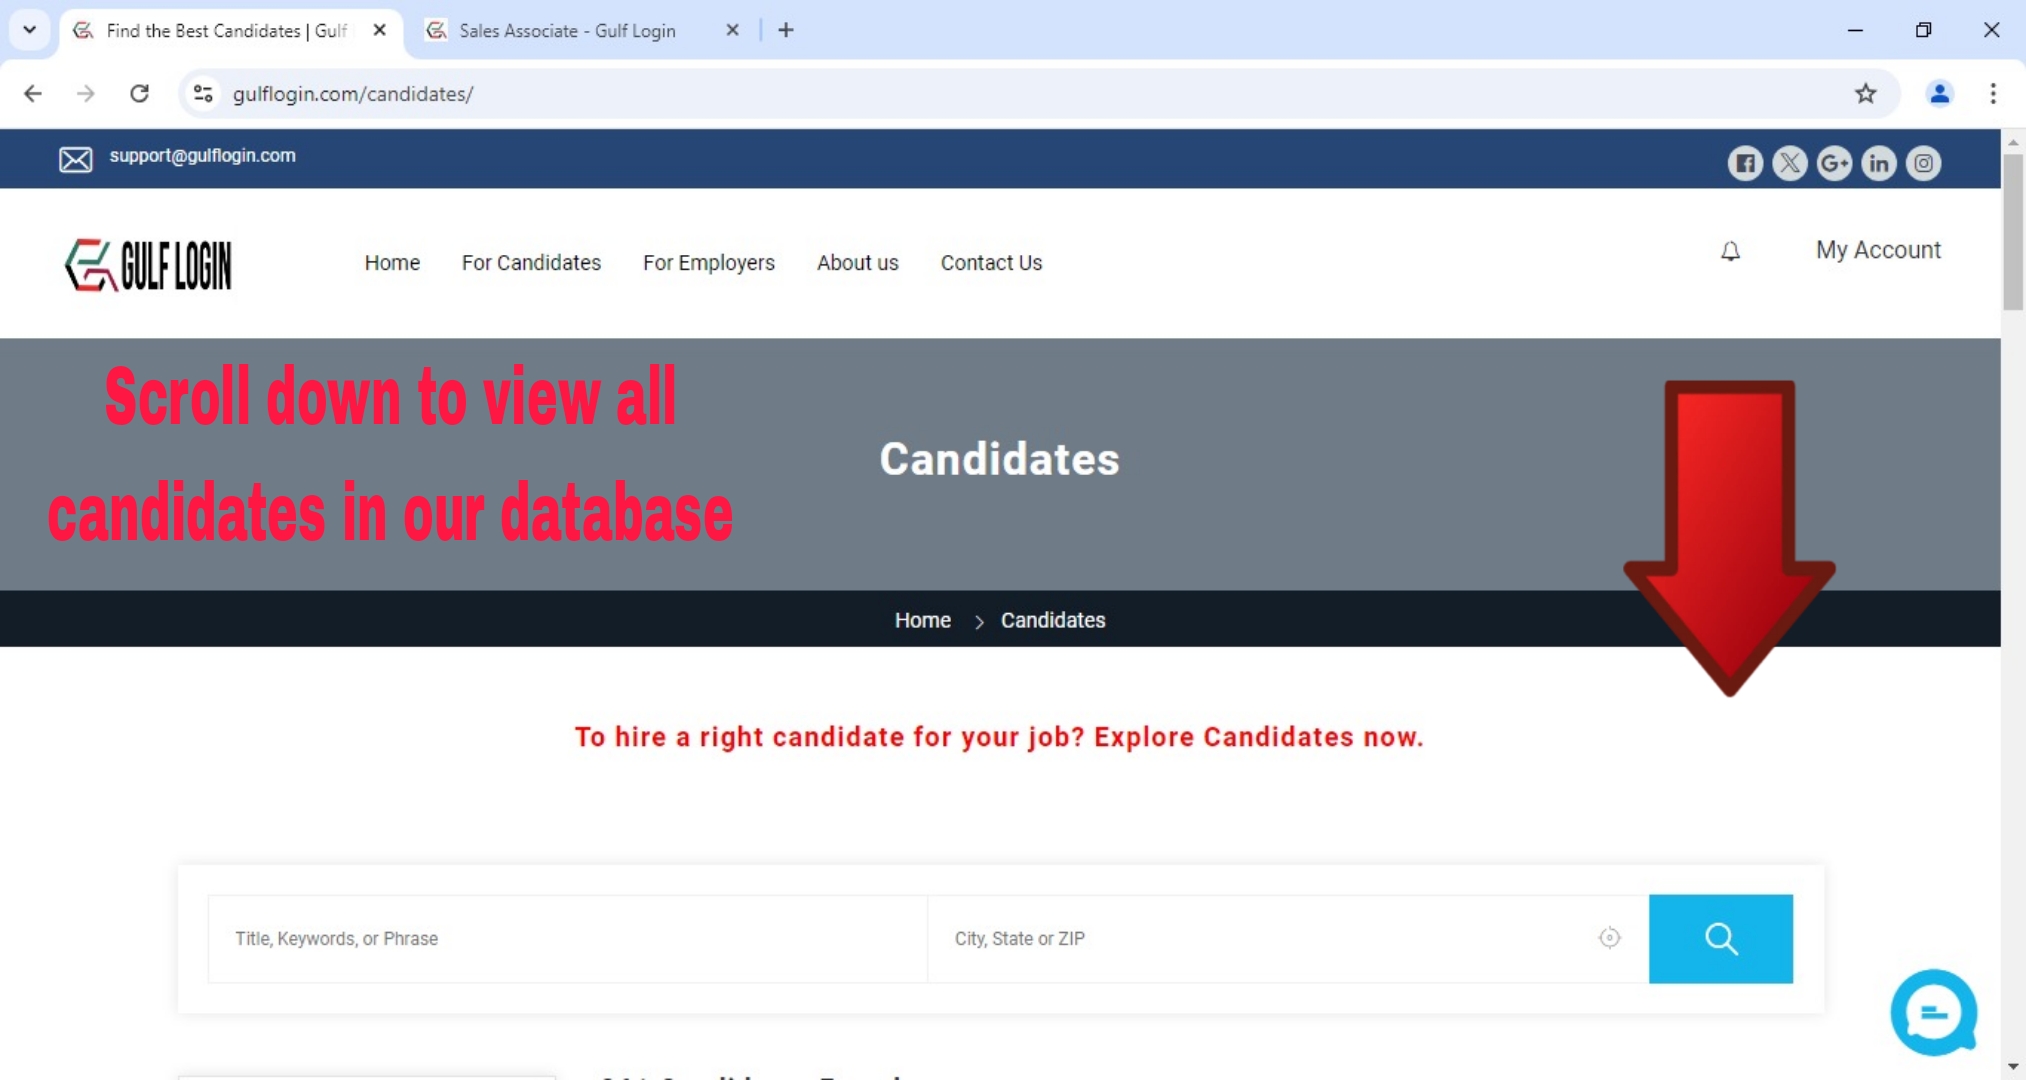
6. Browse Candidates From Our Database
You can browse candidates from our database for your company hiring.
Frequently Asked Questions (FAQs)
How to create an Employer account on Gulf Login?
You can refer the below step 1 to step 4.
How to complete your company profile on Gulf Login?
You can refer the below step 5 to step 7.
How to view our job posting and CV download packages on Gulf Login?
You can refer the below step 8.
How to post your job on Gulf Login?
You can refer the below step 9 to step 14.
How to view your posted job information on Gulf Login?
You can refer the below step 15.
How to check your posted job status whether it is approved or not on Gulf Login?
You can refer the below step 16.
How to view and download your job applicant's CV on Gulf Login?
You can refer the below step 17 to step 20.
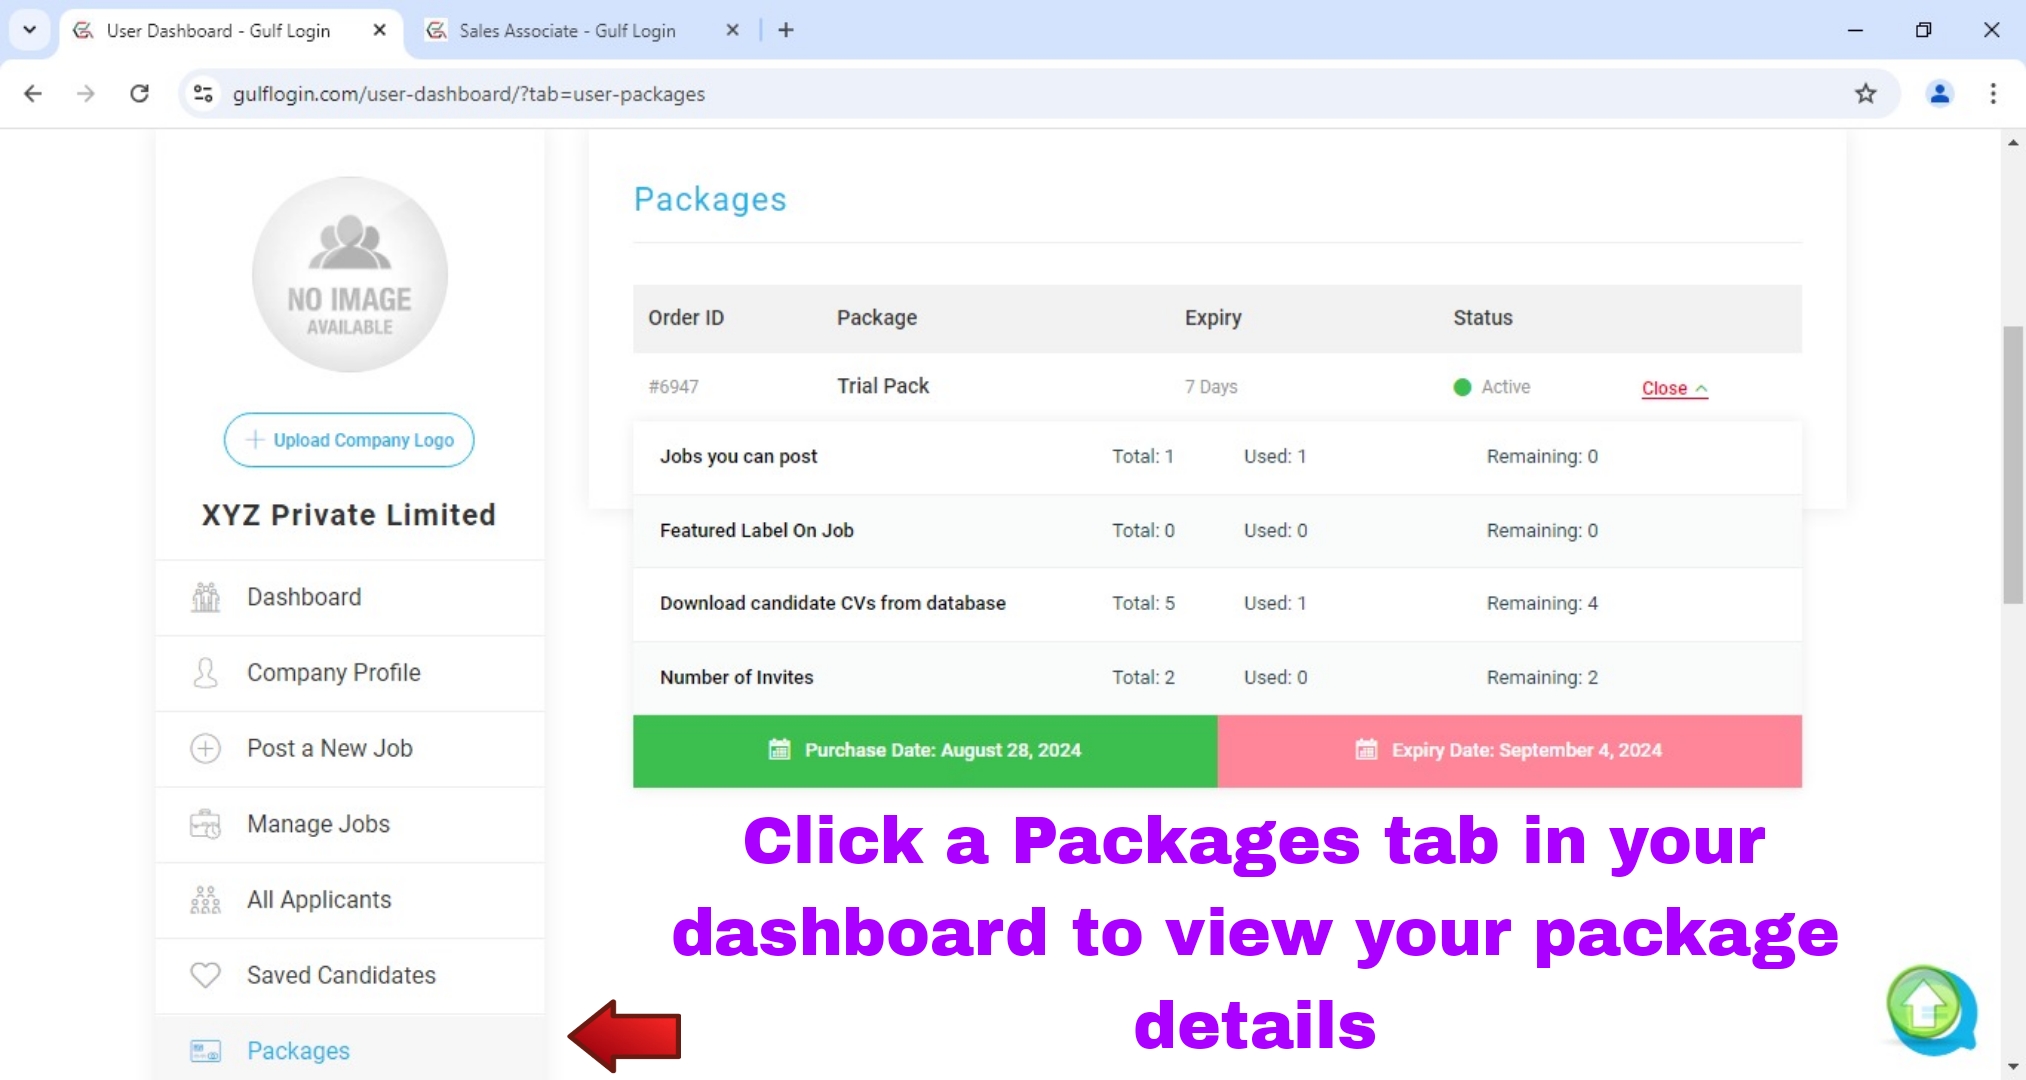
How to view your Package subscription details on Gulf Login?
You can refer the below step 21.
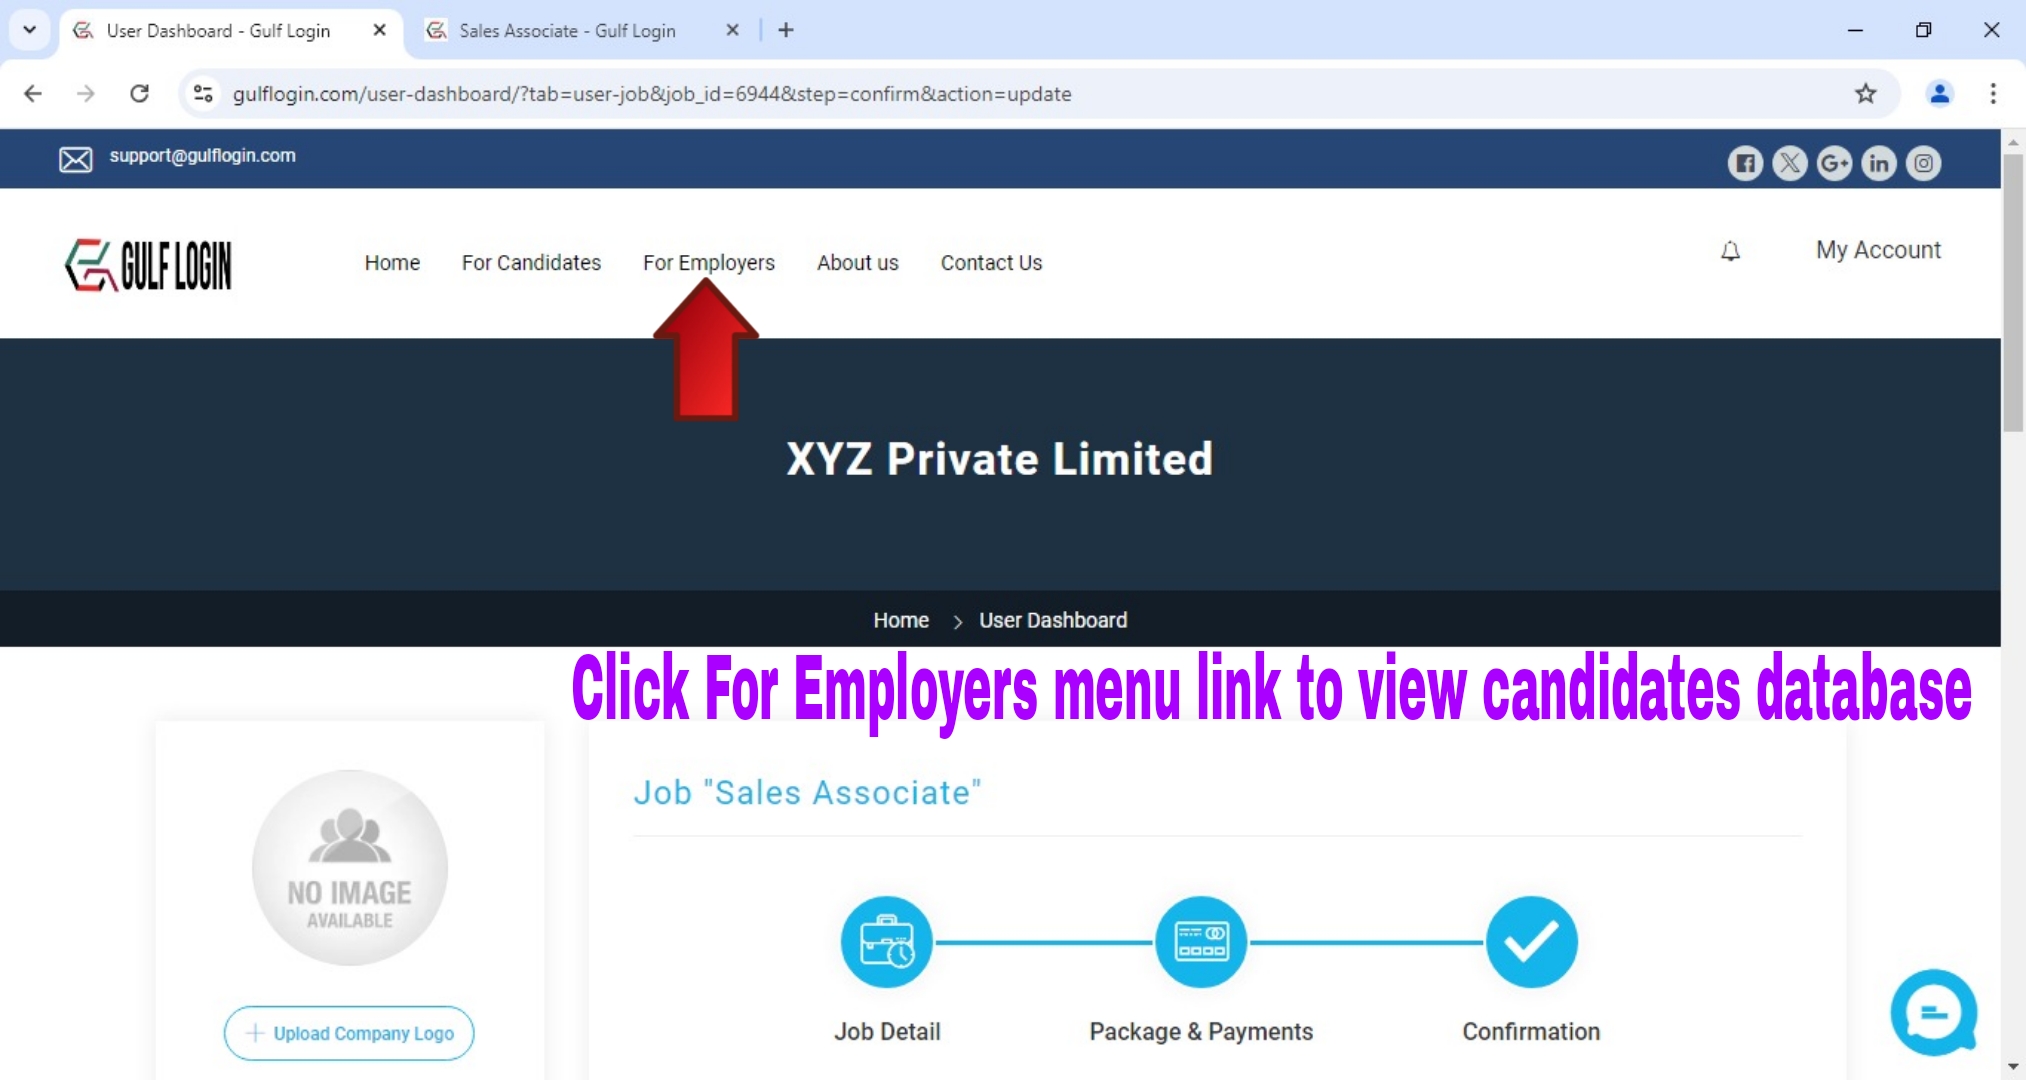
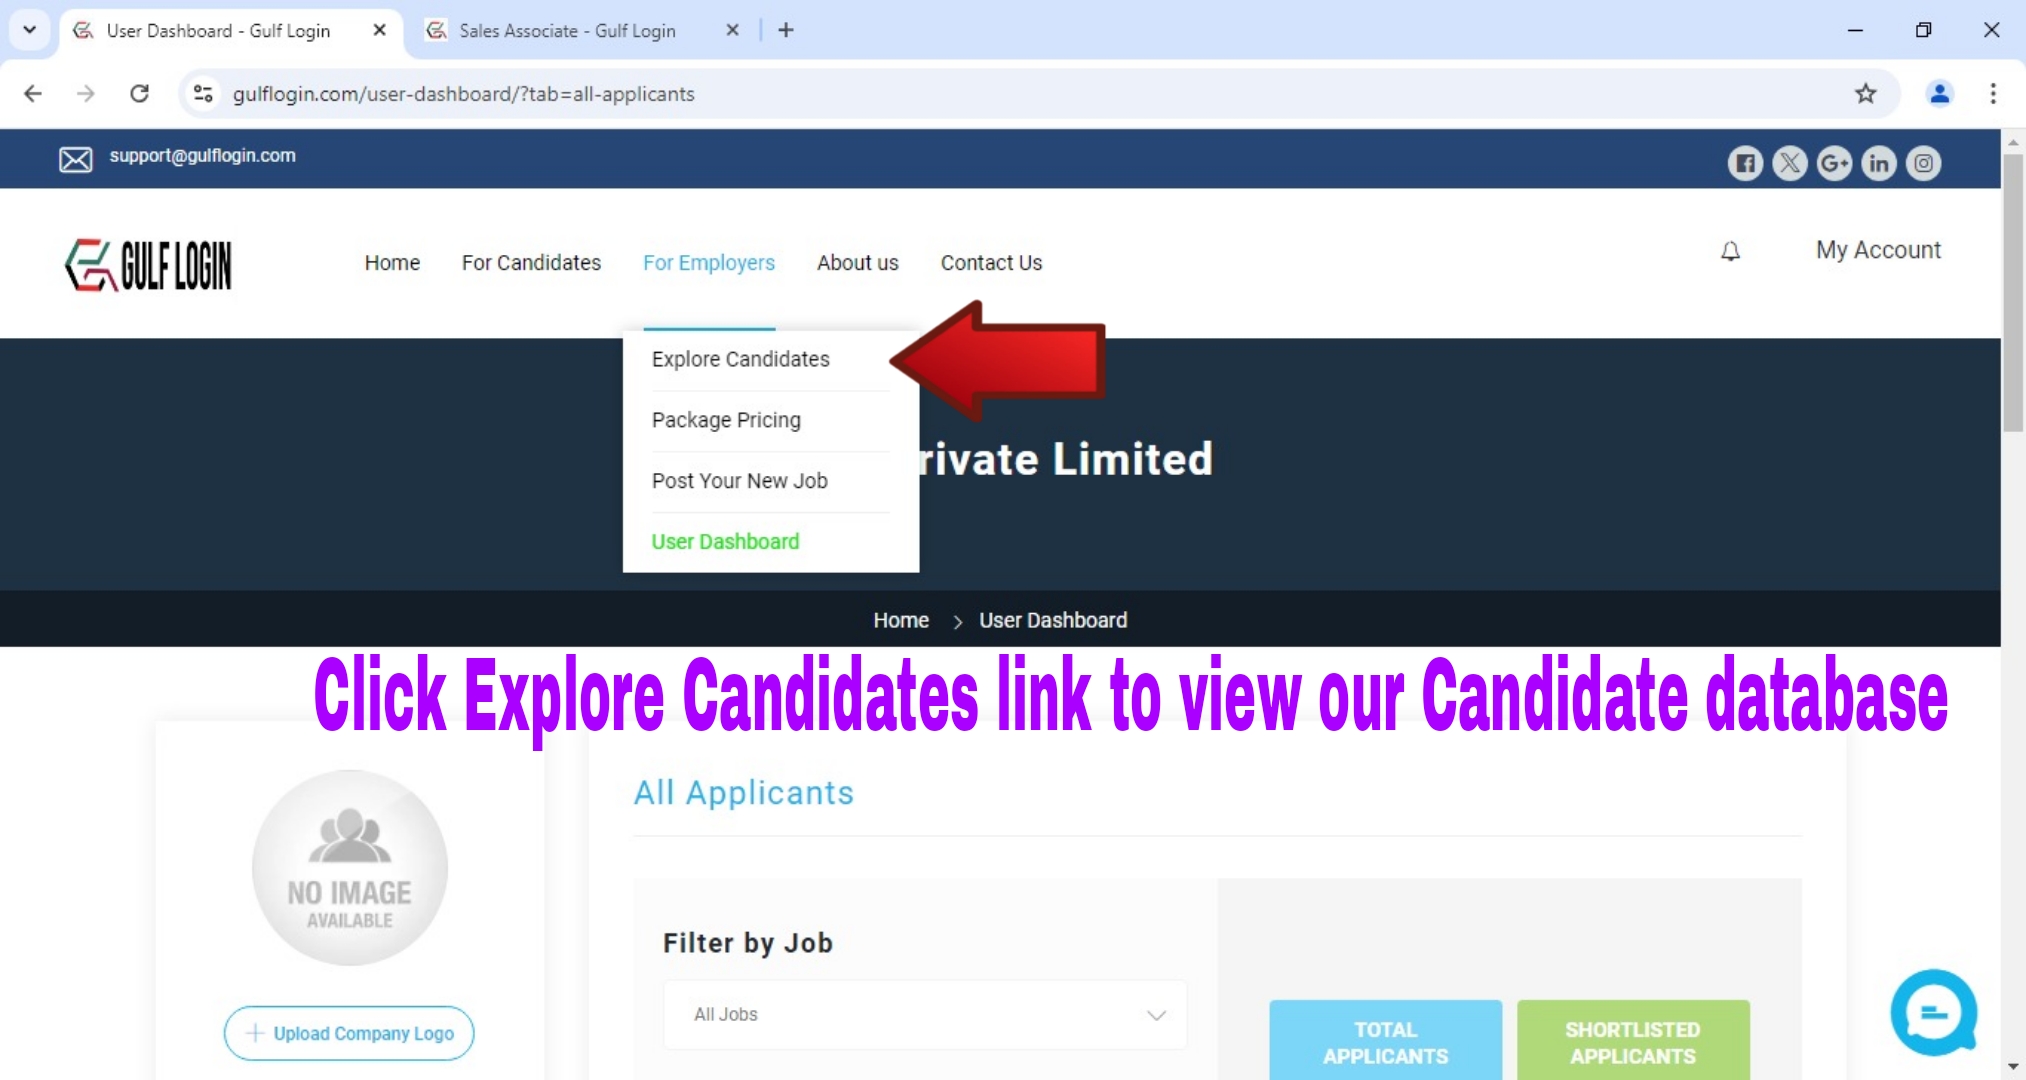
How to access our Gulf Login candidates database?
You can refer the below step 22 to step 25.
After expiry of your free package, How to buy our paid packages on Gulf Login?
You can refer the below step 26 to step 29.
Job Post Guide for Desktop Users
Follow the below steps that will help you how to post jobs in Gulf Login easily for Desktop users.
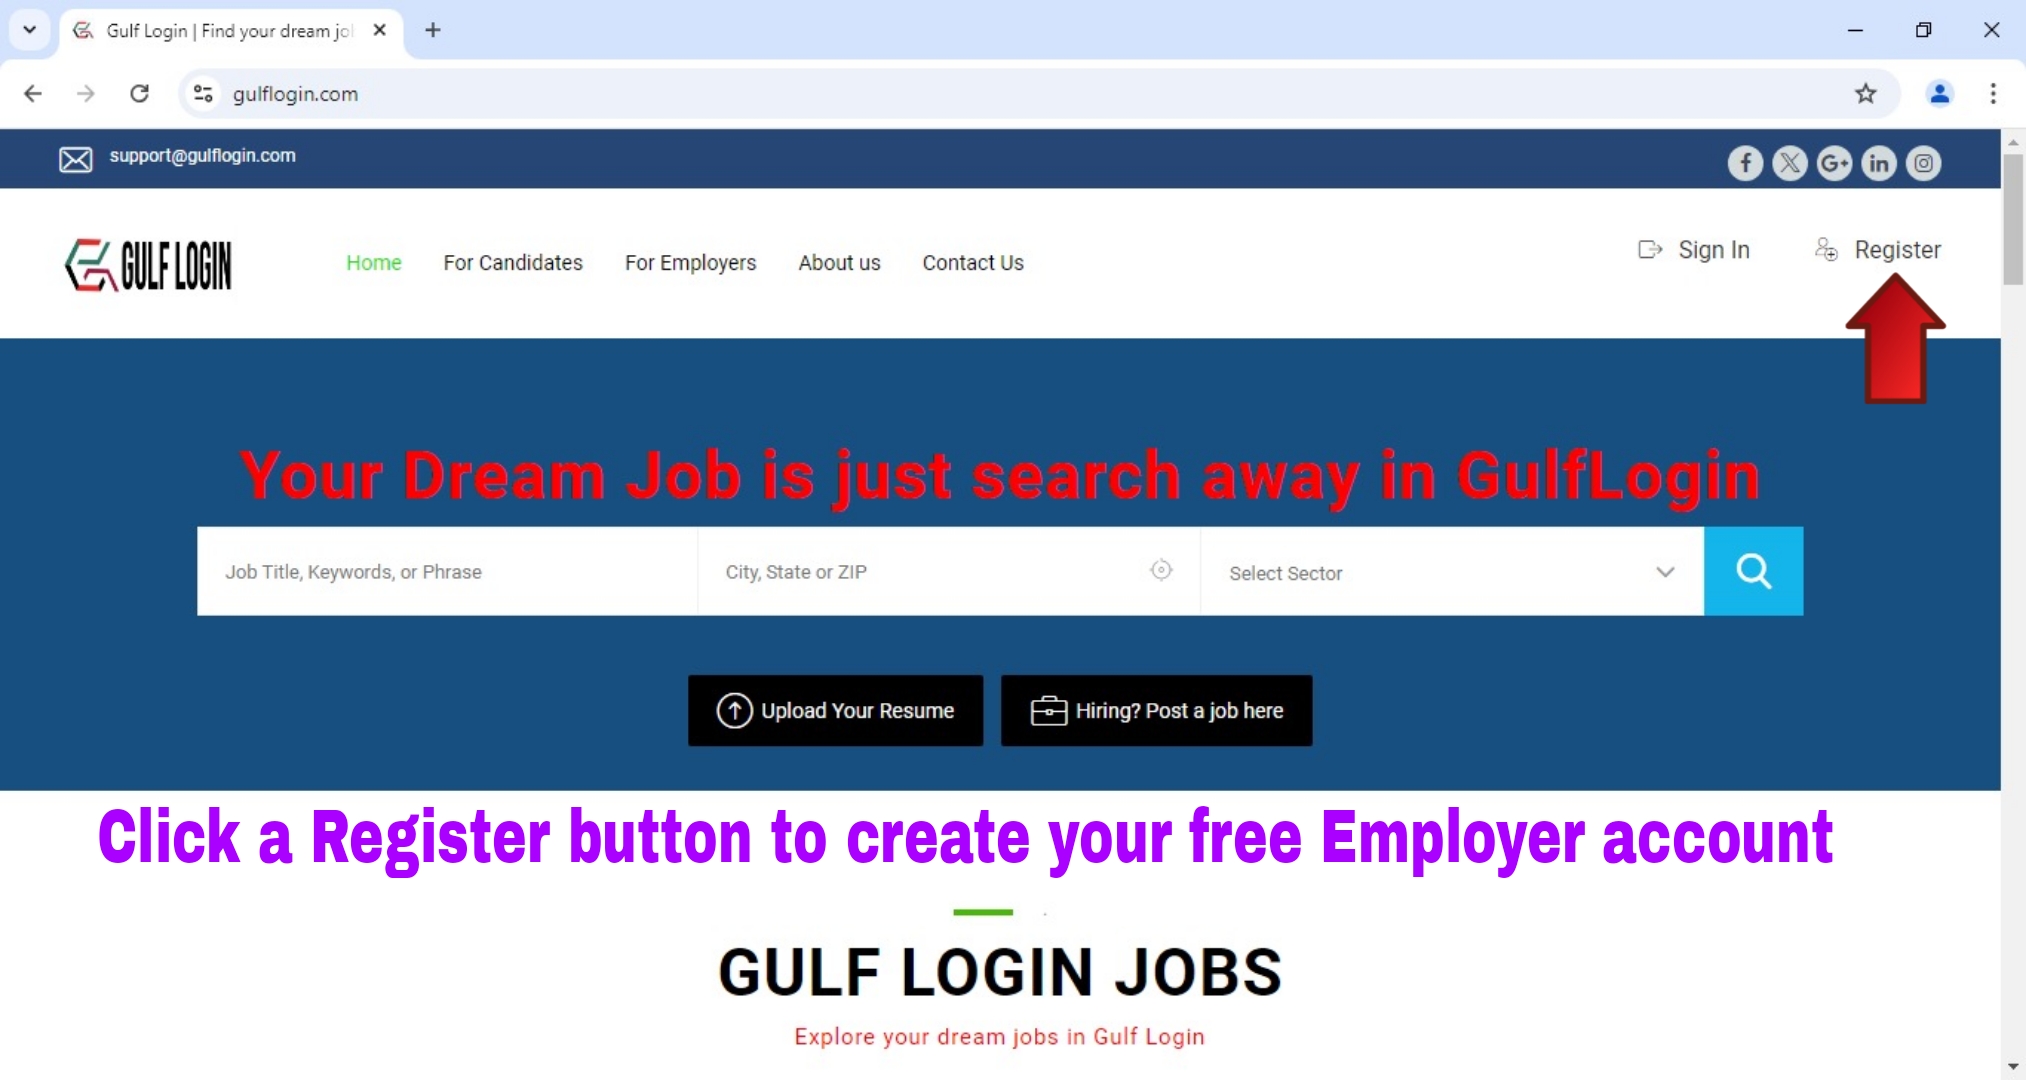
Step 1 : Click a Register button to create your free Employer Account in our Gulf Login home page.
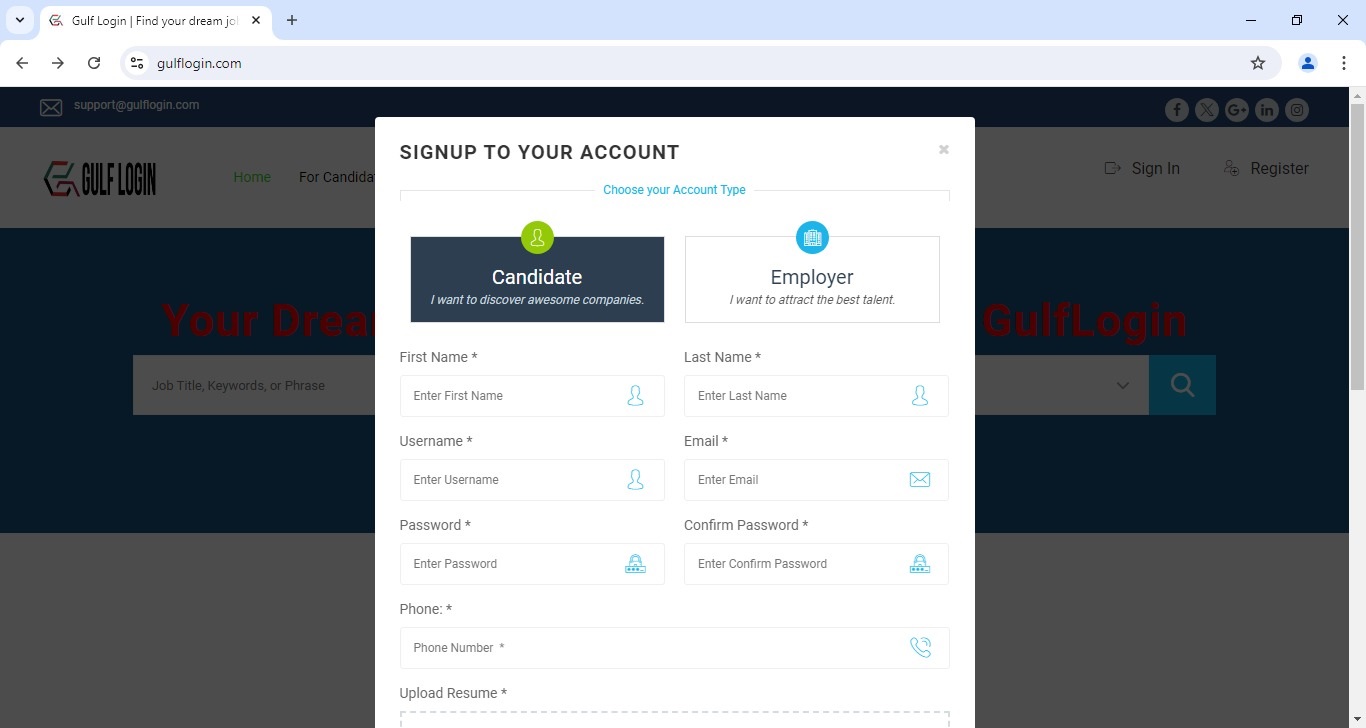
After you click a Register button, A registration form for Candidate / Employer will pop up on your screen.
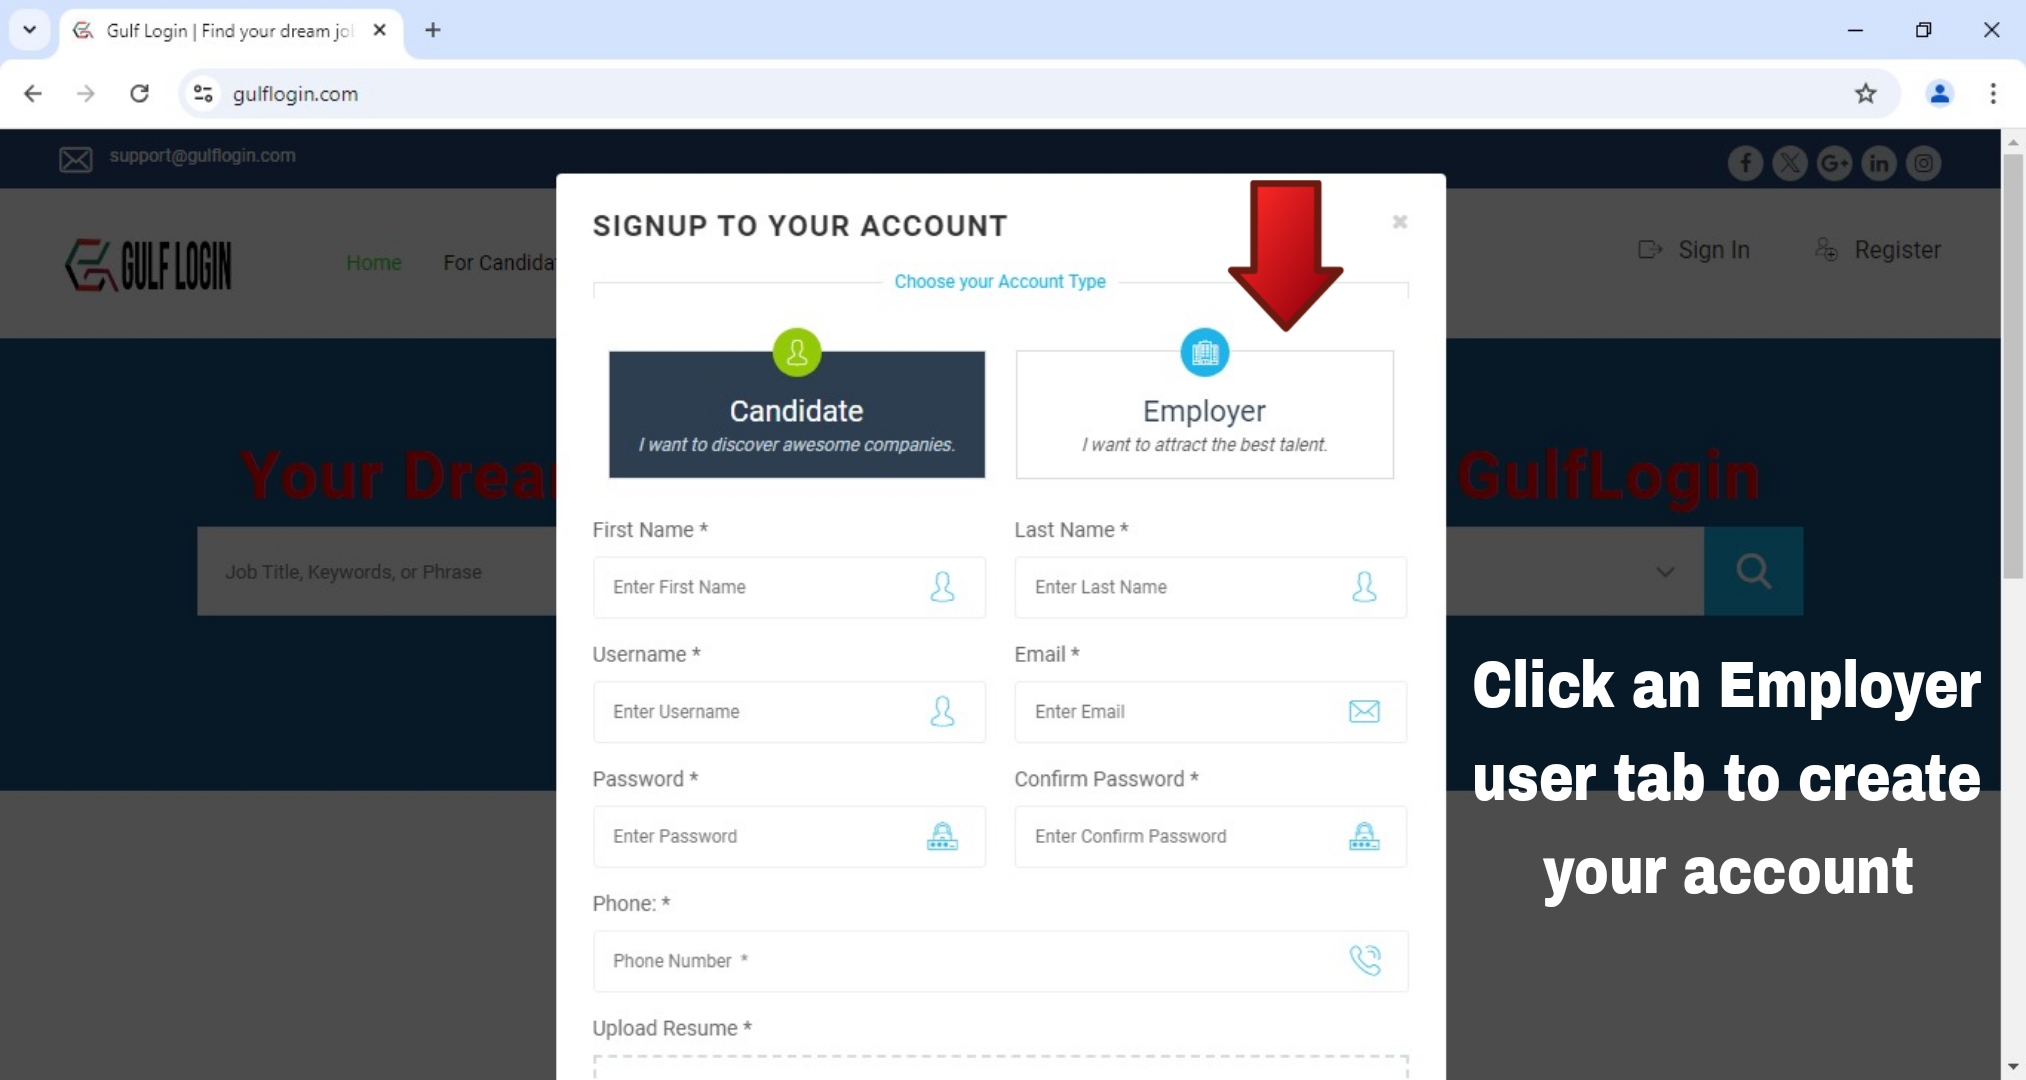
After, To click an Employer user tab in a Registration form for create your Employer account.
Note : By default, An user role tab is set to Candidate in a registration form, So, kindly switch an user role tab to Employer.
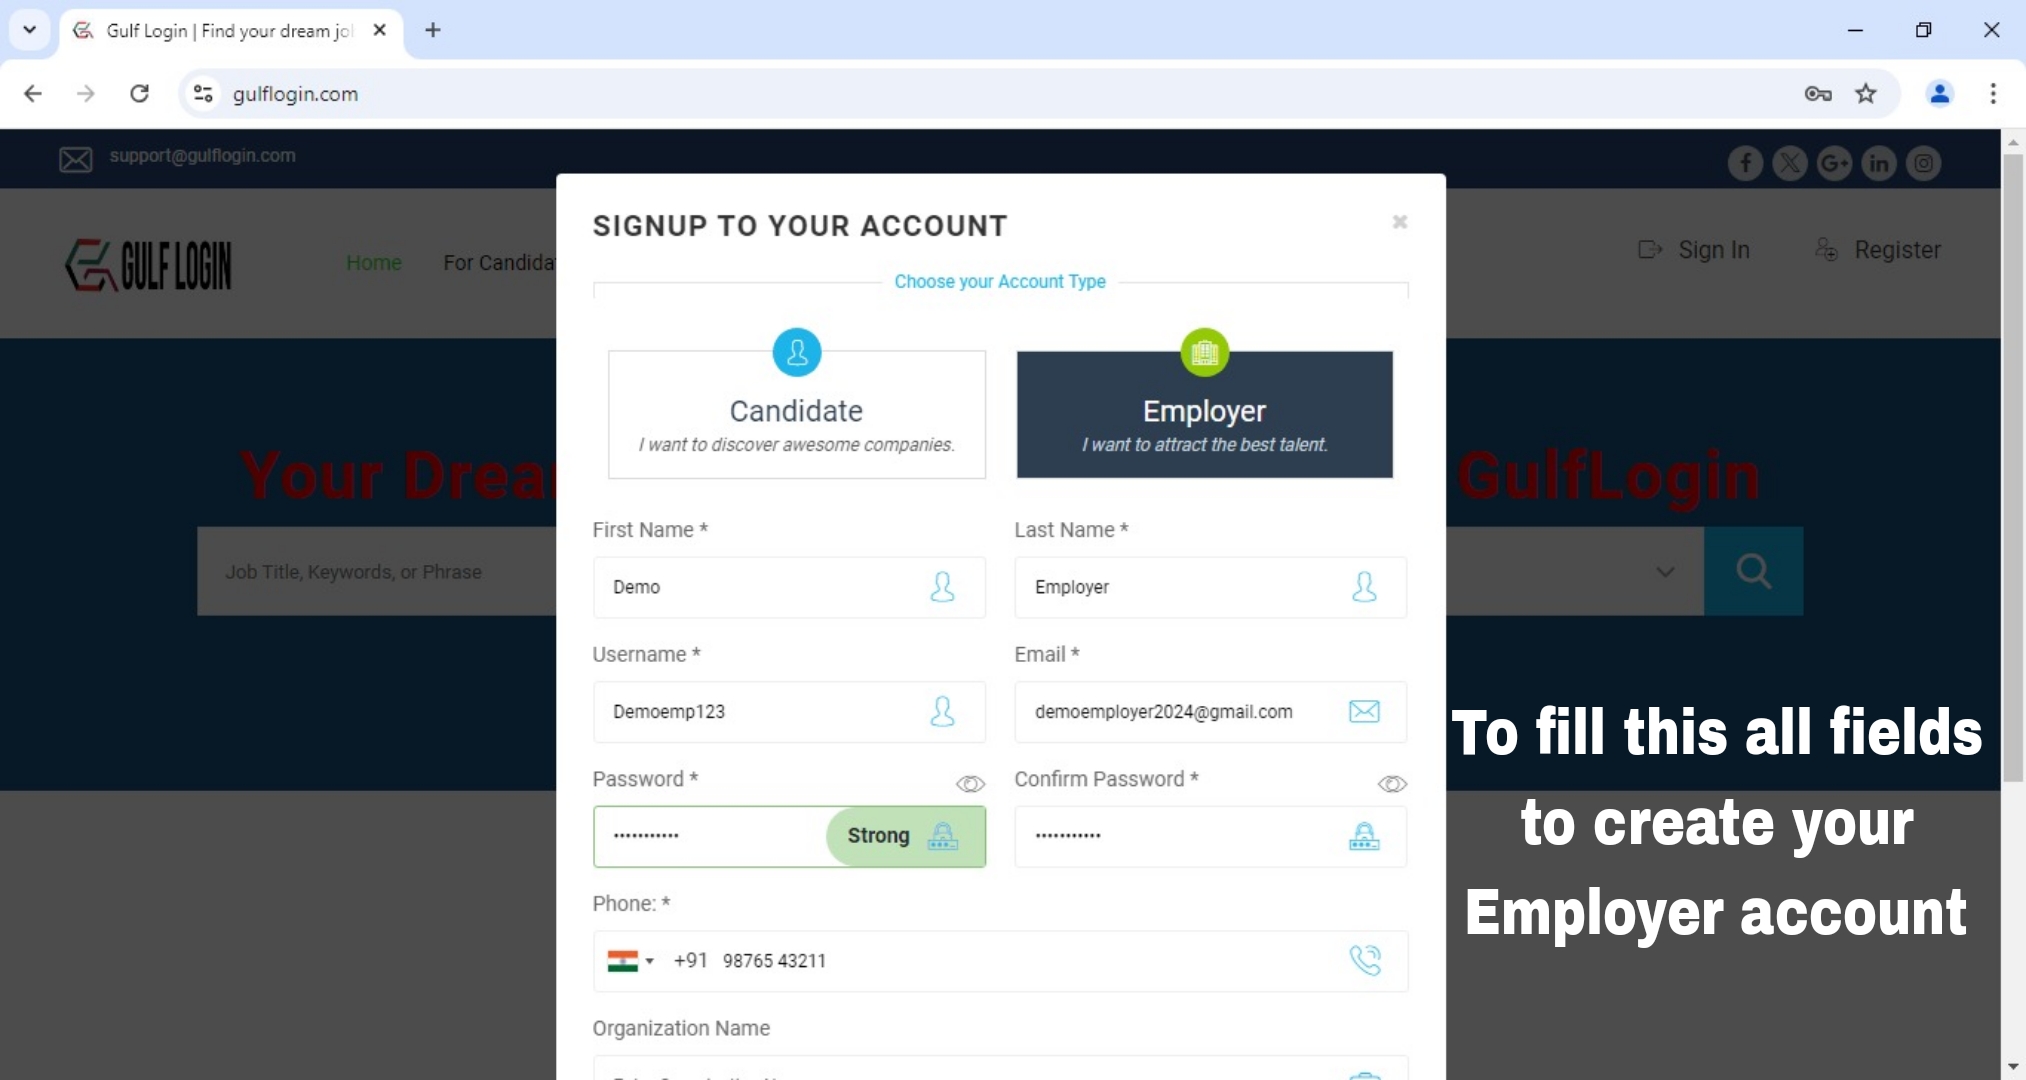
Step 3 : To fill this all required fields in Employer Sign Up form.
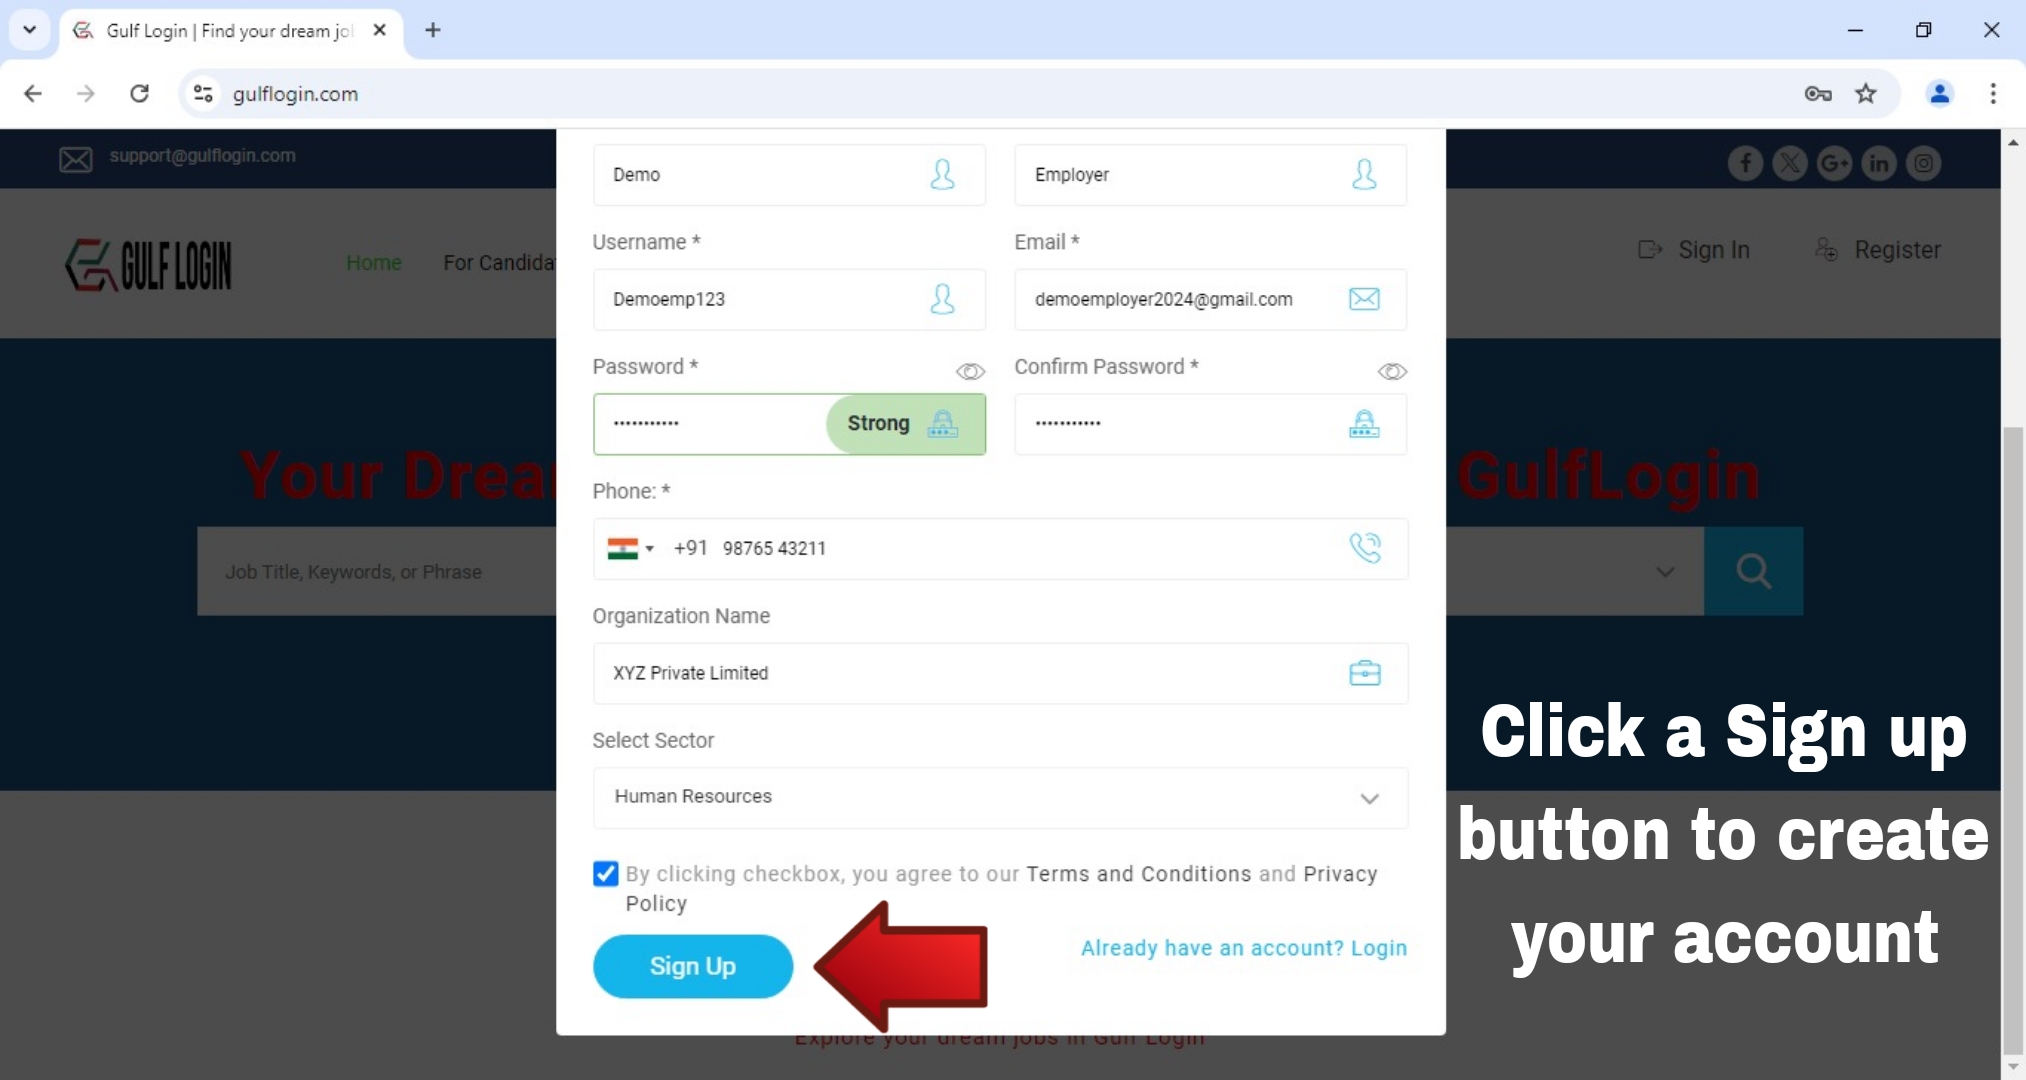
After you fill the fields such as First name, Last Name, Username, Email, Password, Phone Number, Organization Name, Sector and by accept the Terms and Privacy Policy. Then, you click a Sign up button to create your free Employer account.
Step 4 : Click a Sign up button to create your account.
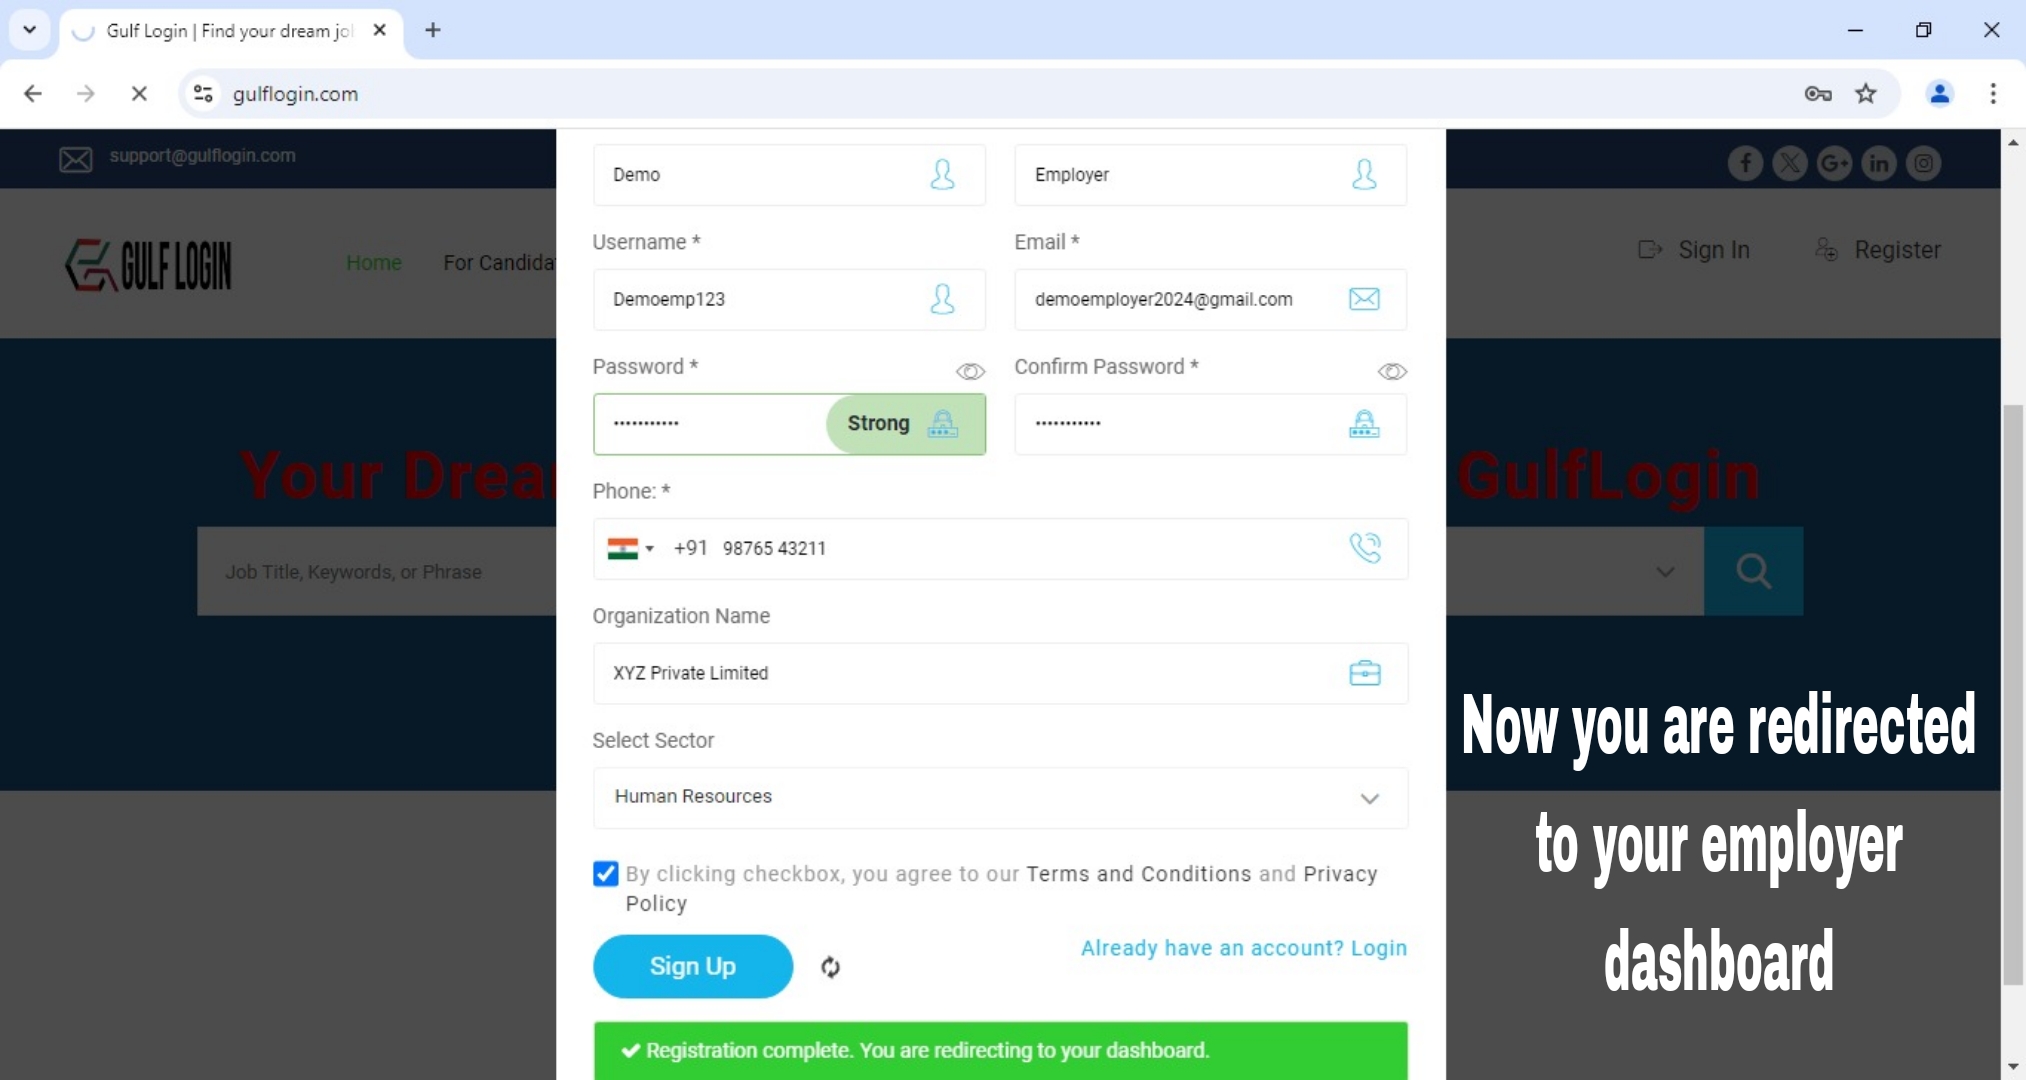
After you click a Sign Up button, Then you are redirecting to your Employer dashboard.
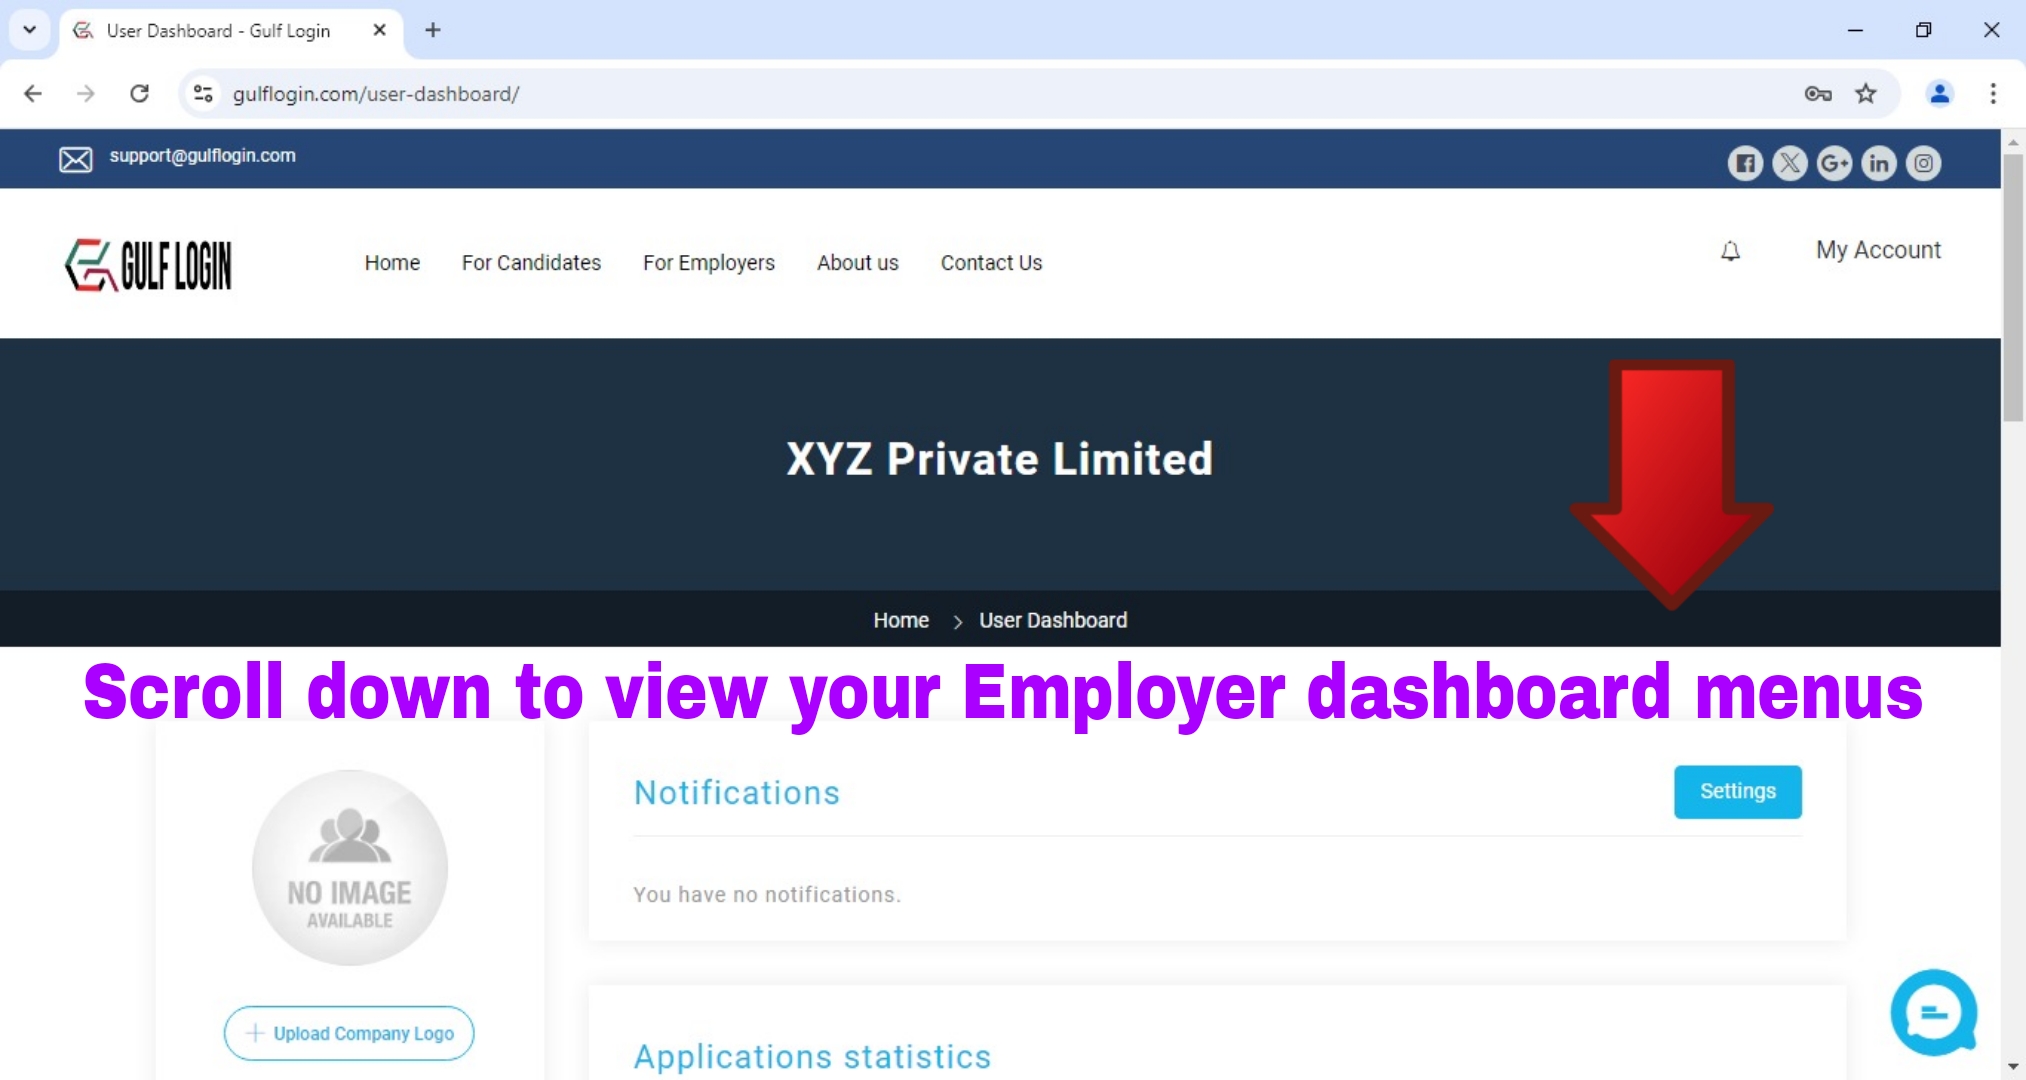
After you are redirected to your Employer dashboard, Then scroll down to view your Employer dashboard menus.
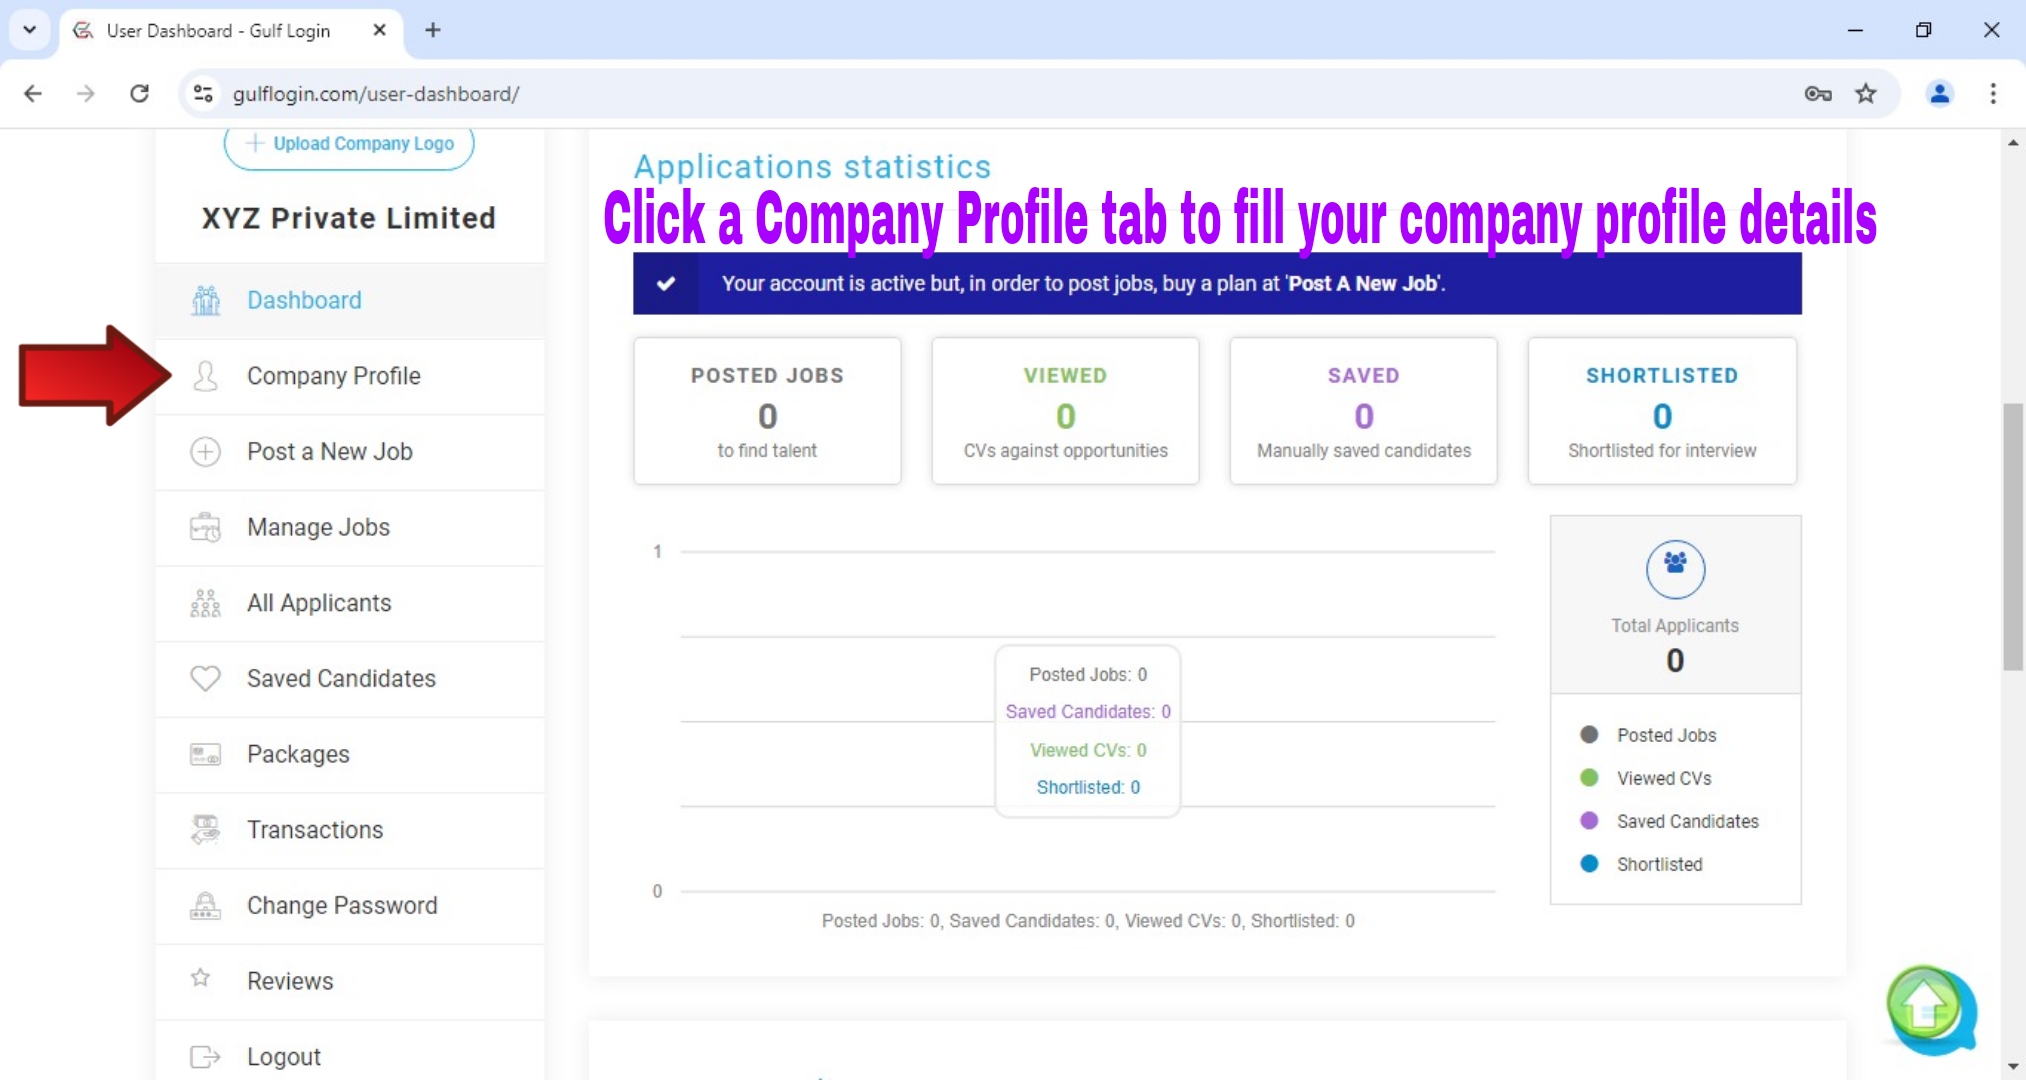
After scroll down to viewed your Employer dashboard menus, then click a Company Profile tab link in your Employer dashboard.
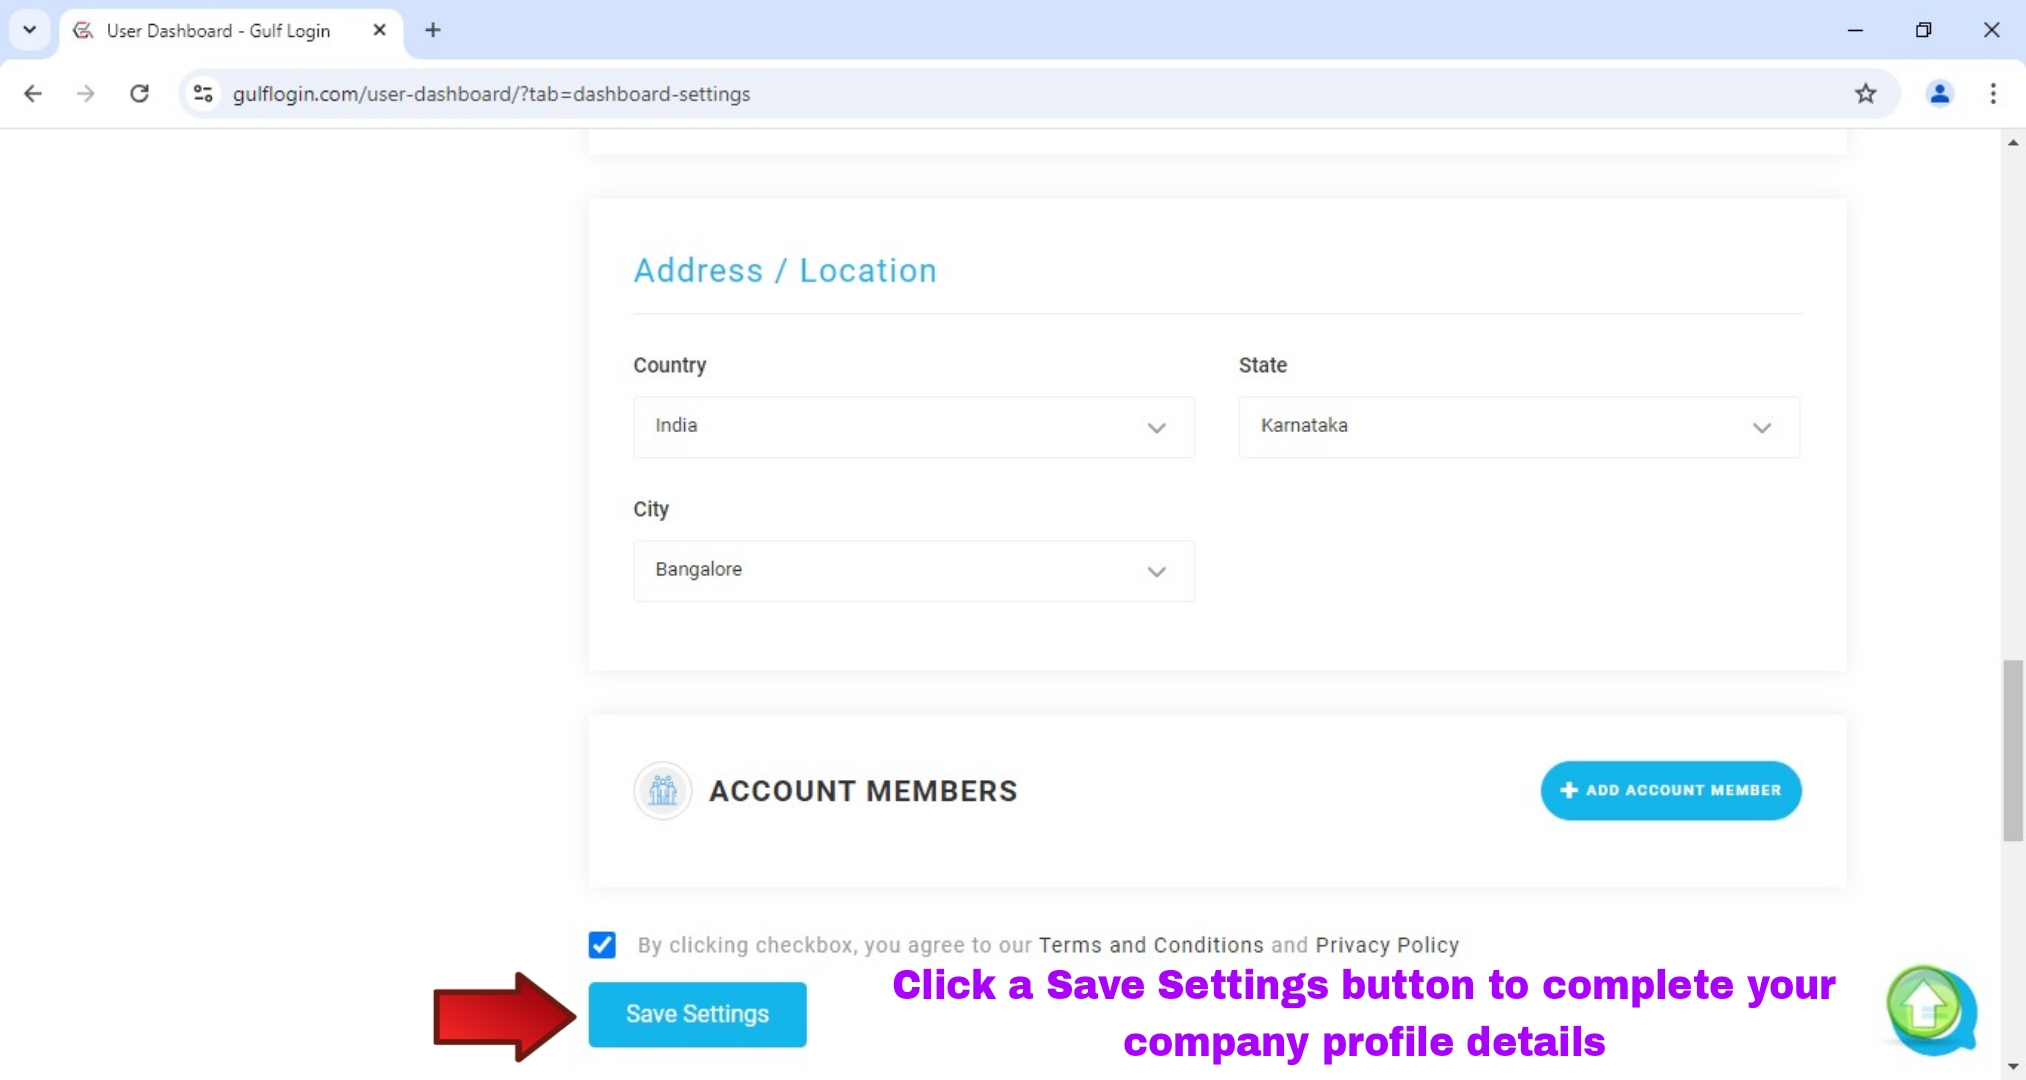
Step 7 : Click the Save Settings button to complete your company profile.
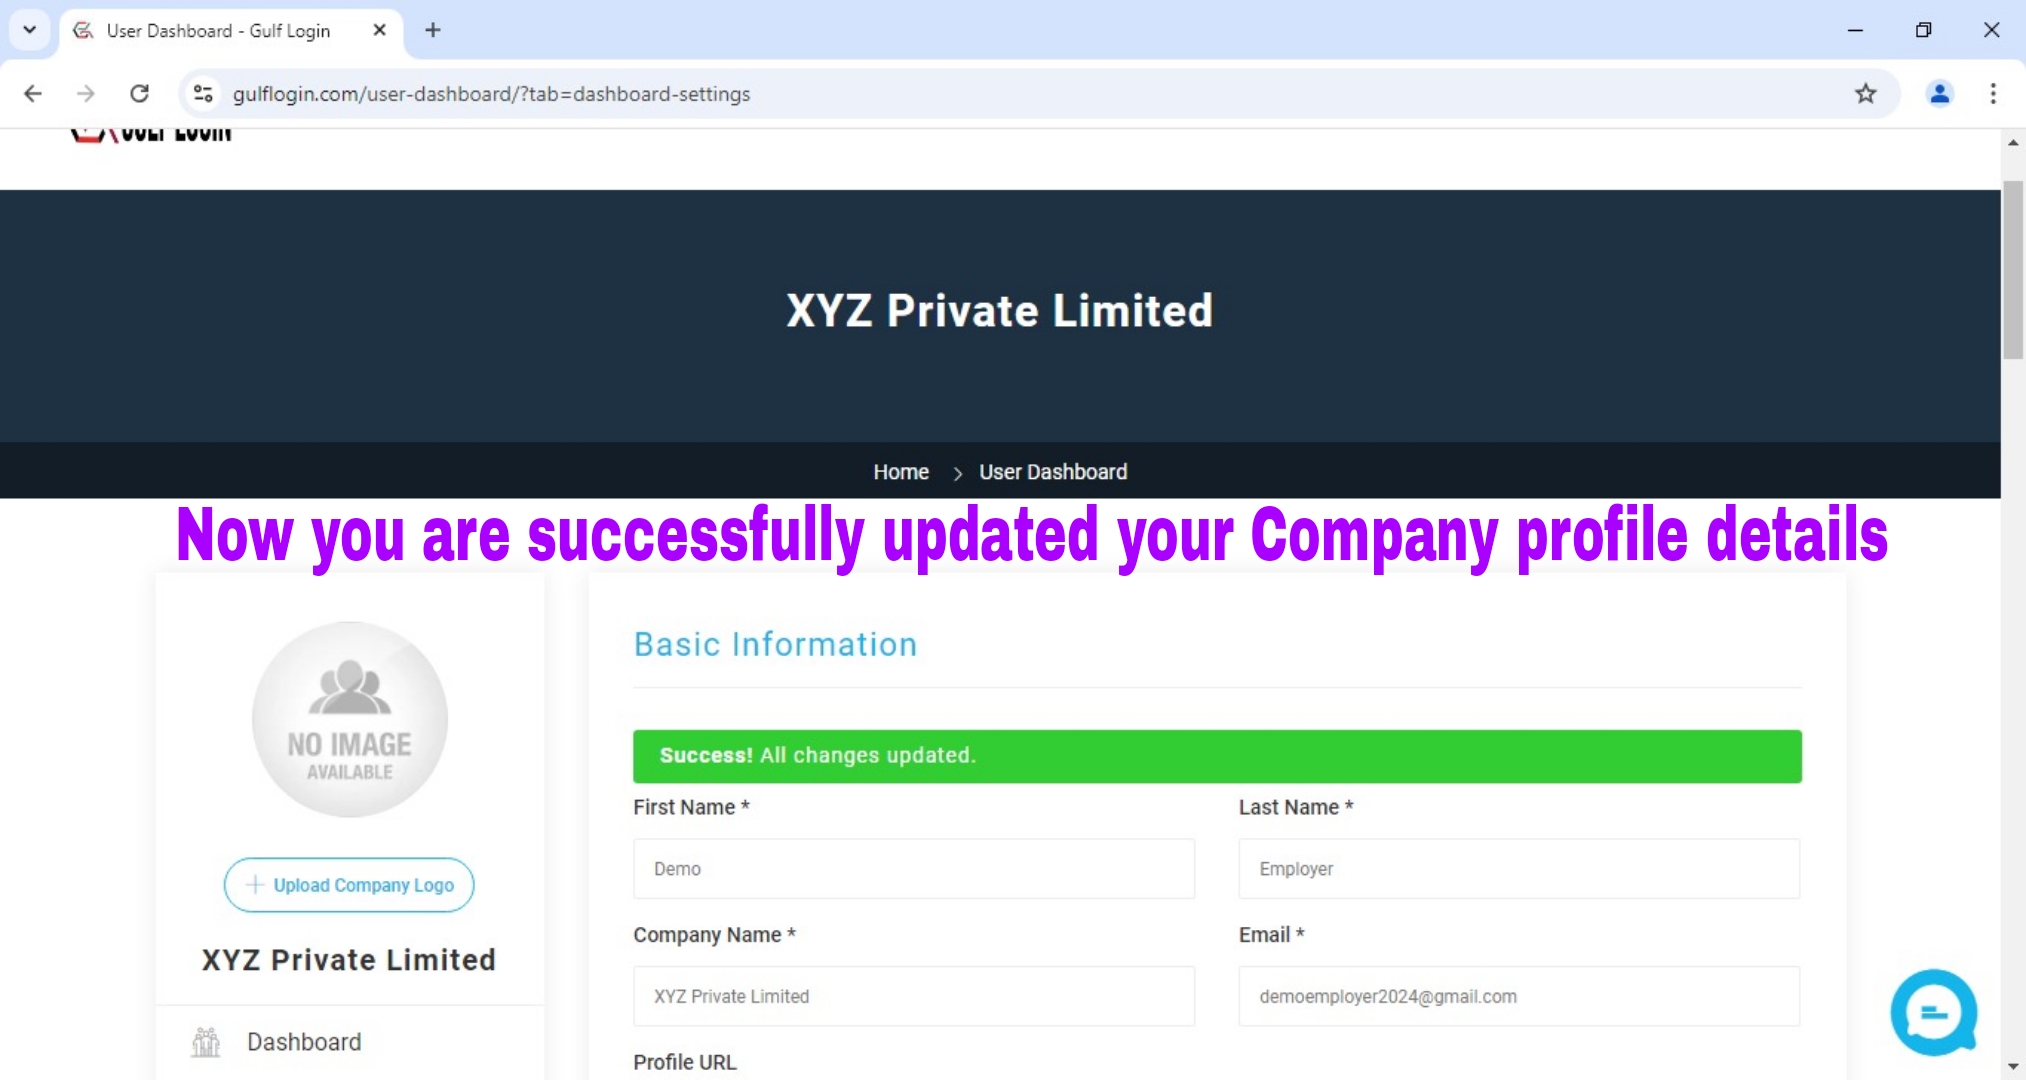
After clicking the Save Settings button, now your company profile details have been successfully updated.
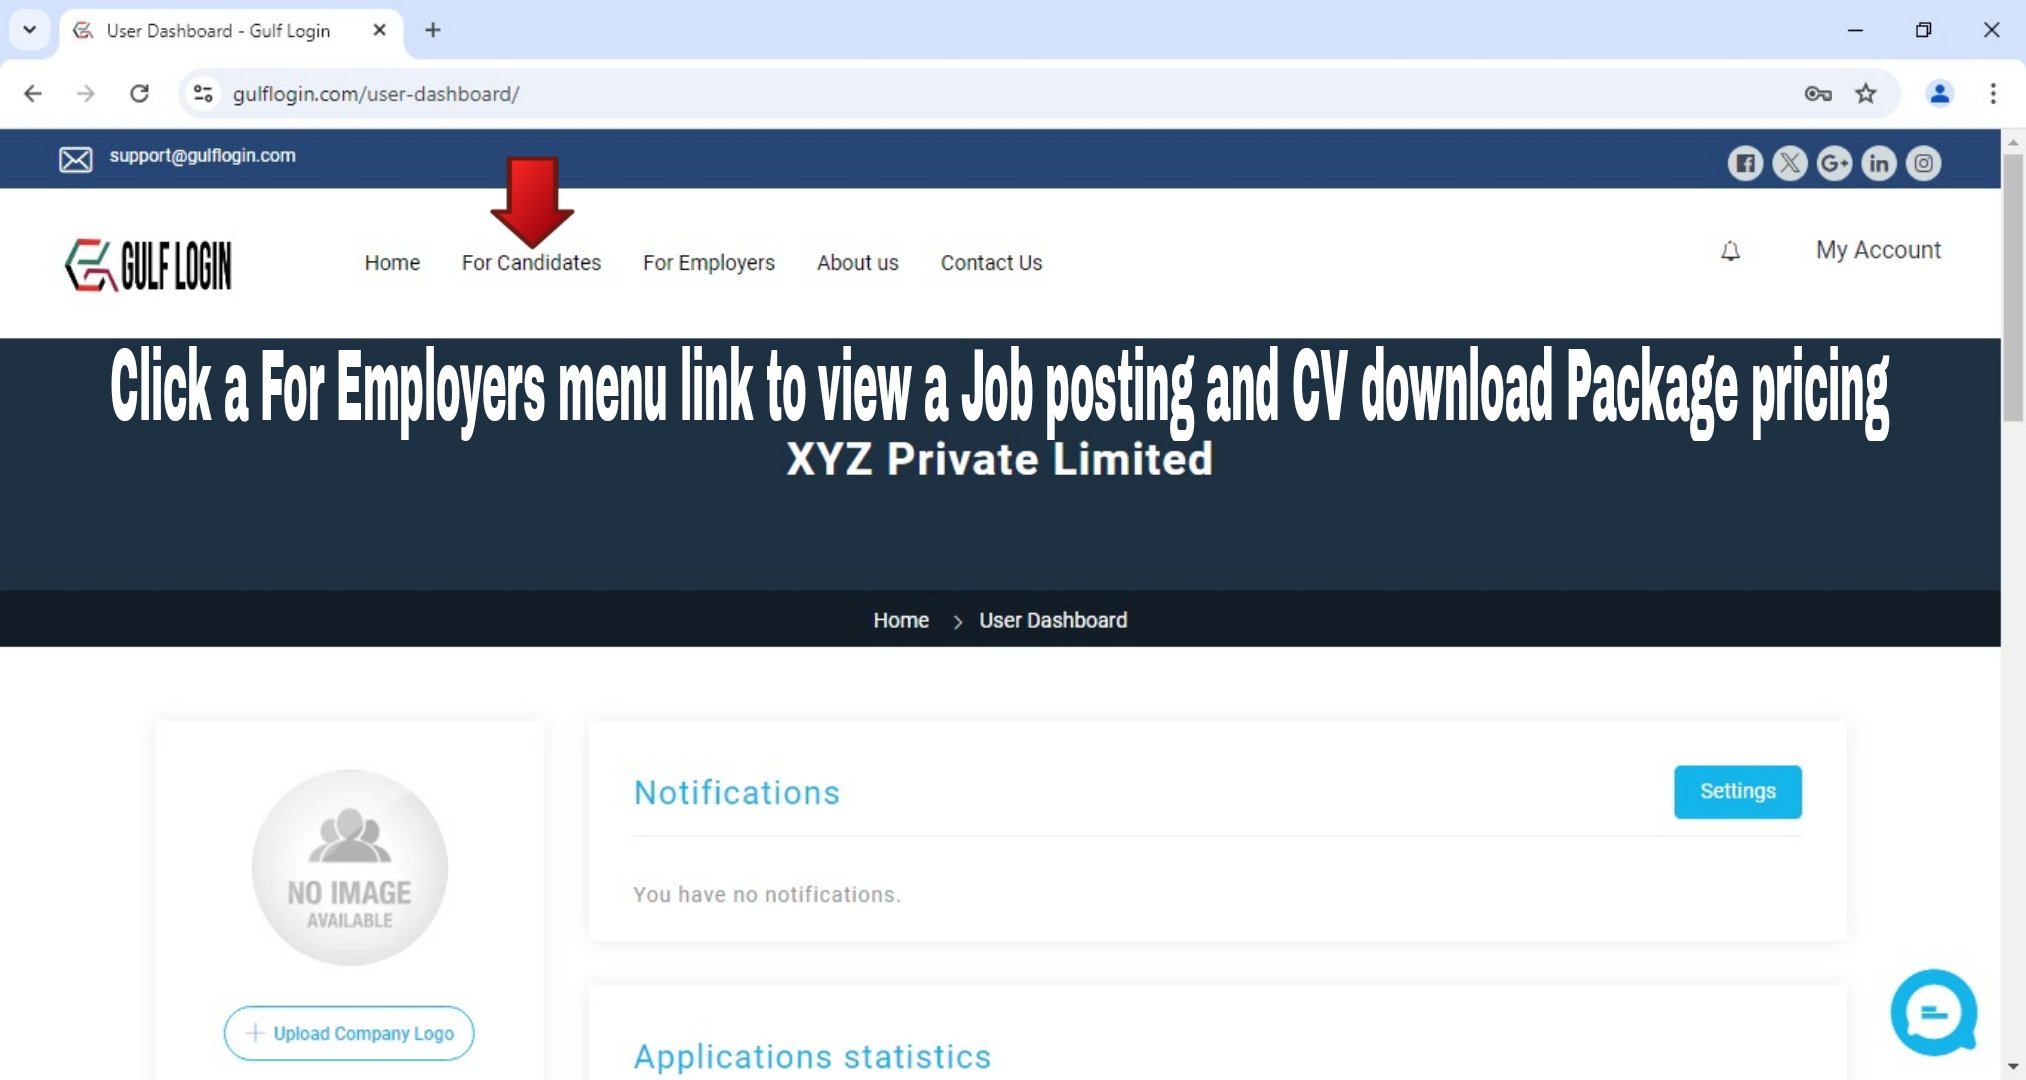
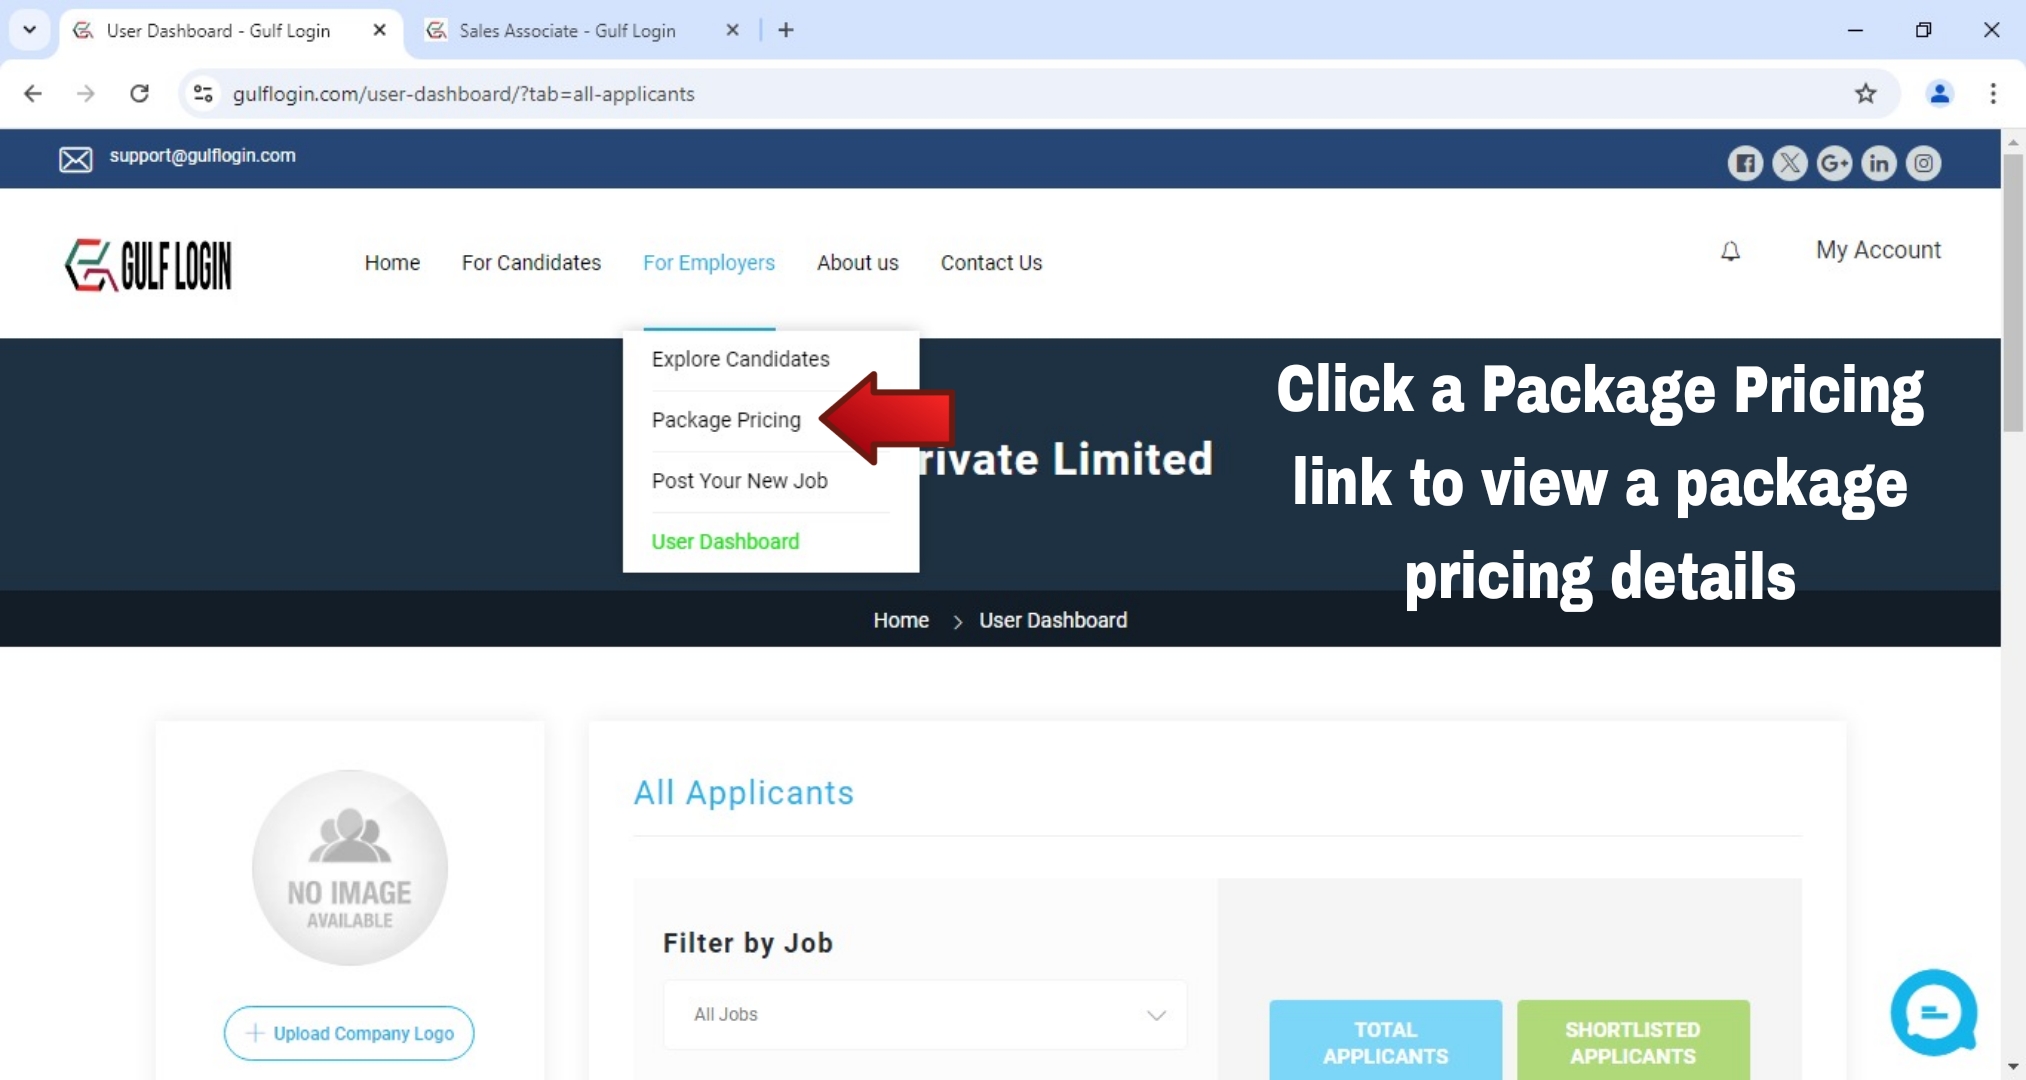
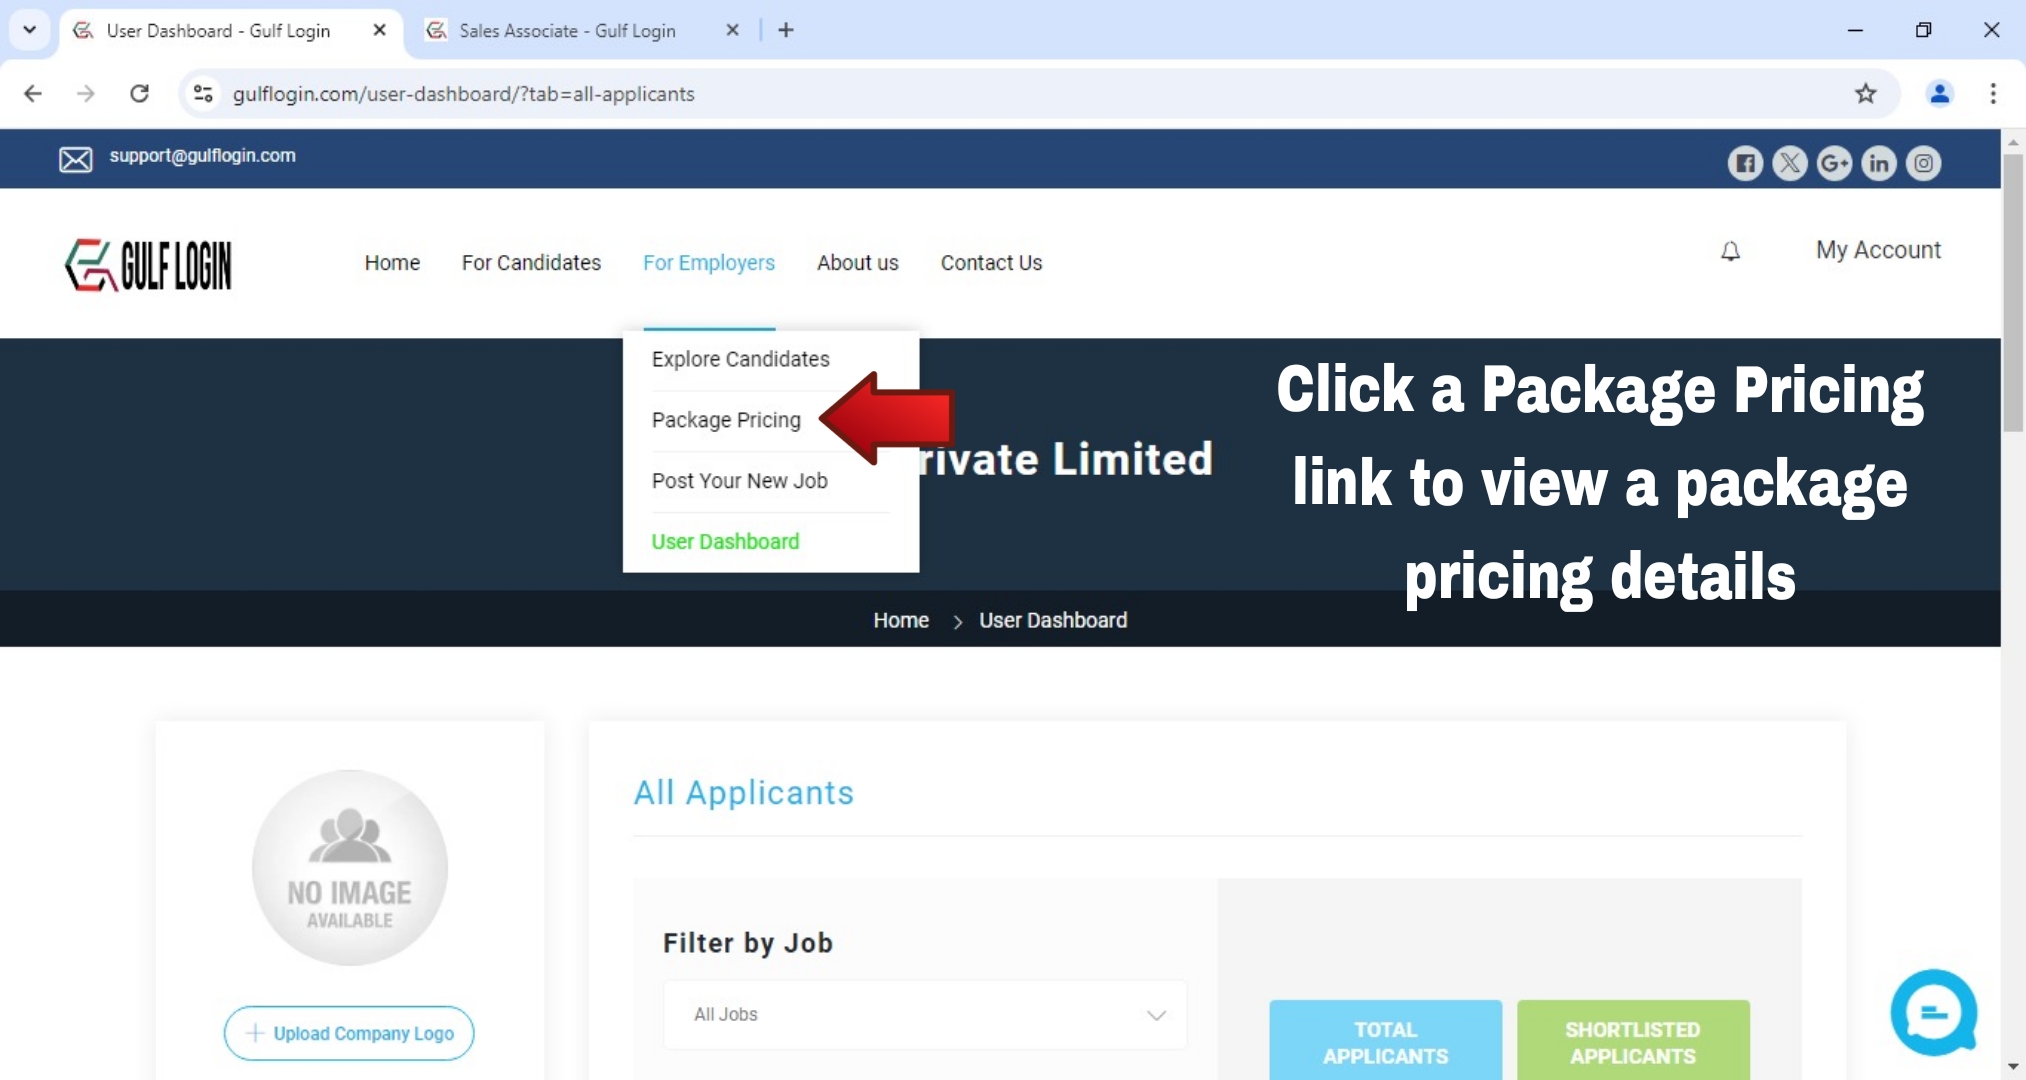
After successfully updating your company profile, then click the For Employers menu link to view the package pricing details.
Step 8 : Click the For Employers menu link to view the package pricing details.
After clicking the For Employers menu link, it will show a sub menu links. Then you click the Package Pricing link to view the package pricing details.
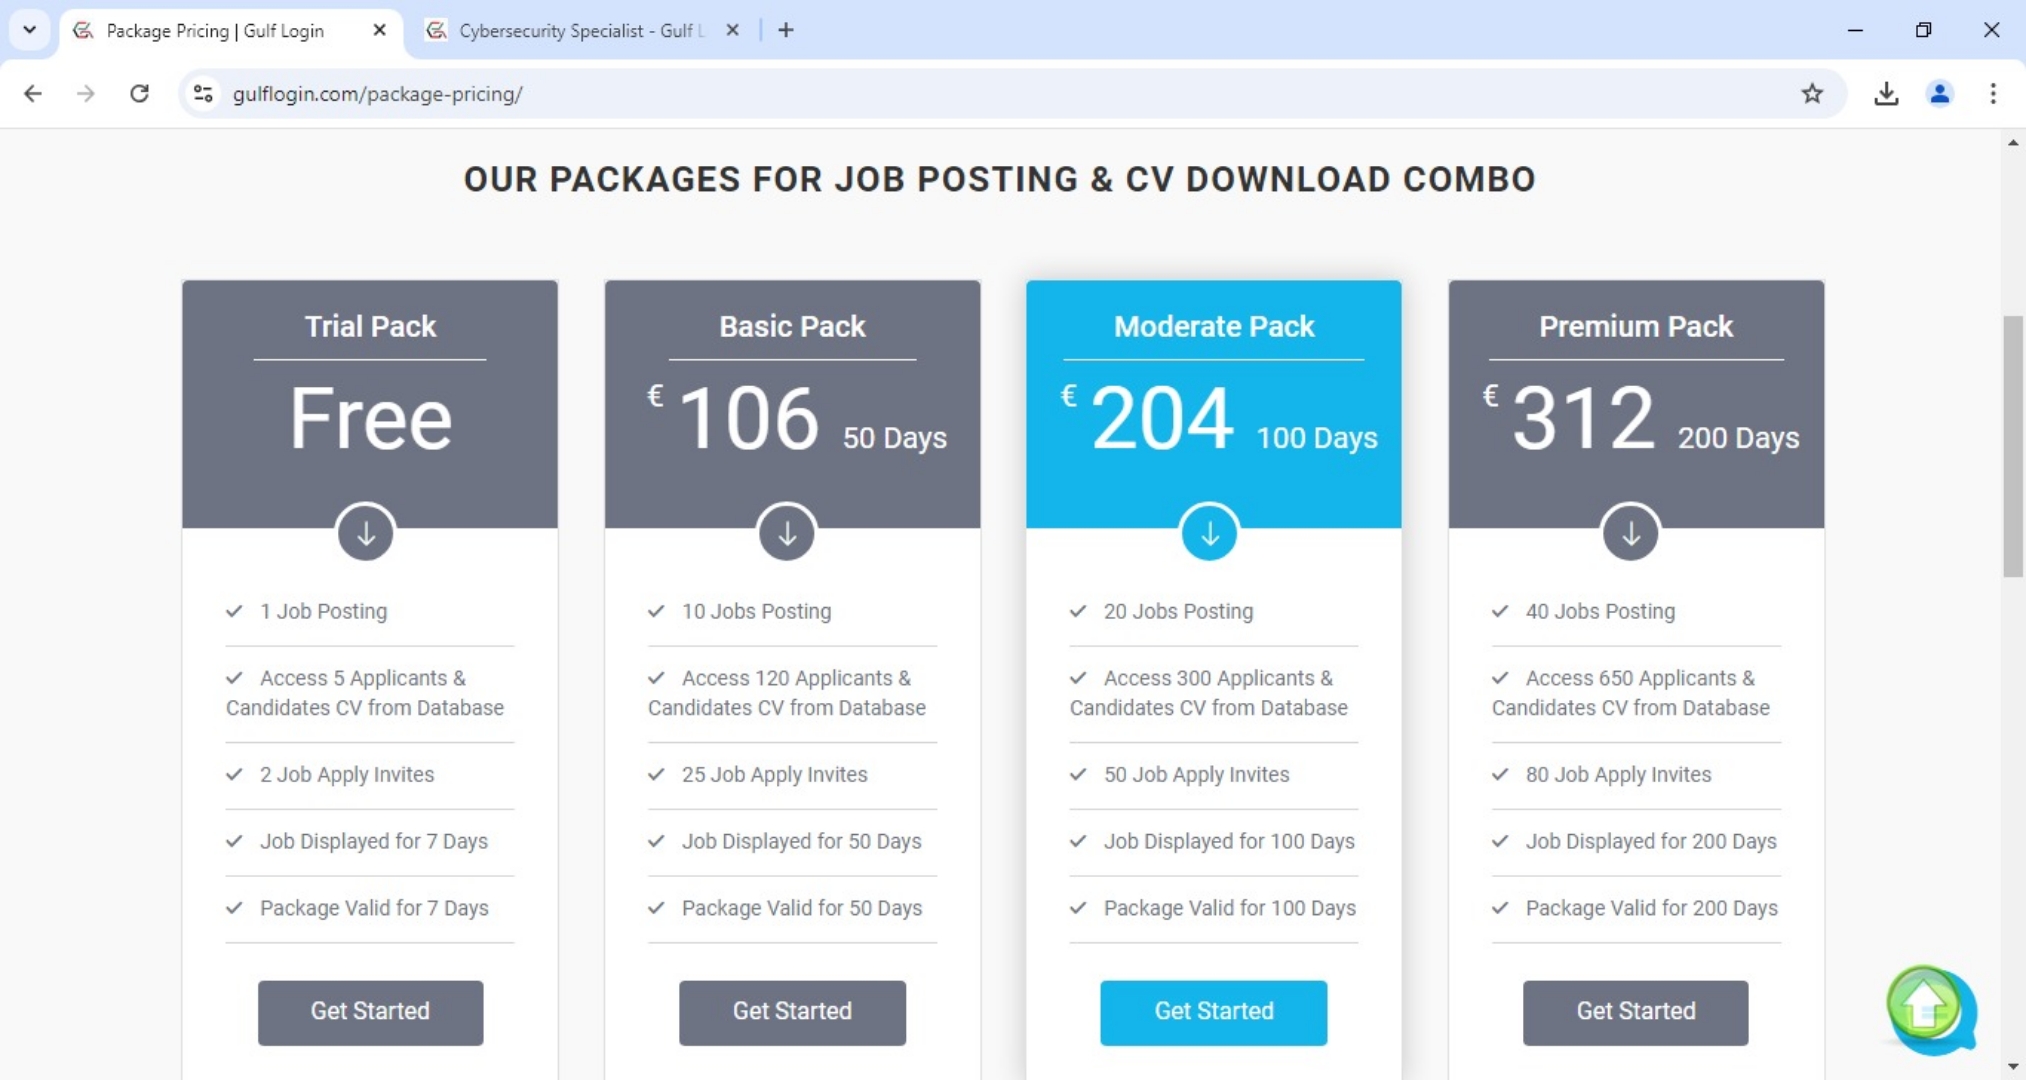
After you click on the package price link, it shows package price details for job posting and CV download.
Important Note : Before posting your job, you should check our package pricing details.
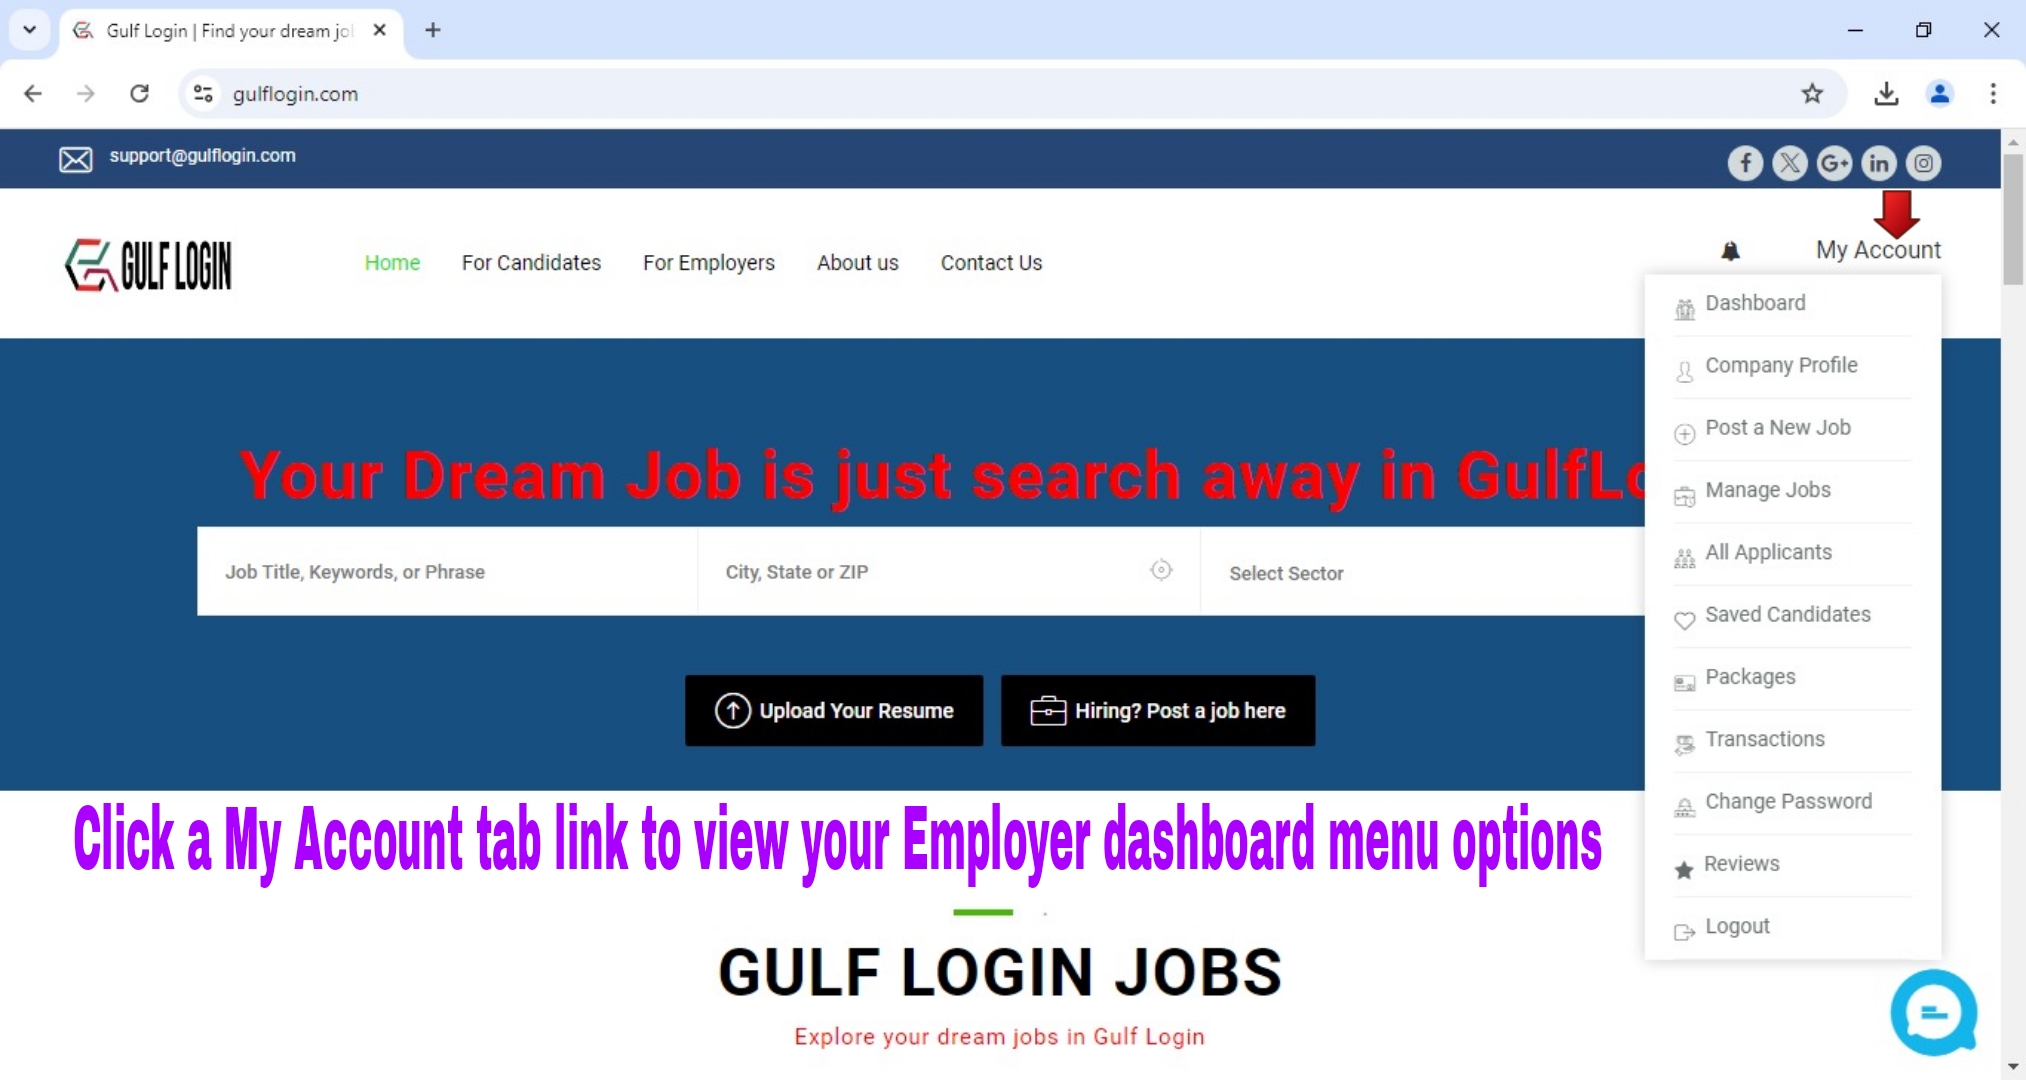
After viewing our package pricing details, click the My Account link on our home page to view your Employer Dashboard menu.
Step 9 : Click the My Account tab link on our home page to view your Employer Dashboard menu links.
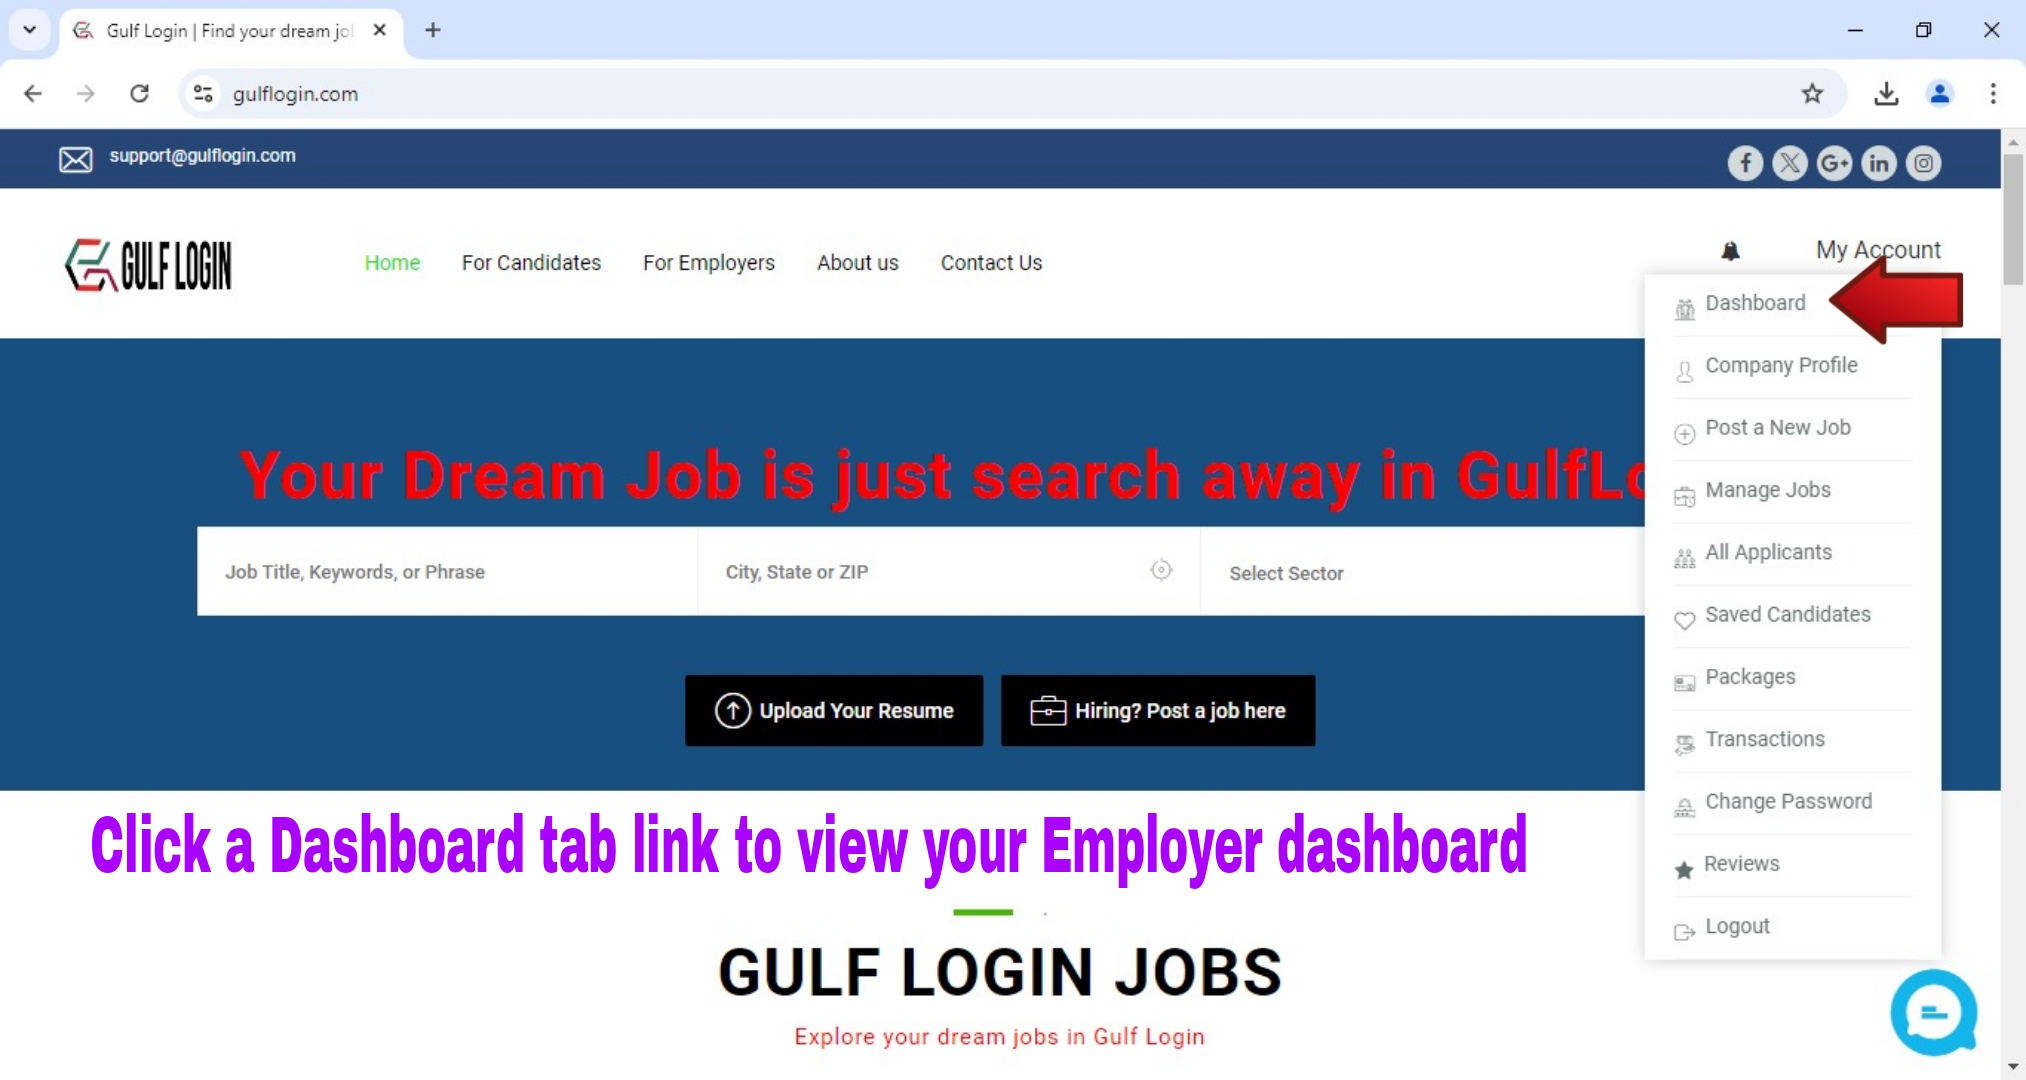
After you clicking the My Account tab link on our home page, it shows the links for Employer Dashboard menu. Then click a Dashboard link to view your entire Employer Dashboard.
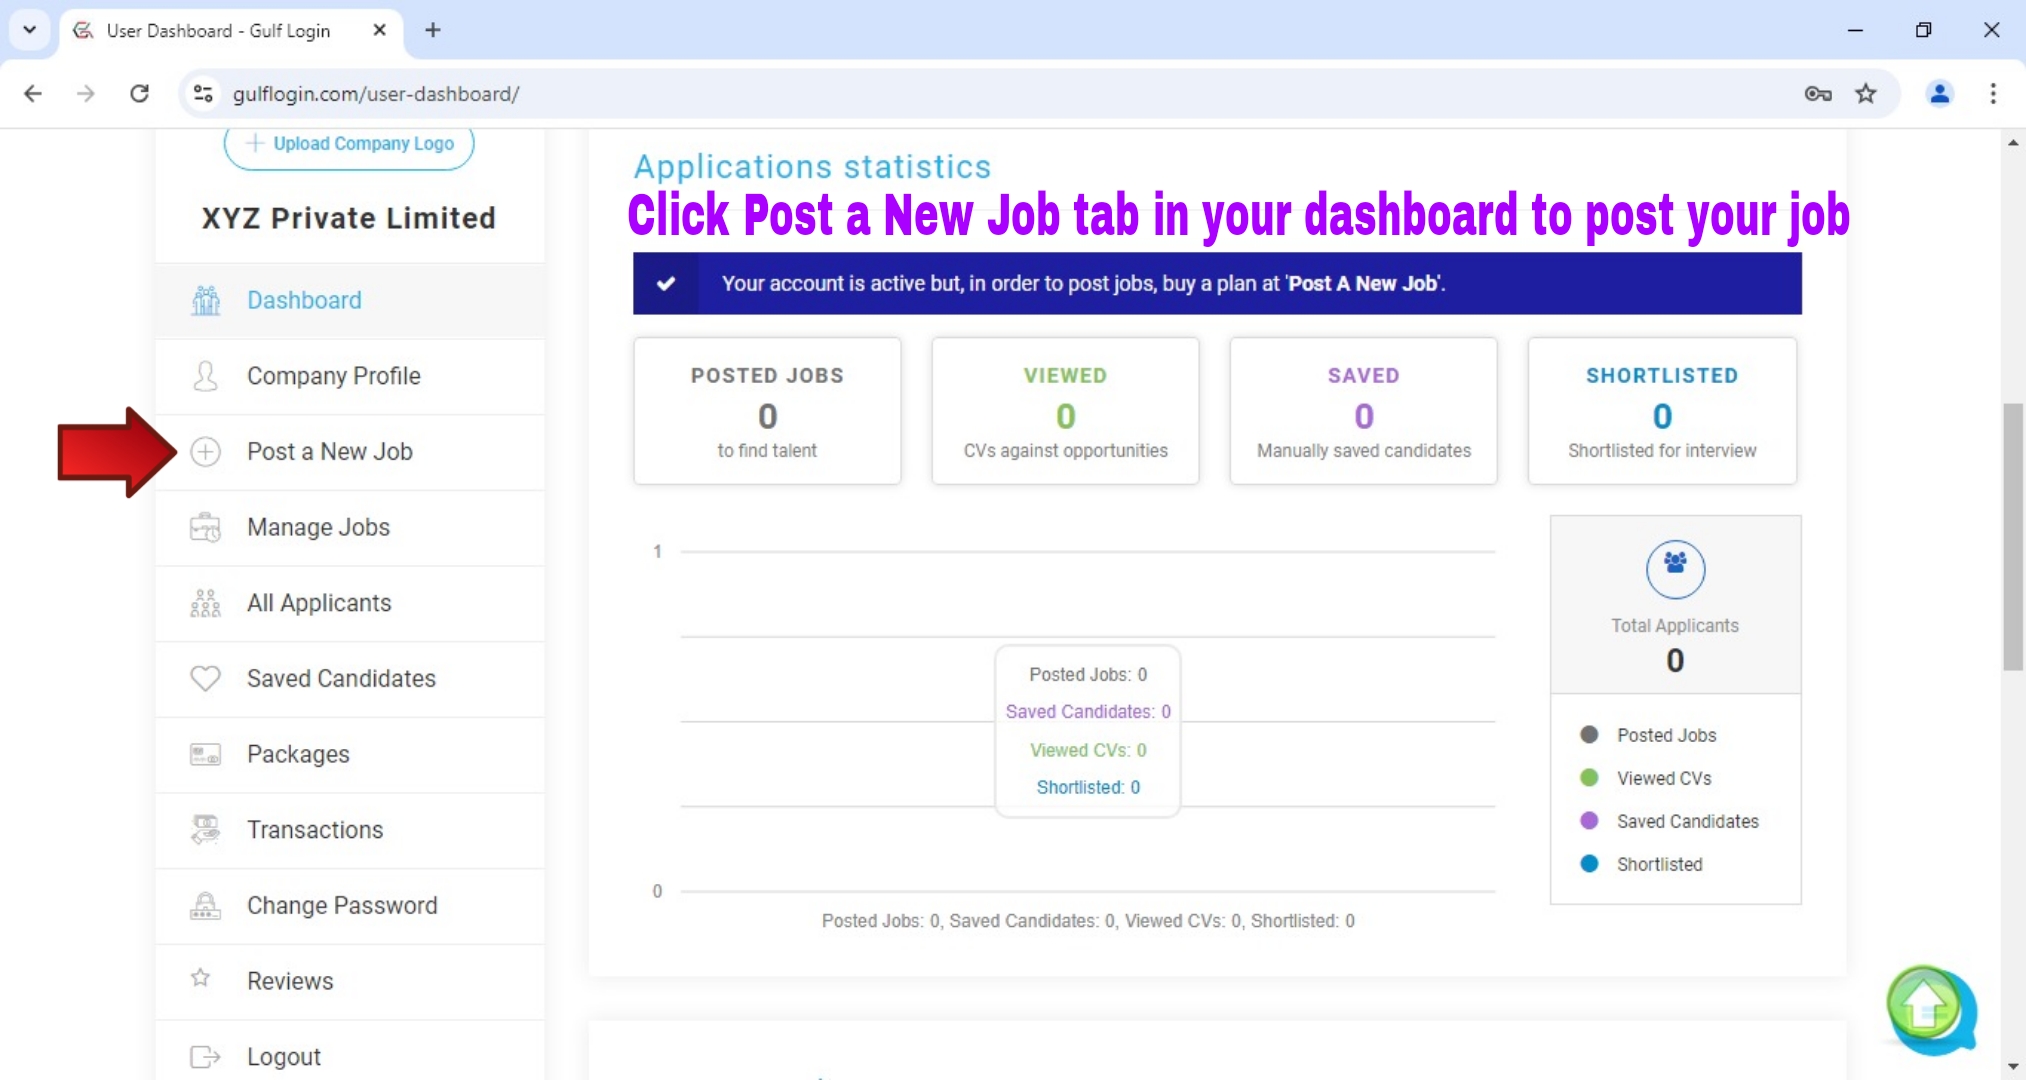
Then click the Post a New Job tab link in your Employer dashboard to post your jobs in our website.
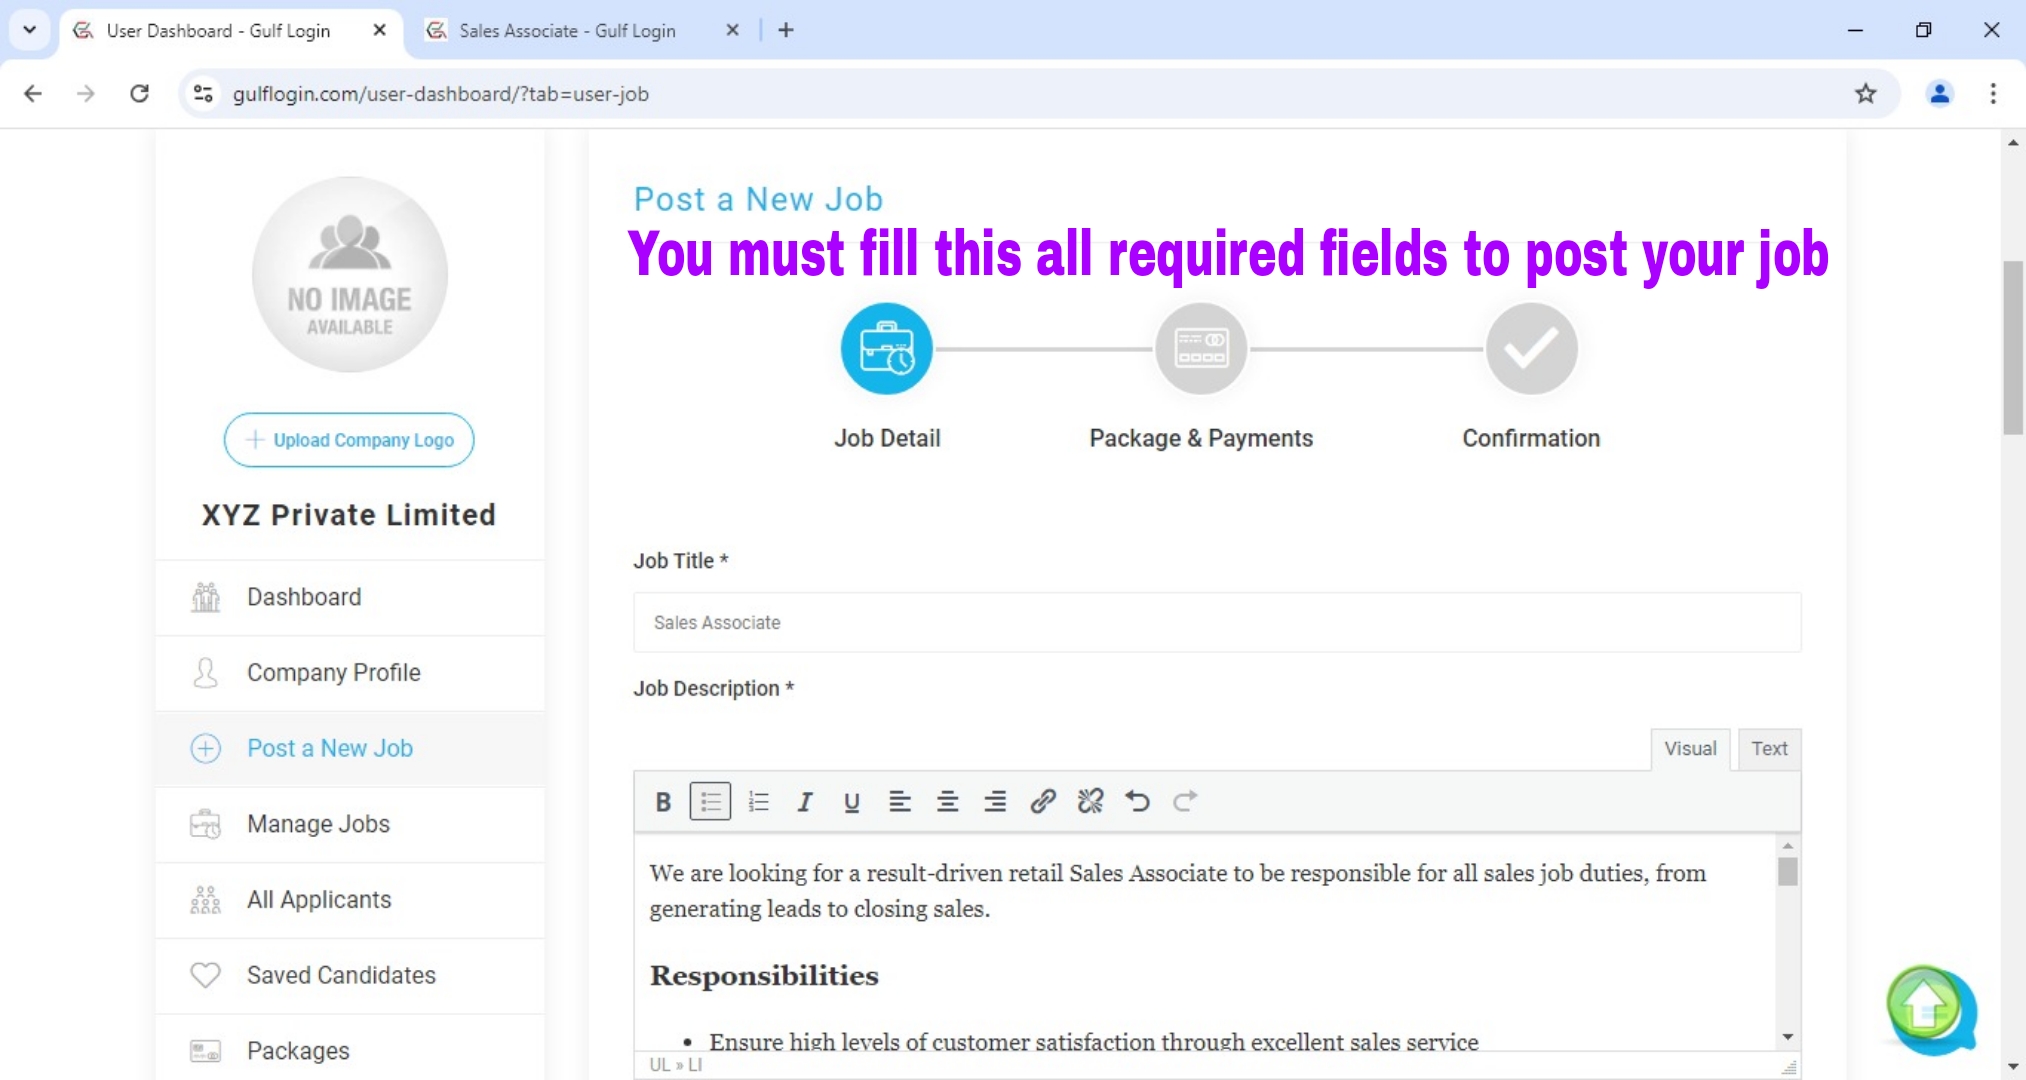
Step 11 : To fill all this required fields in our Job Post form.
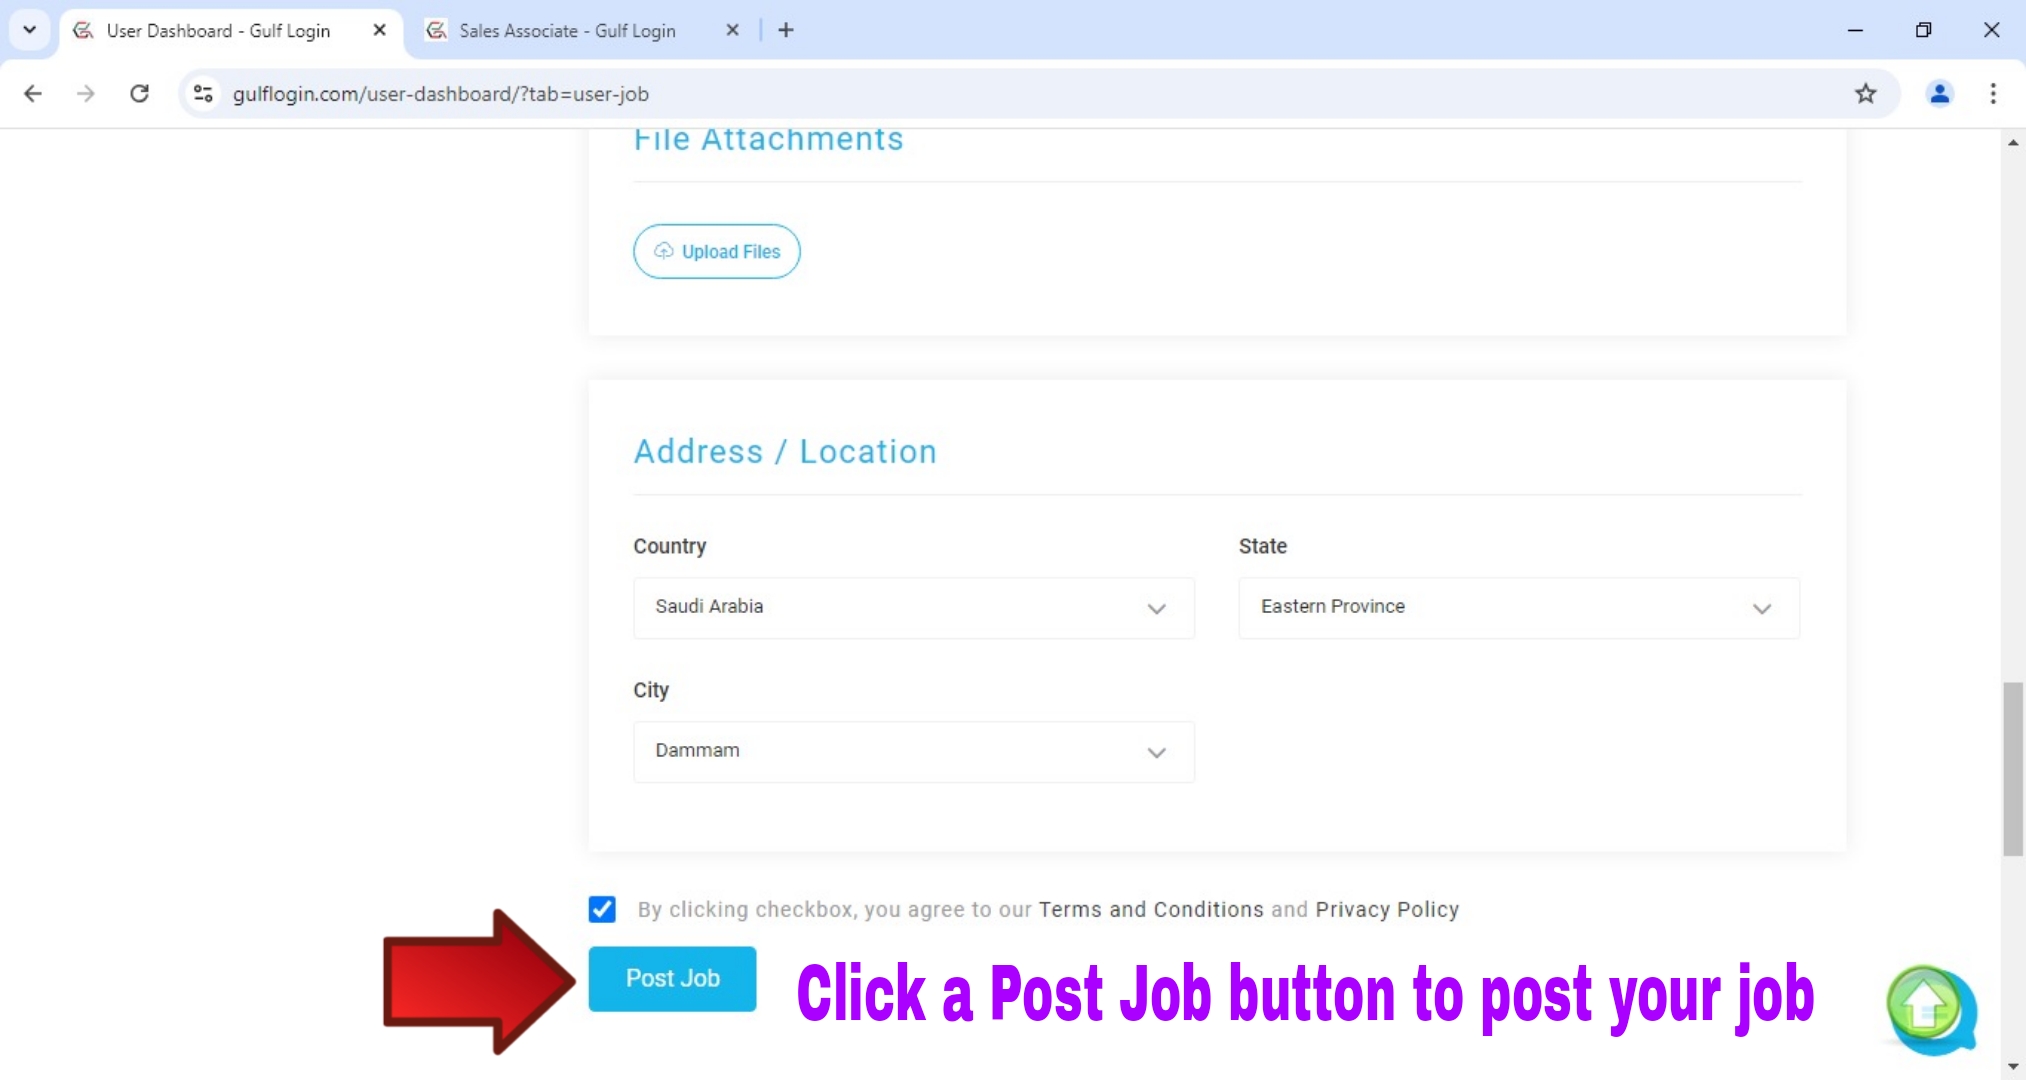
After you have filled out all the required fields in our job posting form, click the Post Job button to post your job.
Important Note :
1. Don’t mention your company or any other mail id and phone number in your job description. (For Example, kindly send your CV to this mail id XXX@gmail.com and kindly send your CV to this whatsapp Number). In case, If you mention your mail id and phone number in your job description, then it will be removed from your job description.
2. Before post your job, kindly check your job post details. Because, once you post your job, then you can’t edit your job details. The only way to change your job post is contact our administrator.
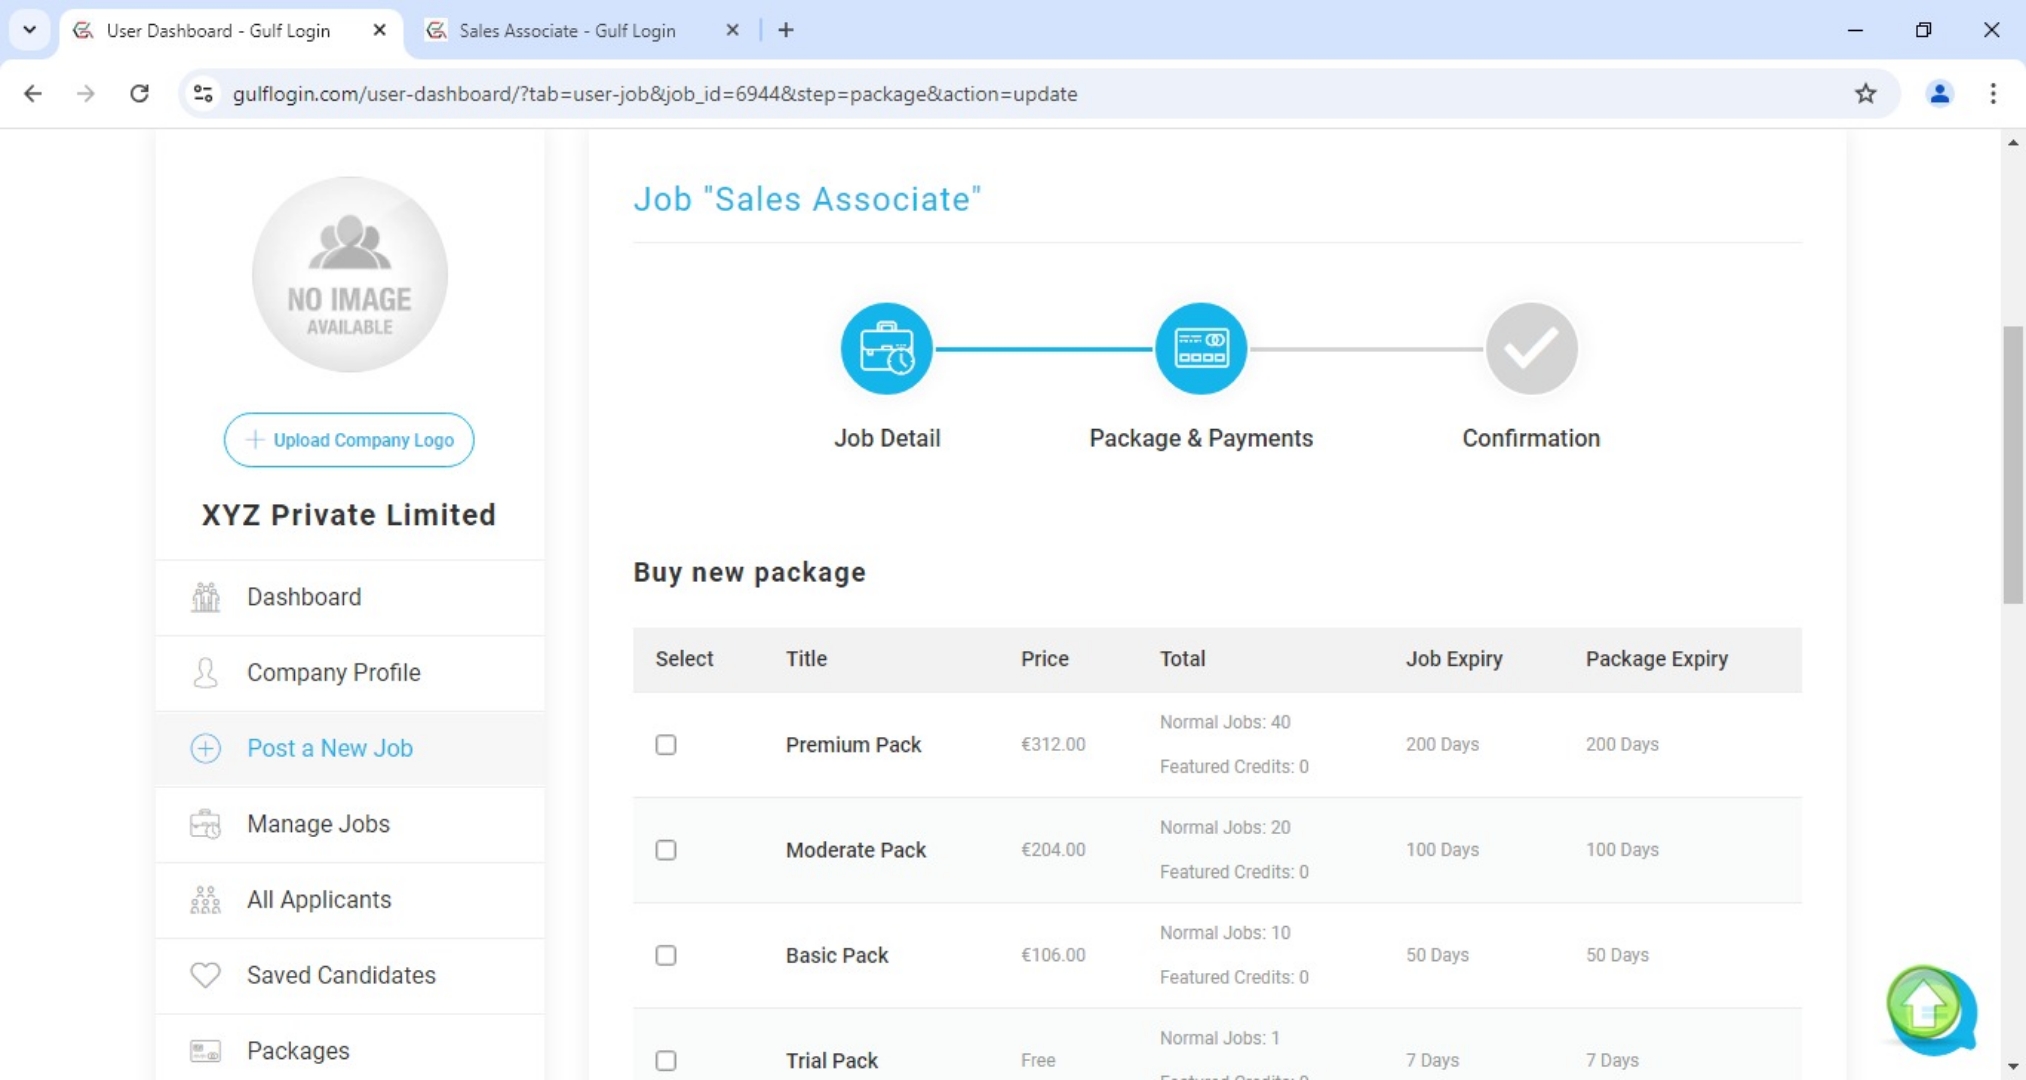
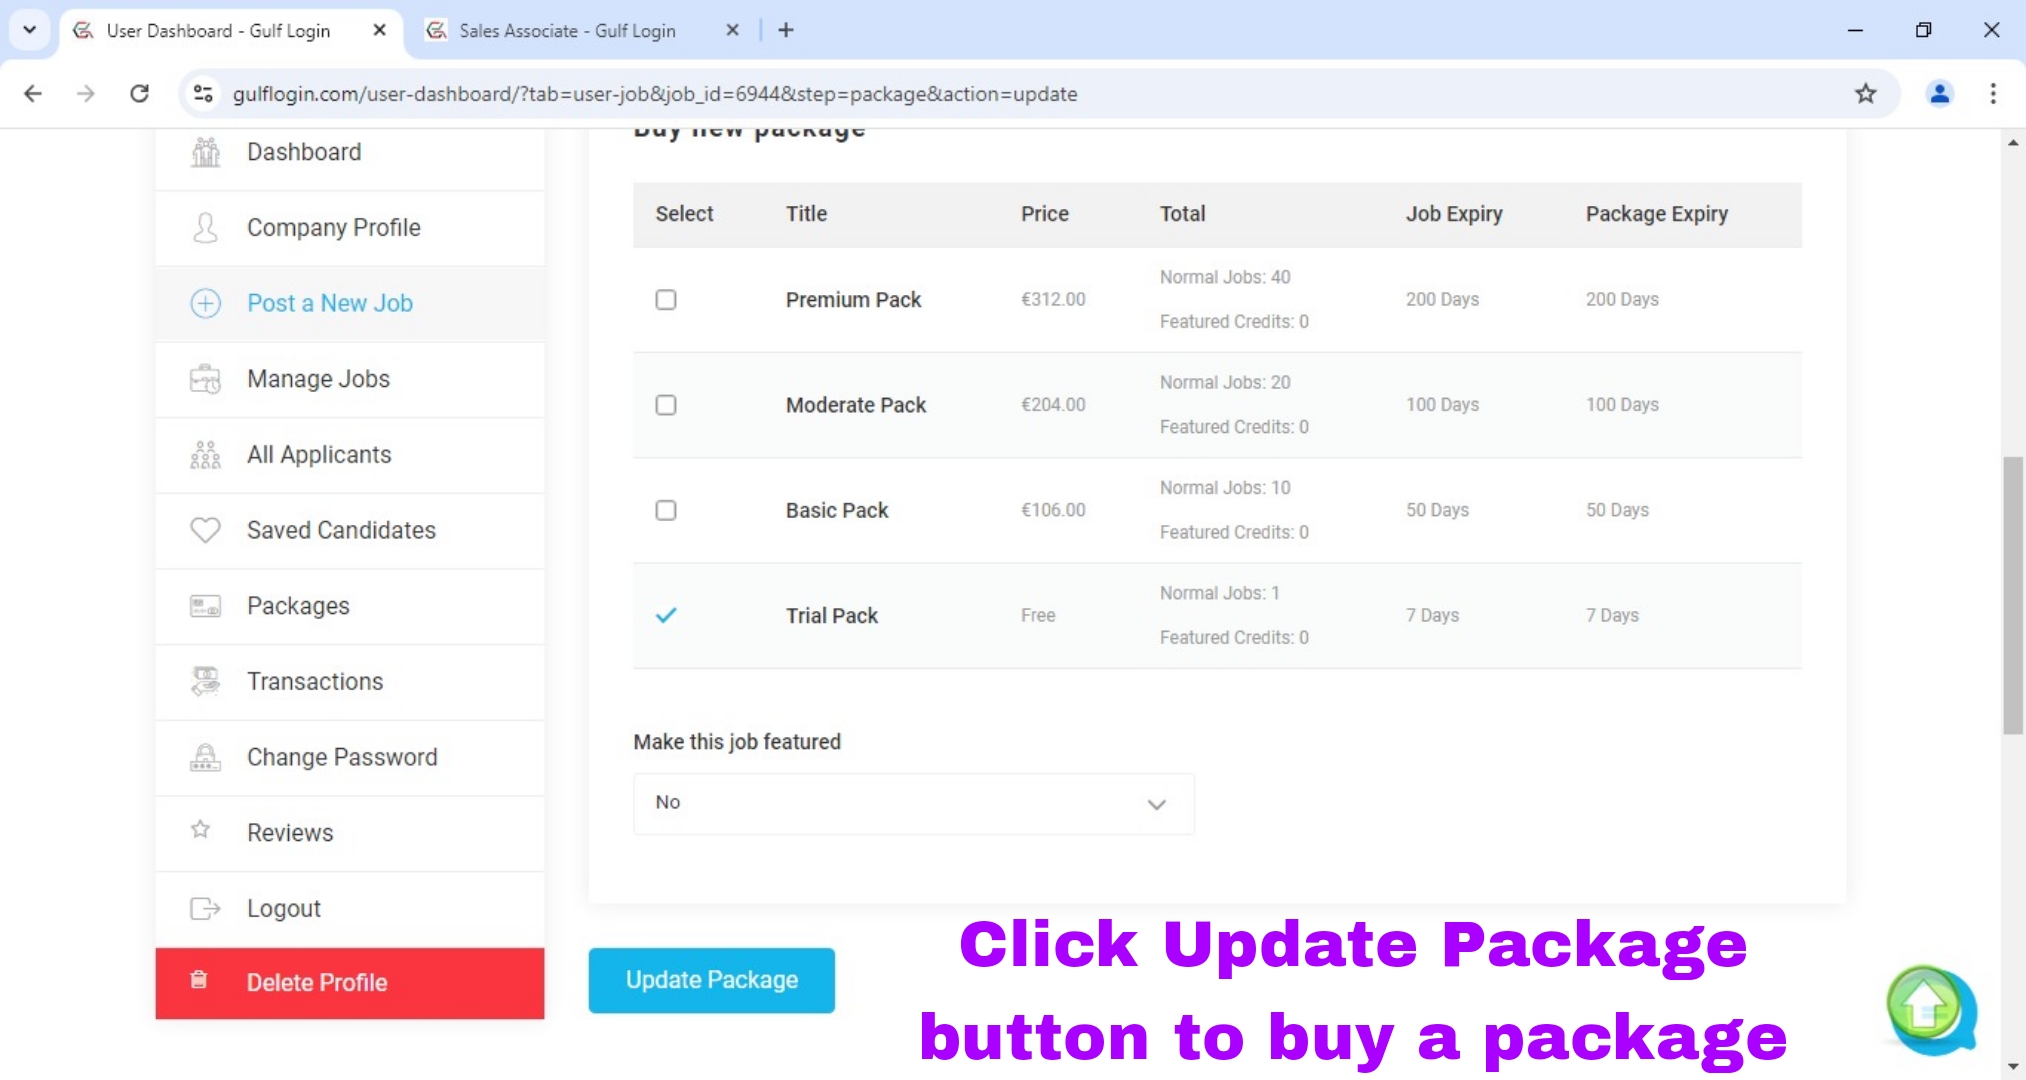
Step 14 : Click the Update Package button to buy a free package.
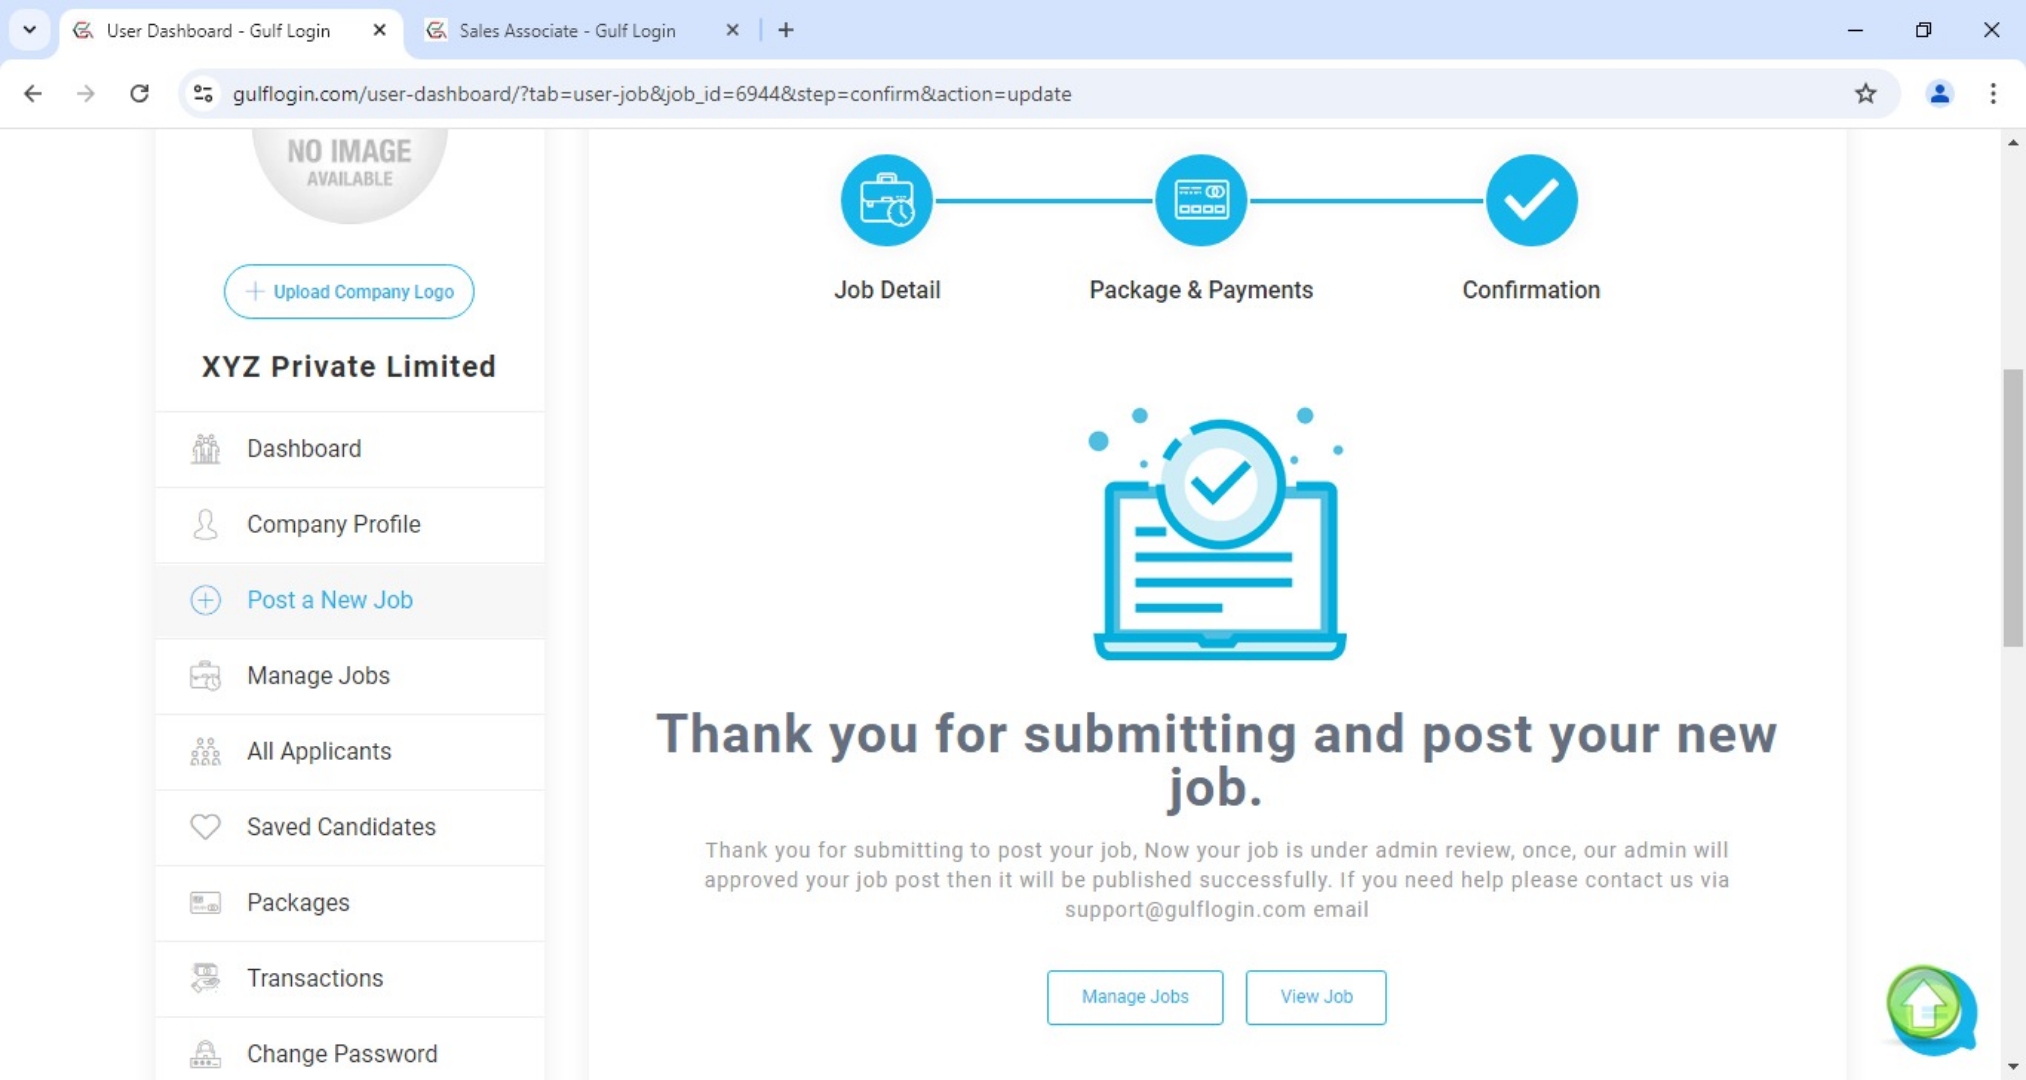
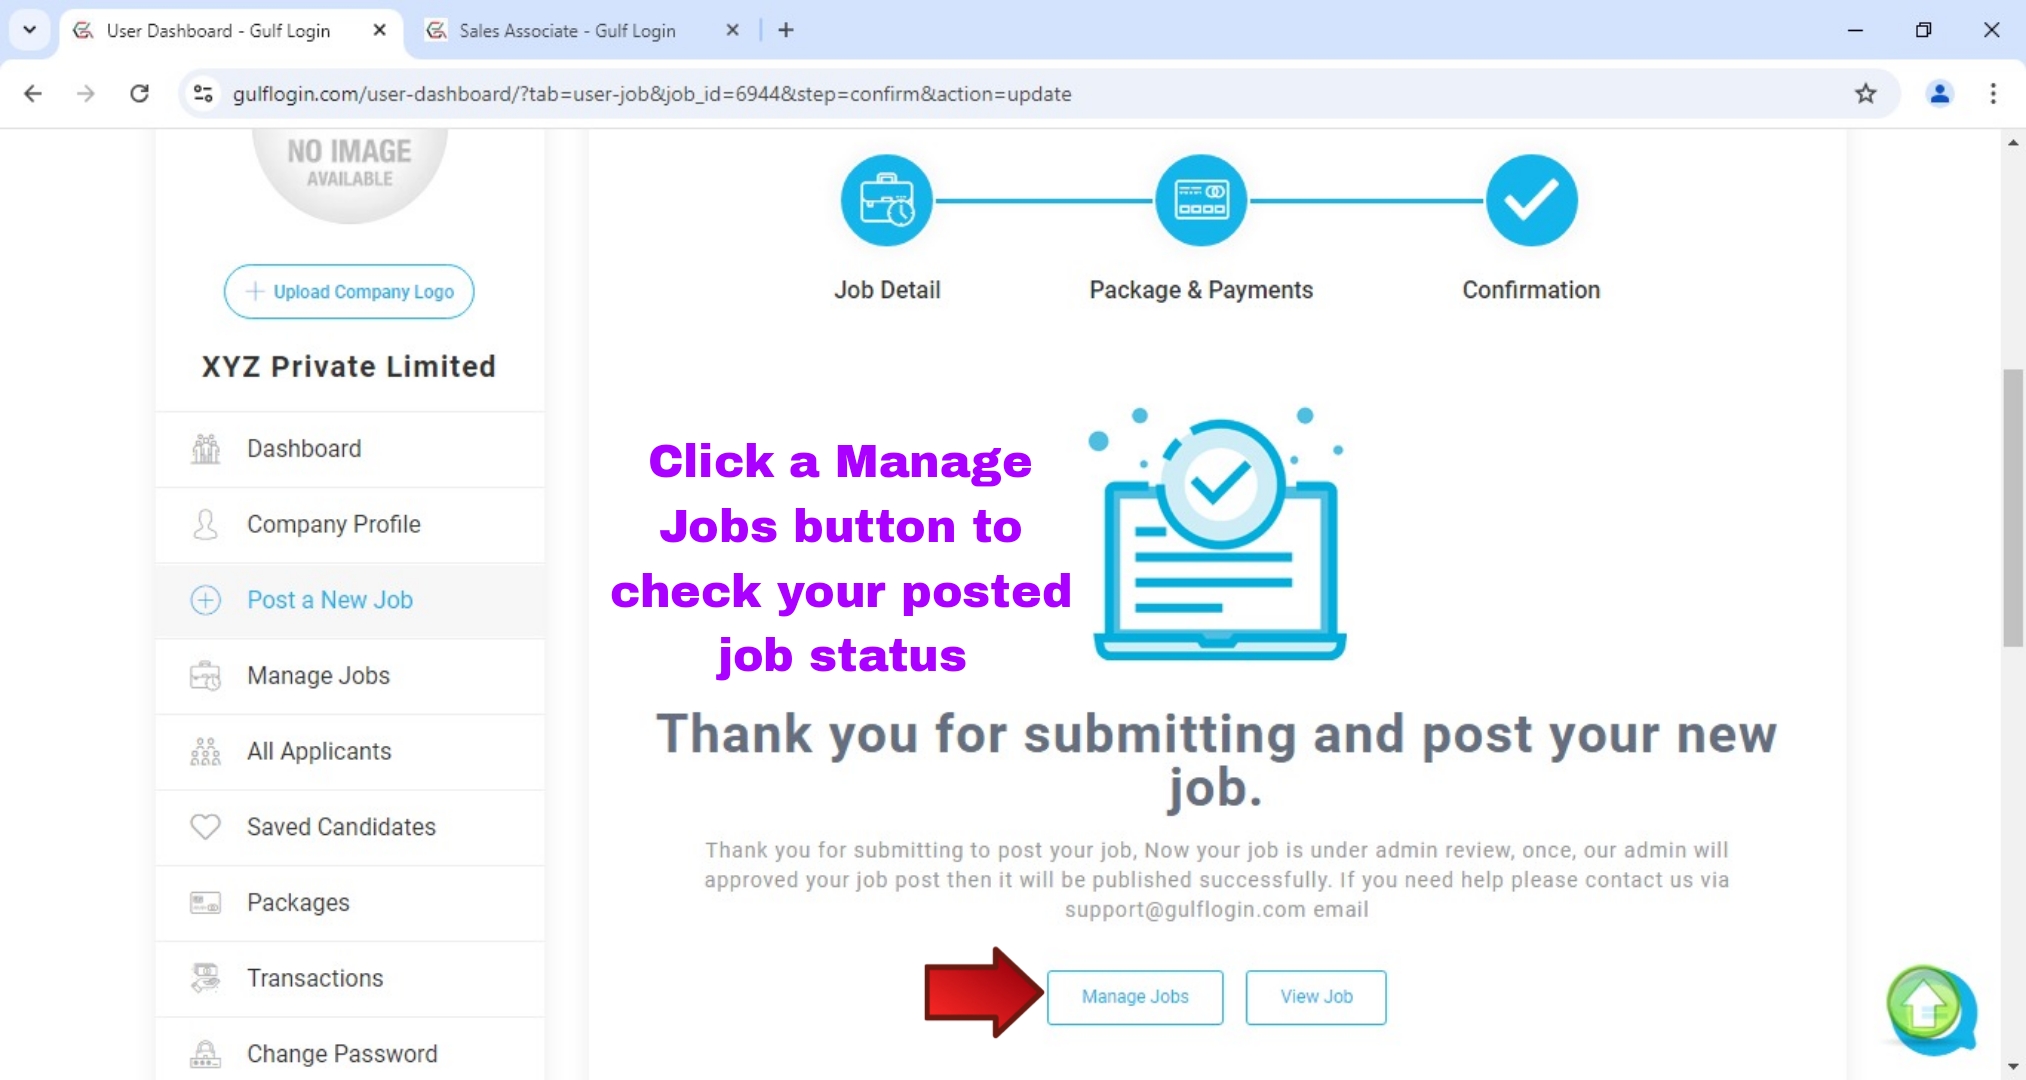
After you clicking the Update Package button, now your job post is under admin review. So, kindly wait for your job approval. Once your job is approved by our admin, then your job has been successfully posted in our website.
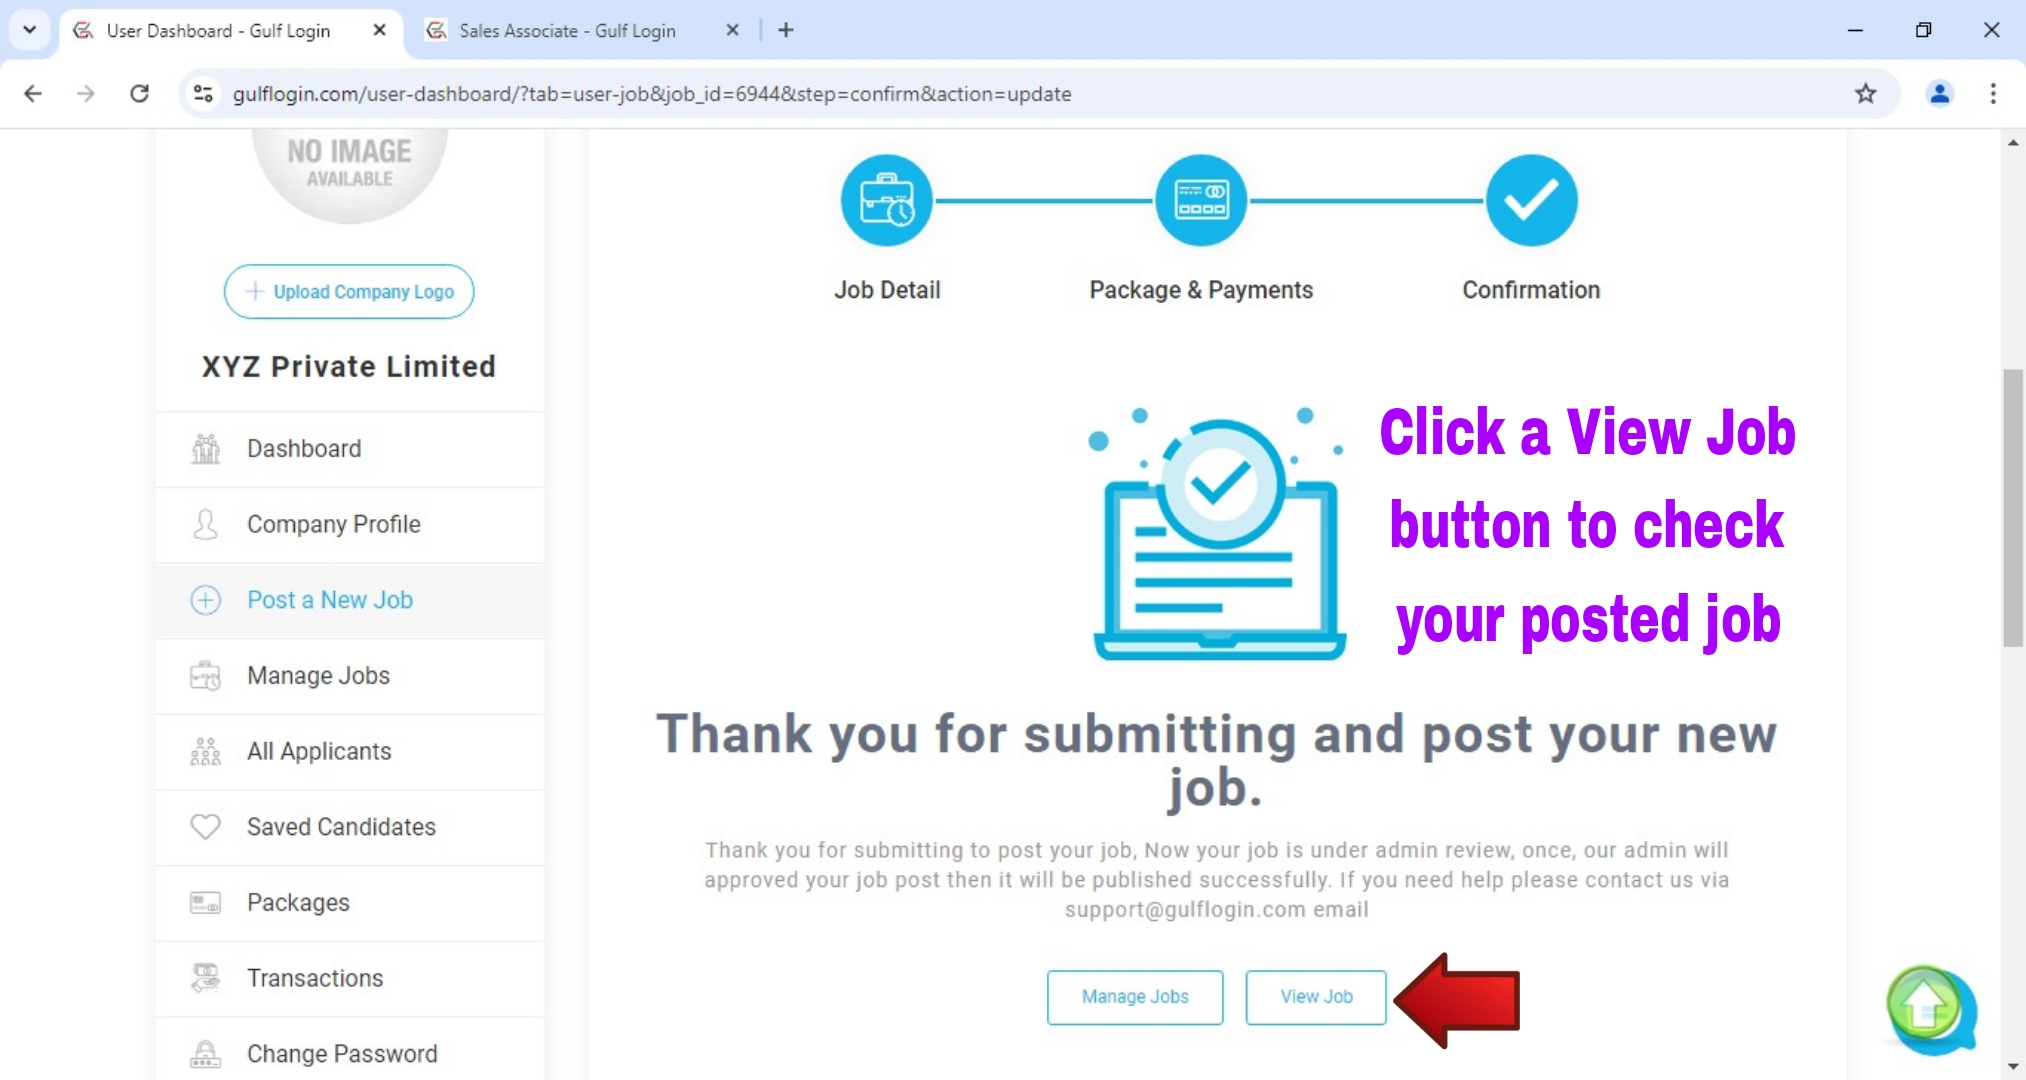
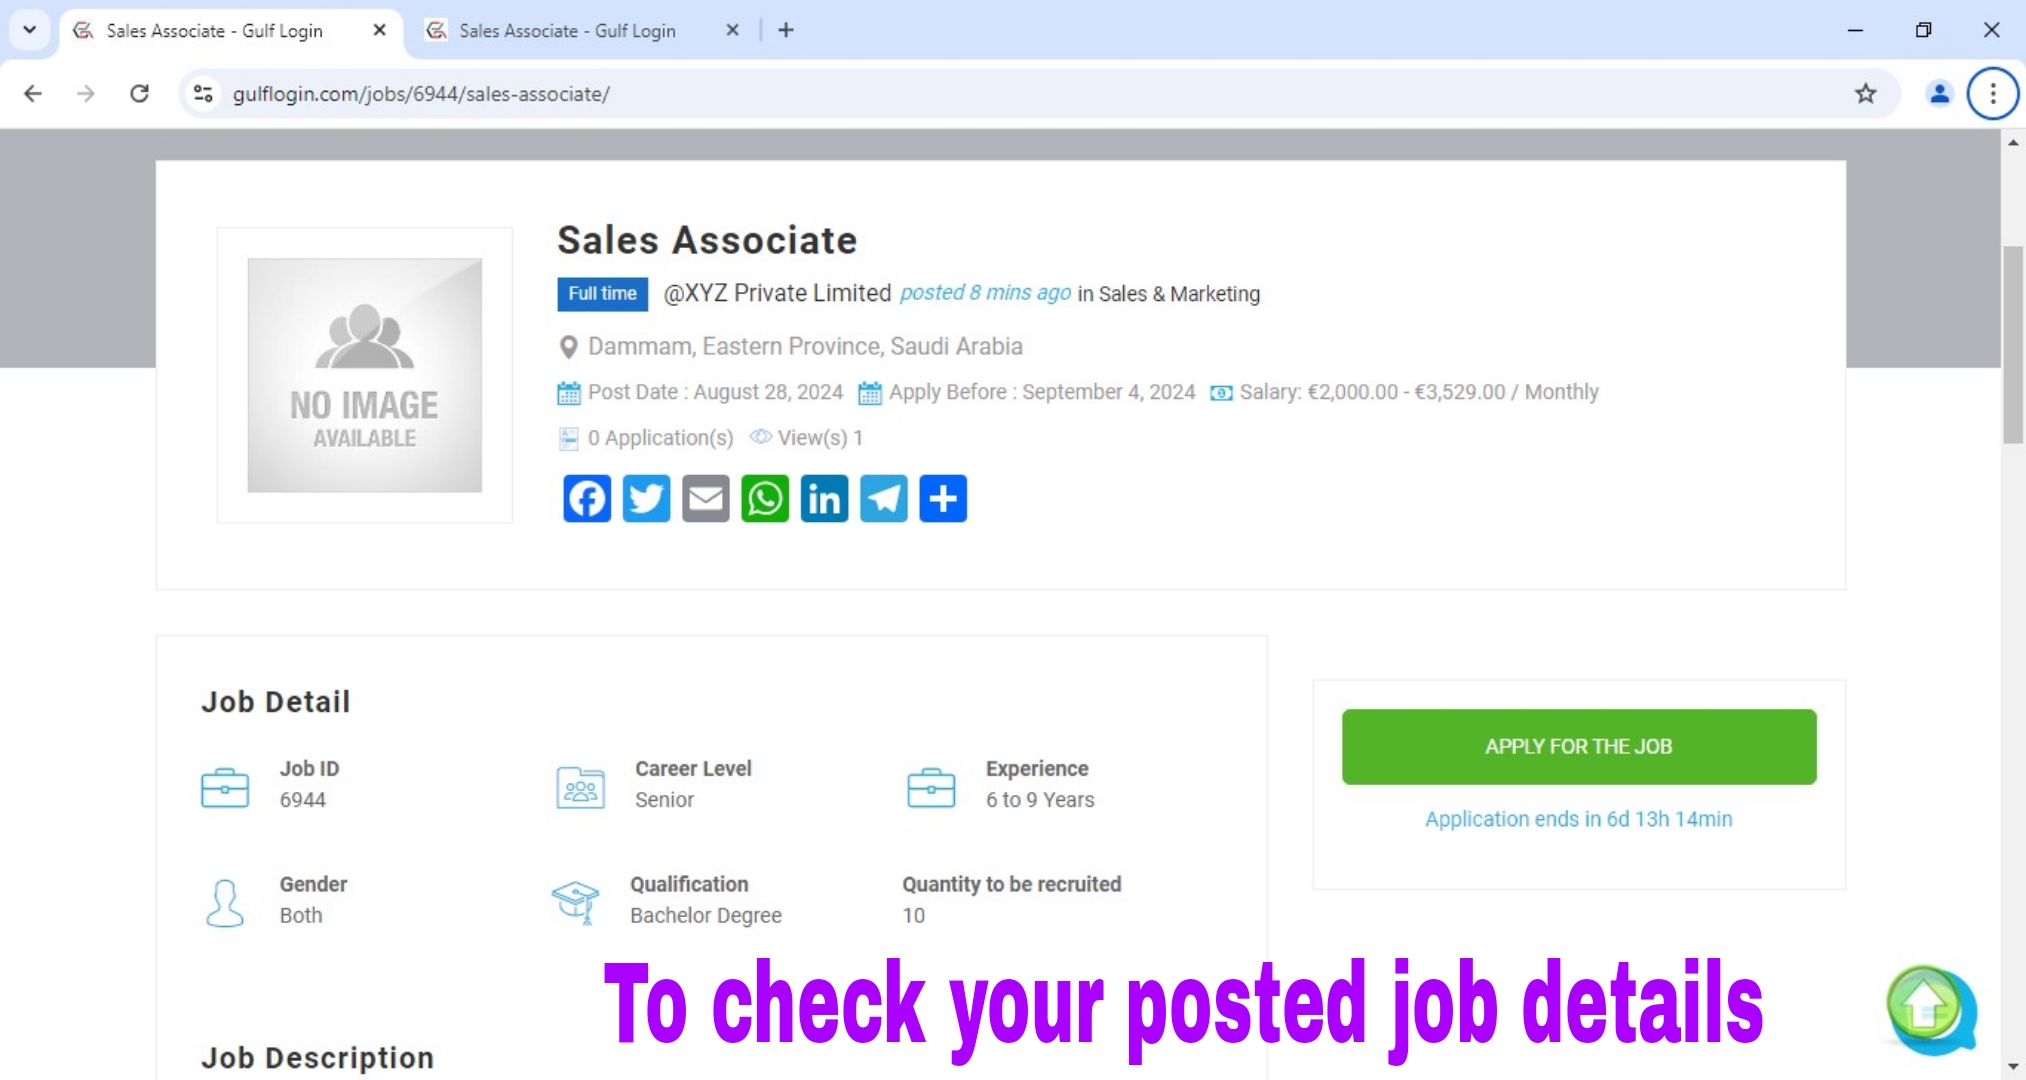
After posted your job, then click a View Job button to view your posted job details.
Step 15 : Click the View Job button to view your posted job details.
After you Clicking the View Job button, then you can check your posted job details in job information page.
After check your posted job details in job information page, then click the Manage Jobs button to check your posted job status whether it is approved or not.
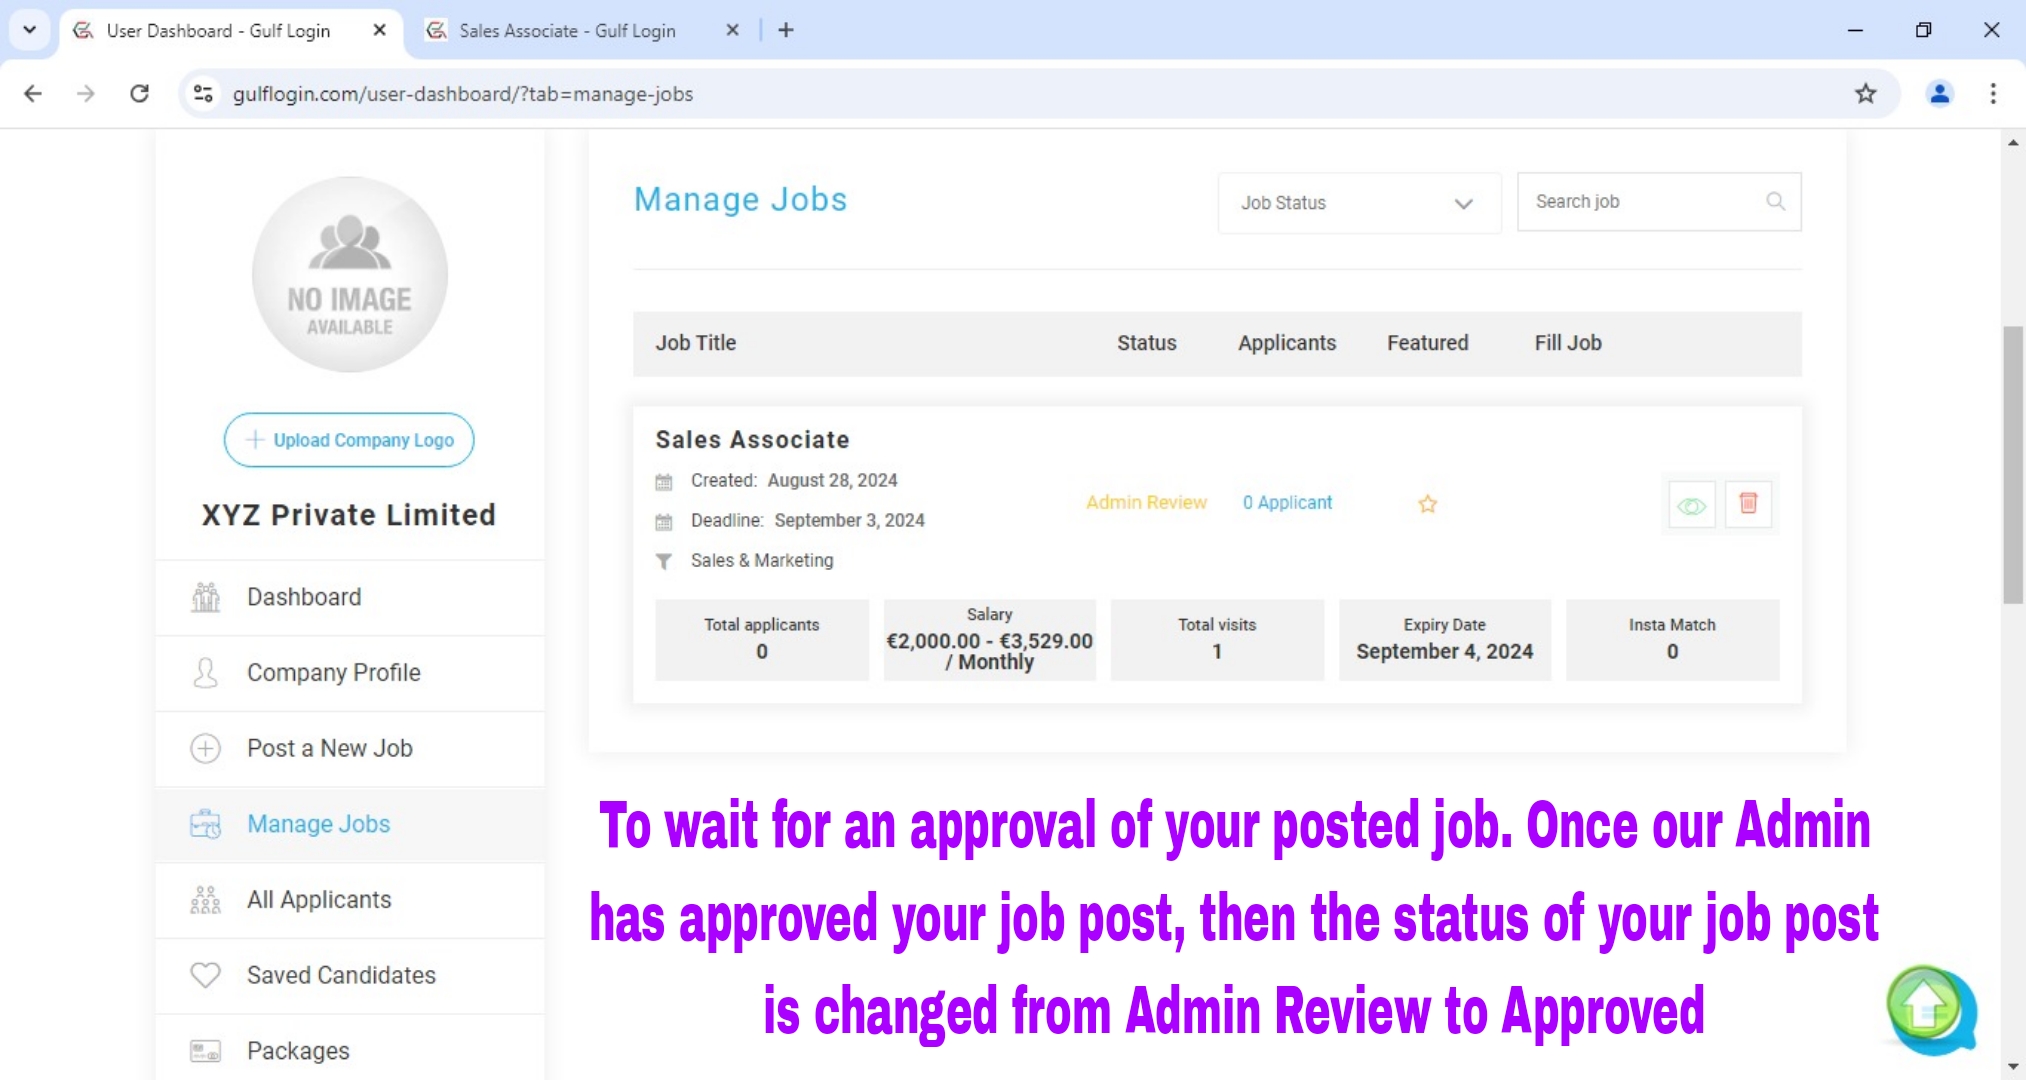
Step 16 : Click the Manage Jobs button to check your posted job status.
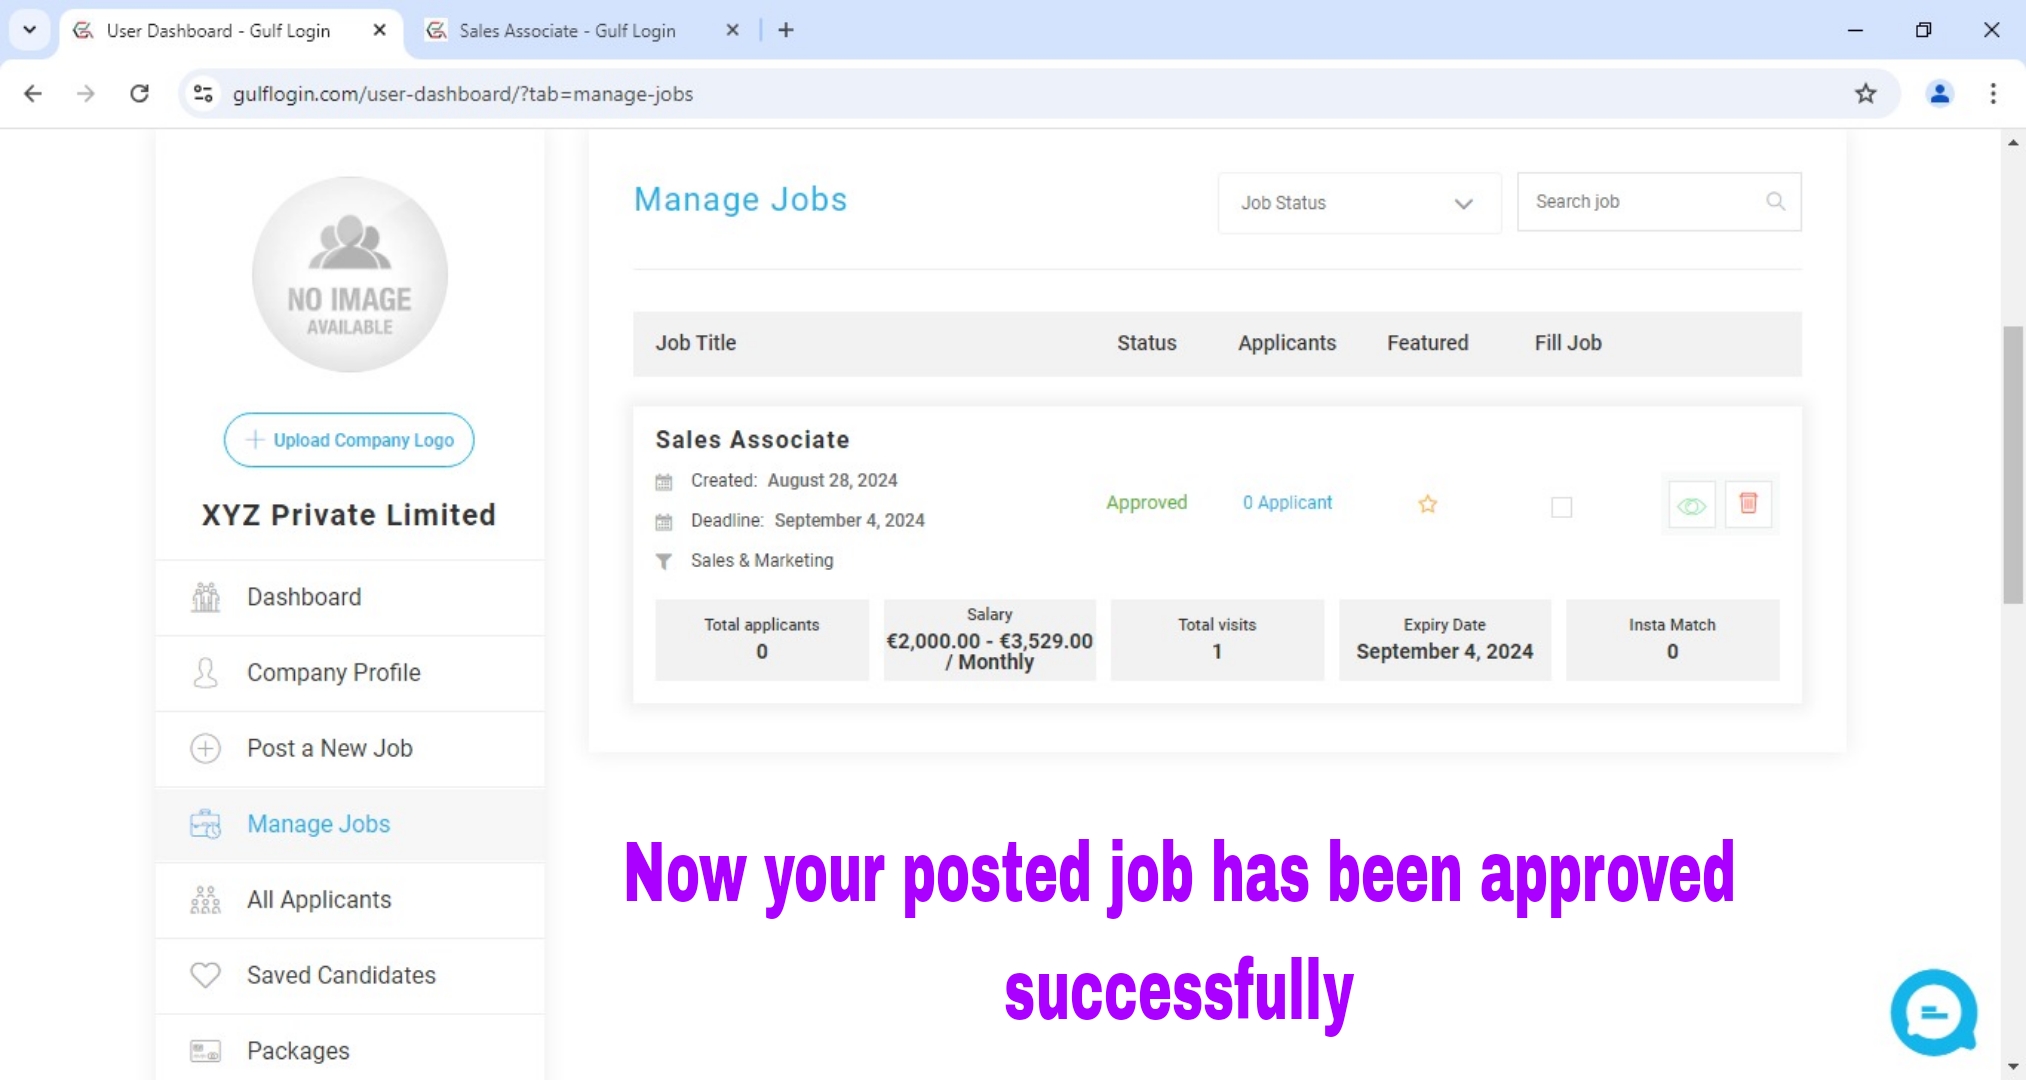
After you clicking the Manage Jobs button, now your job post is under admin review. So, kindly wait for your job approval. Once your job is approved by our admin, then your posted job status is changed from Admin Review to Approved.
Now your posted job has been approved successfully in our website.
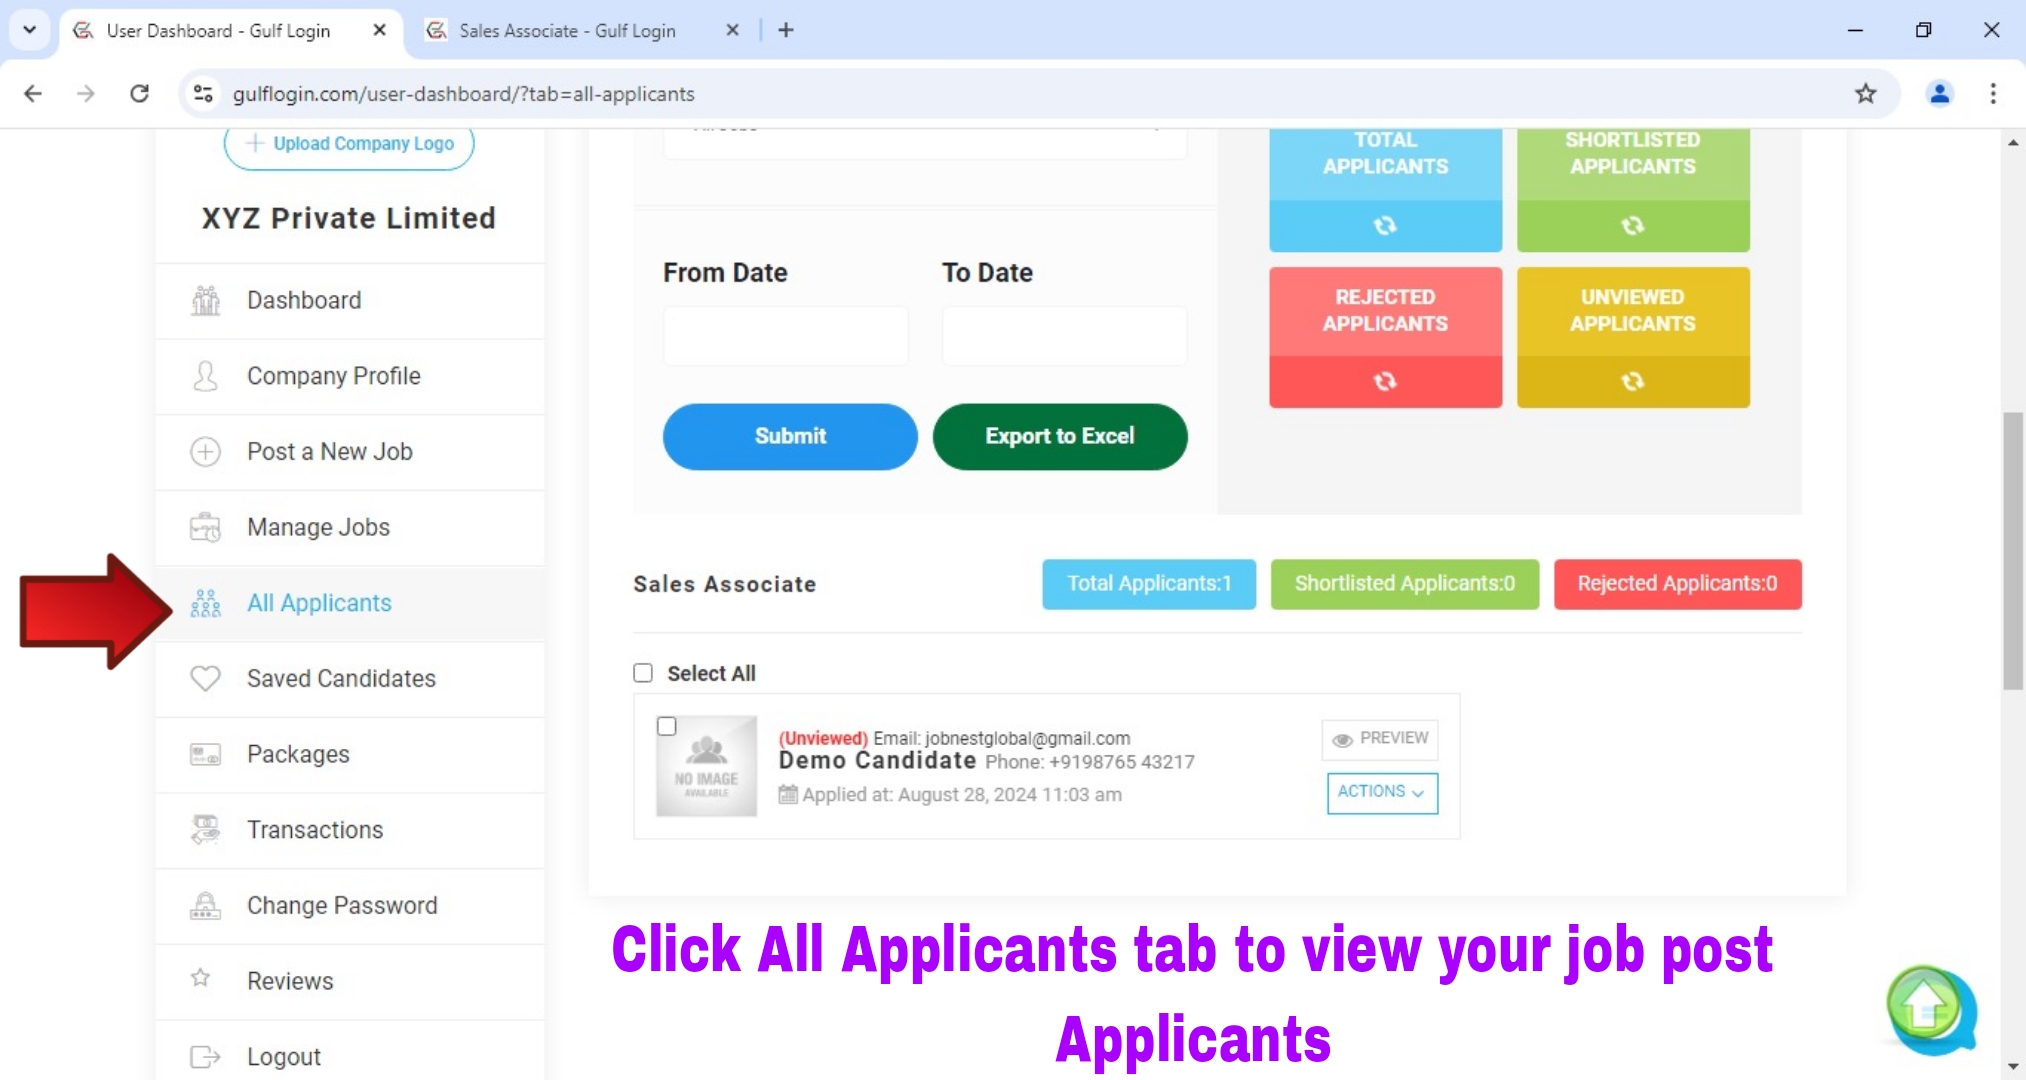
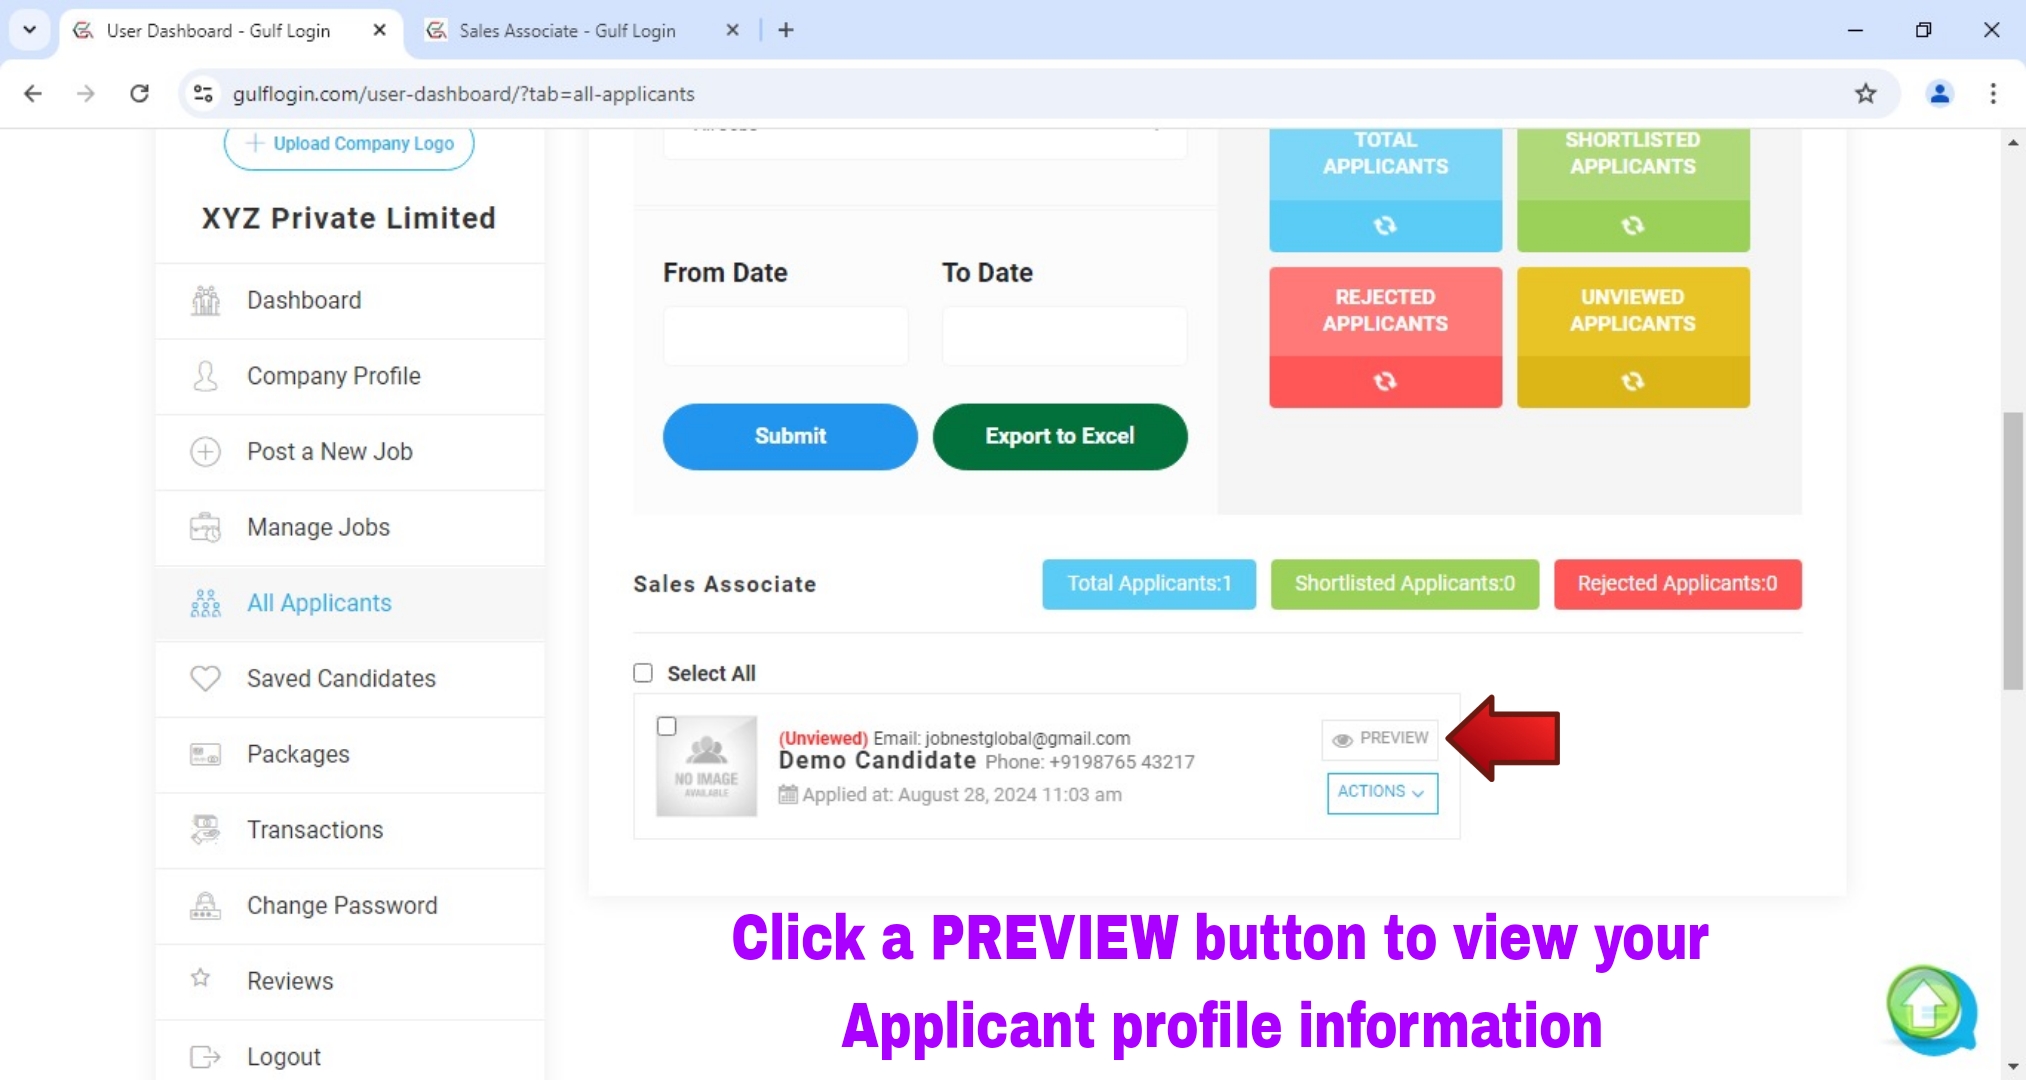
After approval of your post job, then click the All Applicants tab in your Employer dashboard to view your job post applicants.
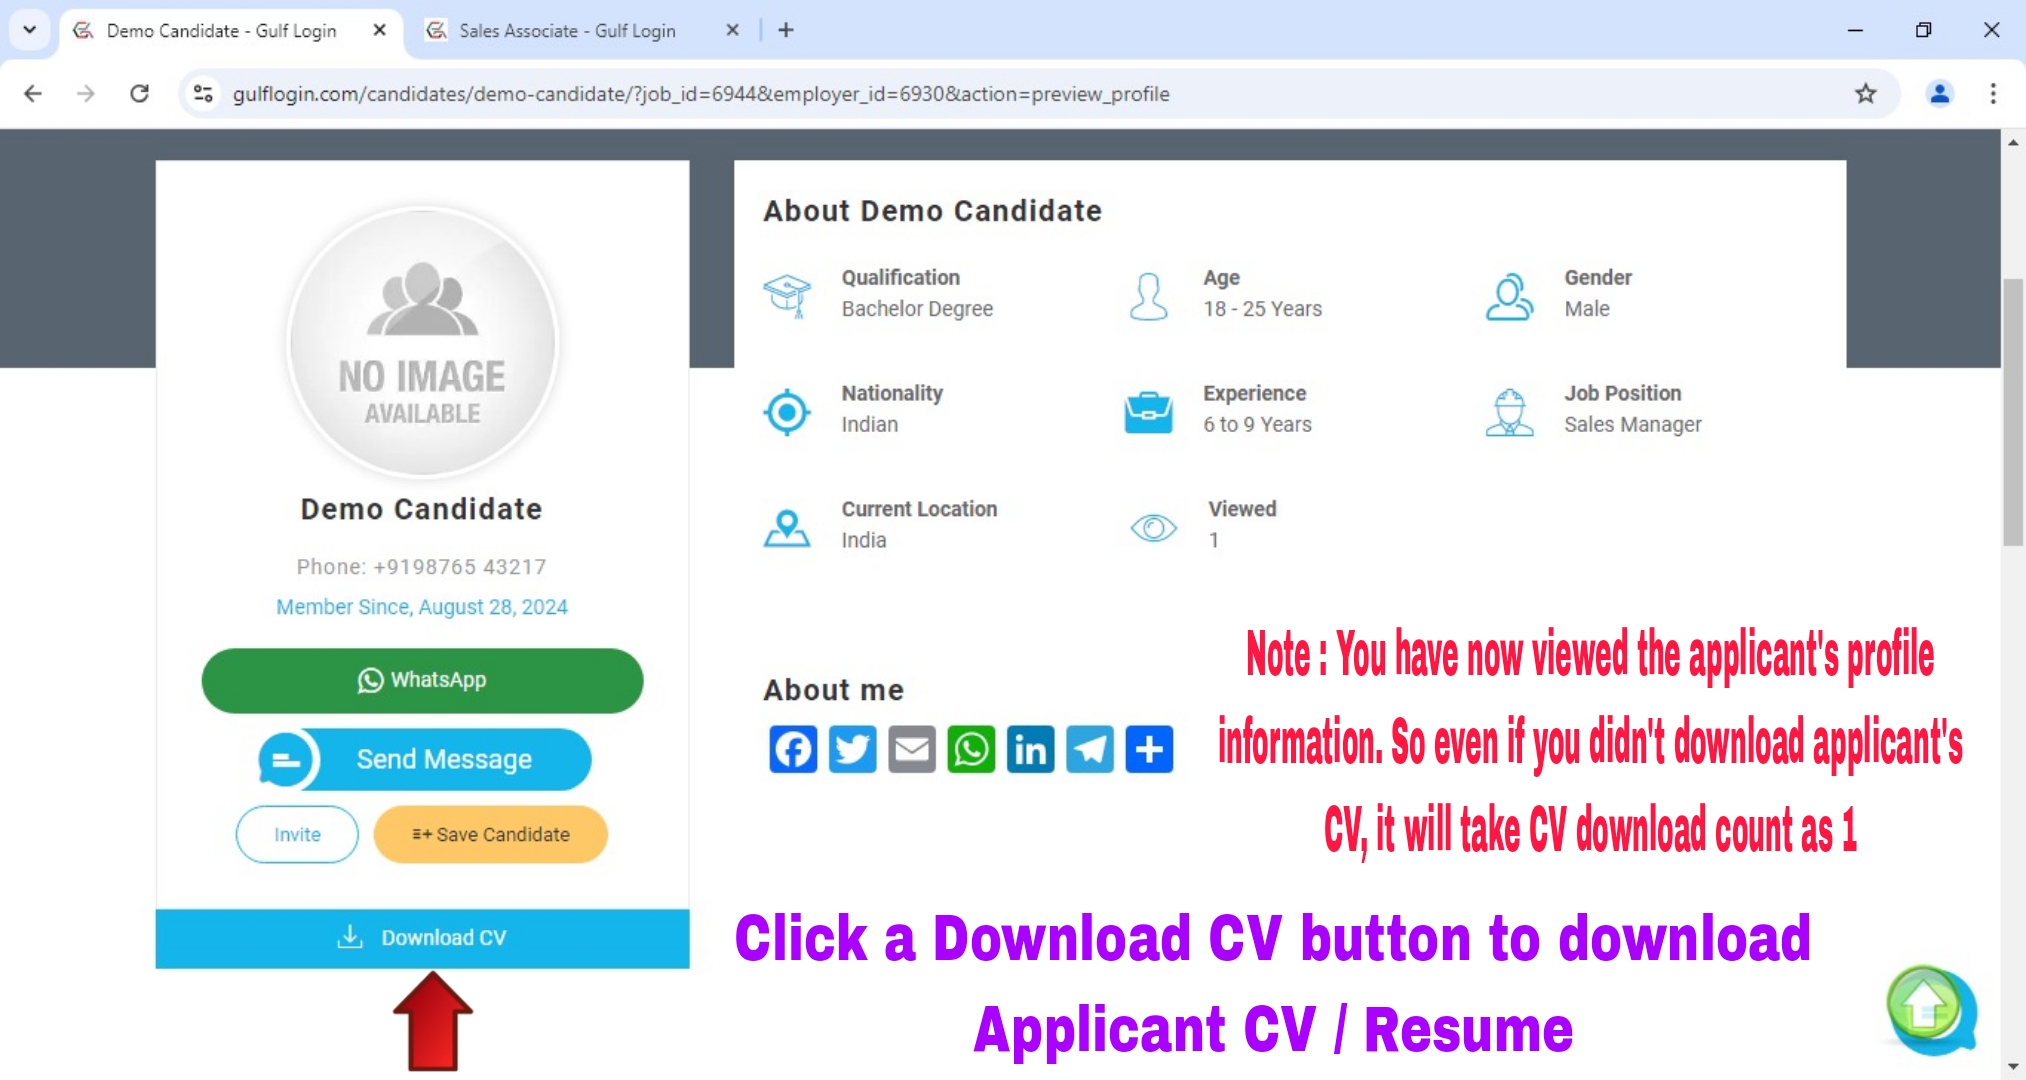
Step 19 : Click a Download CV button to download your job applicant CV.
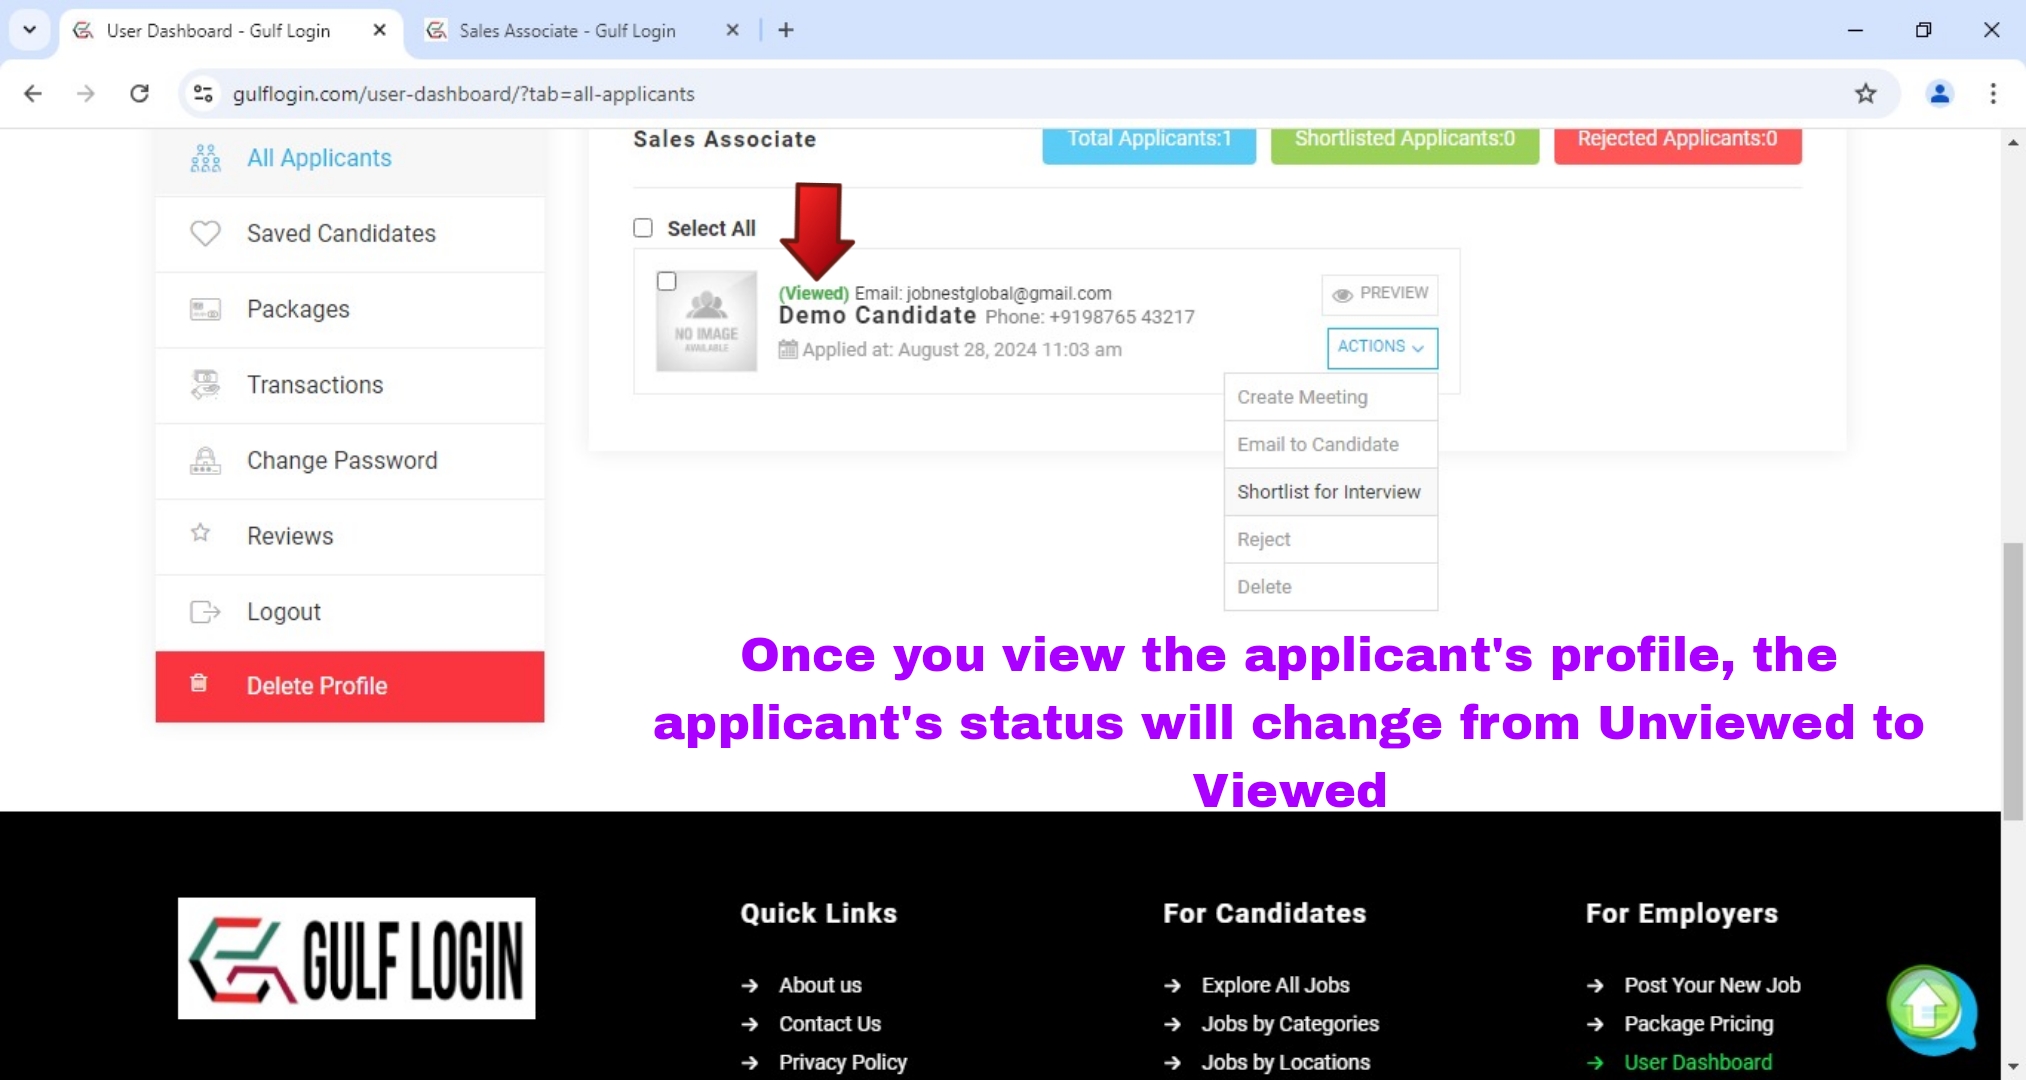
After viewed and downloaded your job Applicant’s profile, Then the Applicant status is changed from Unviewed to Viewed.
Important Note : You have now viewed the Applicant’s profile information. So, even if you didn’t download Applicant’s CV, it will automatically deduct CV download count as 1 in your package subscription.
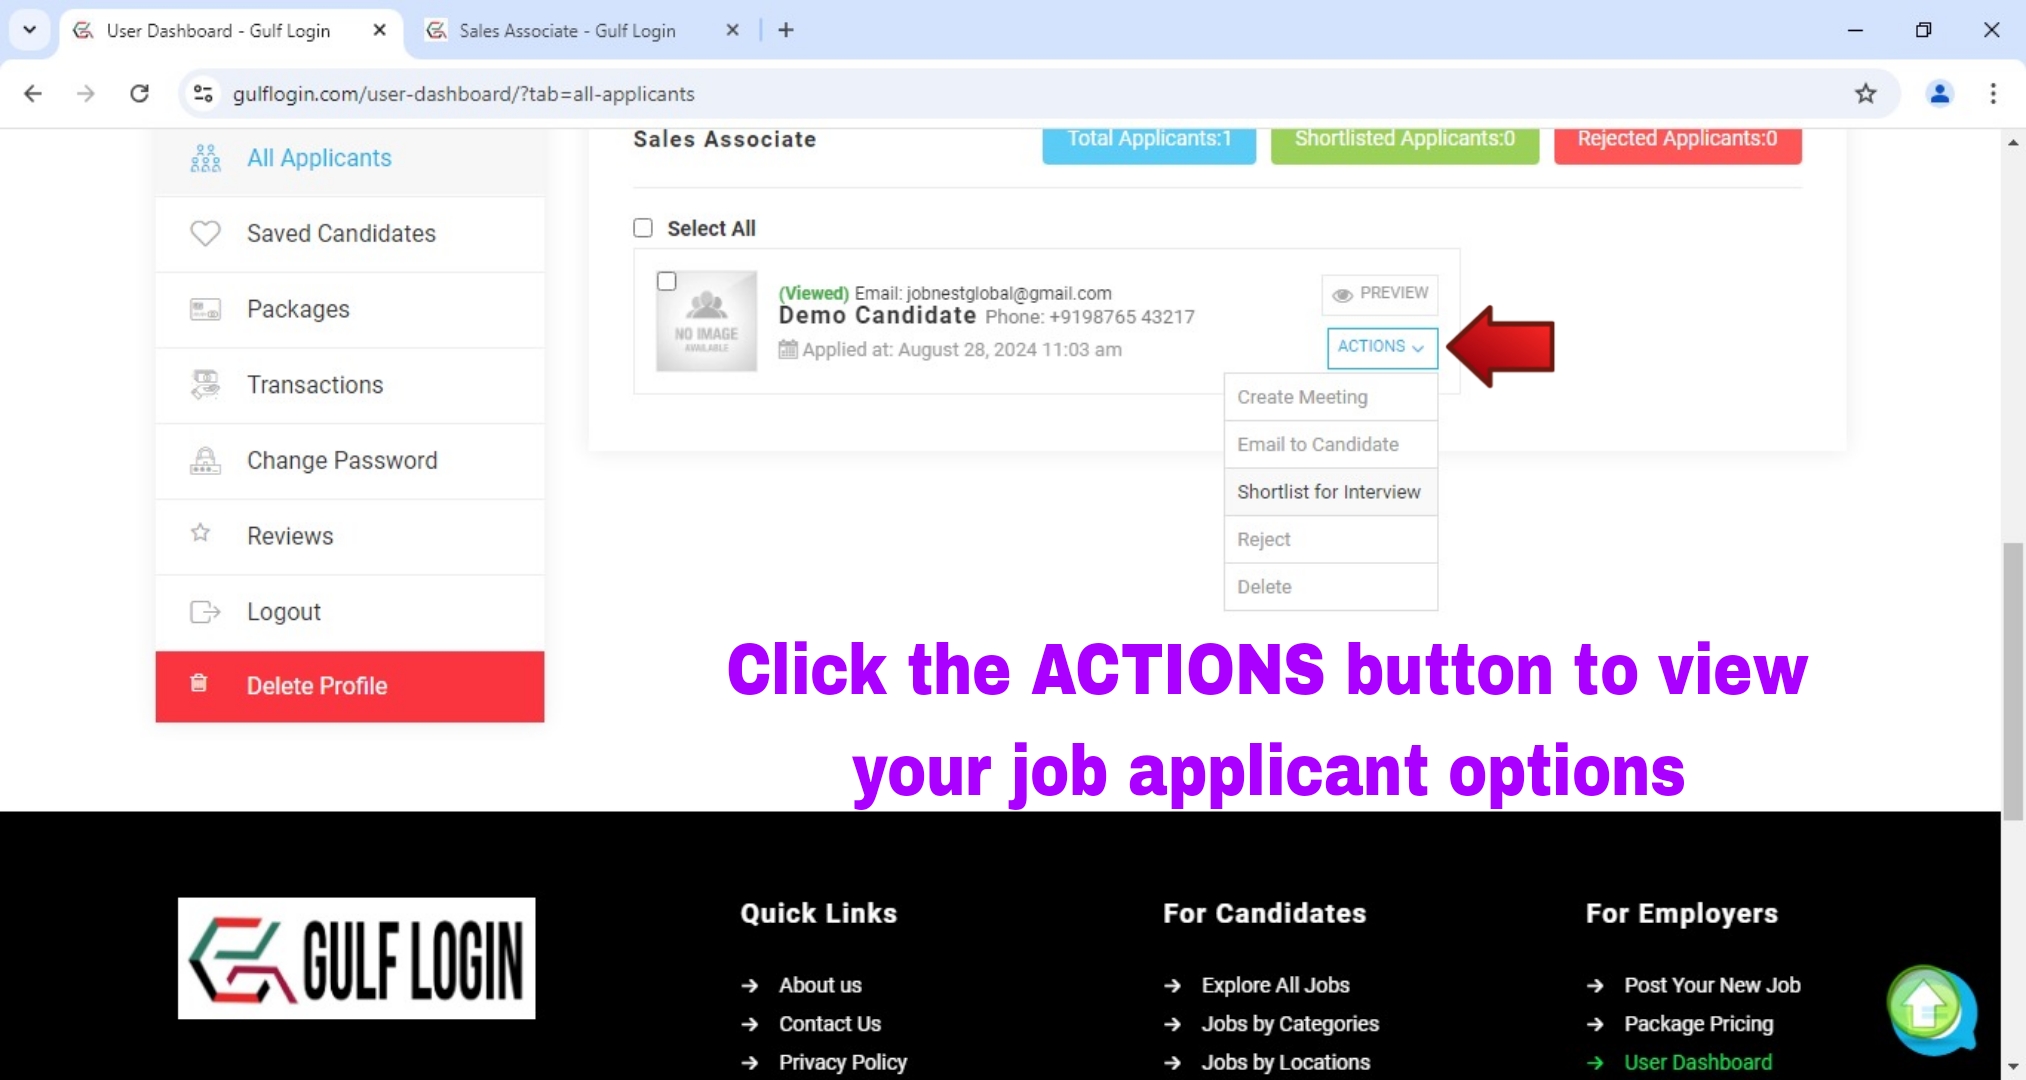
After viewed and downloaded your Job Applicant’s CV, then click the ACTIONS button to view your Job Applicant options.
Step 20 : Click the ACTIONS button to view your Job Applicant options.
After you clicking the ACTIONS button, then it shows options such as Create Meeting, Email to Candidates, Shortlist for Interview, Reject and Delete. So, you can use this options to perform the above actions. Then, click the Packages tab in your Employer dashboard to view your Package subscription details.
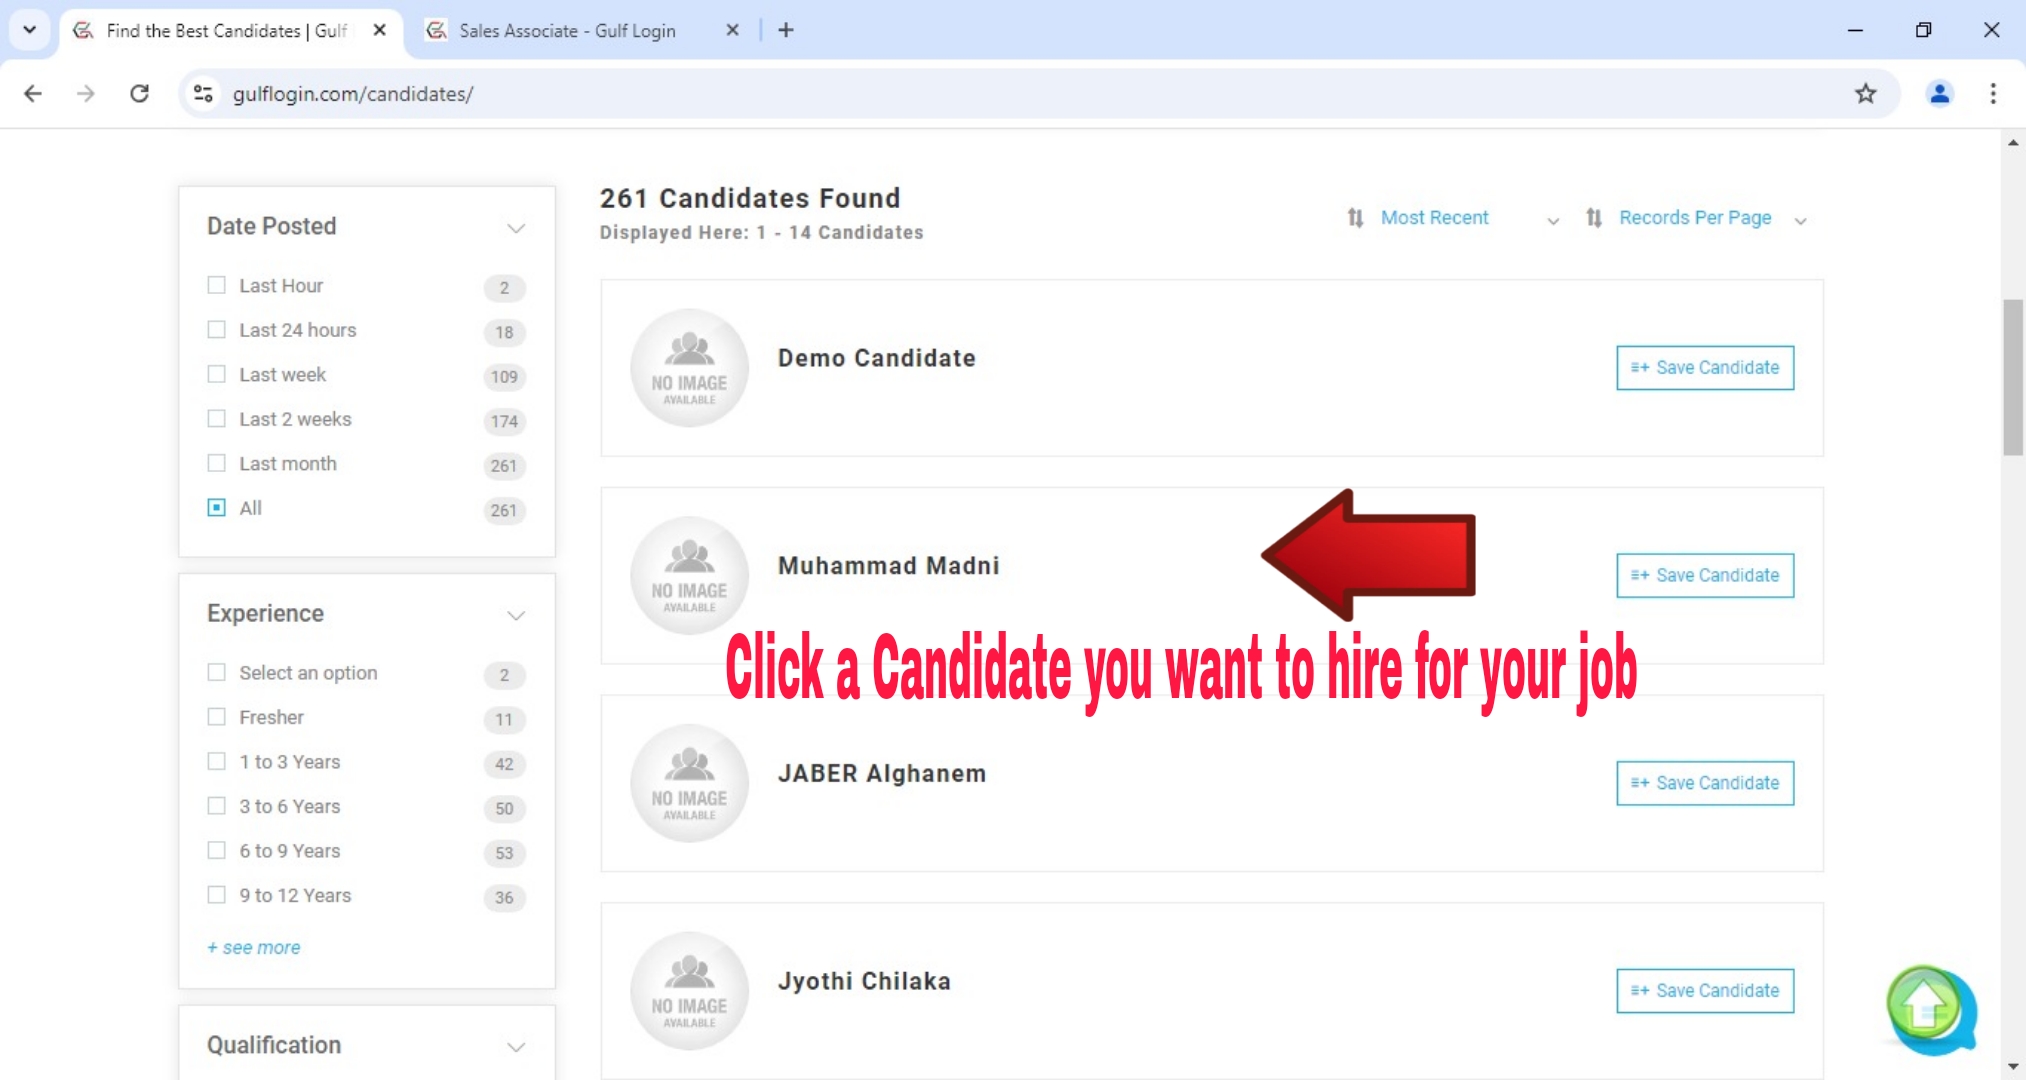
Step 24 : Click a Candidate you want to hire for your job.
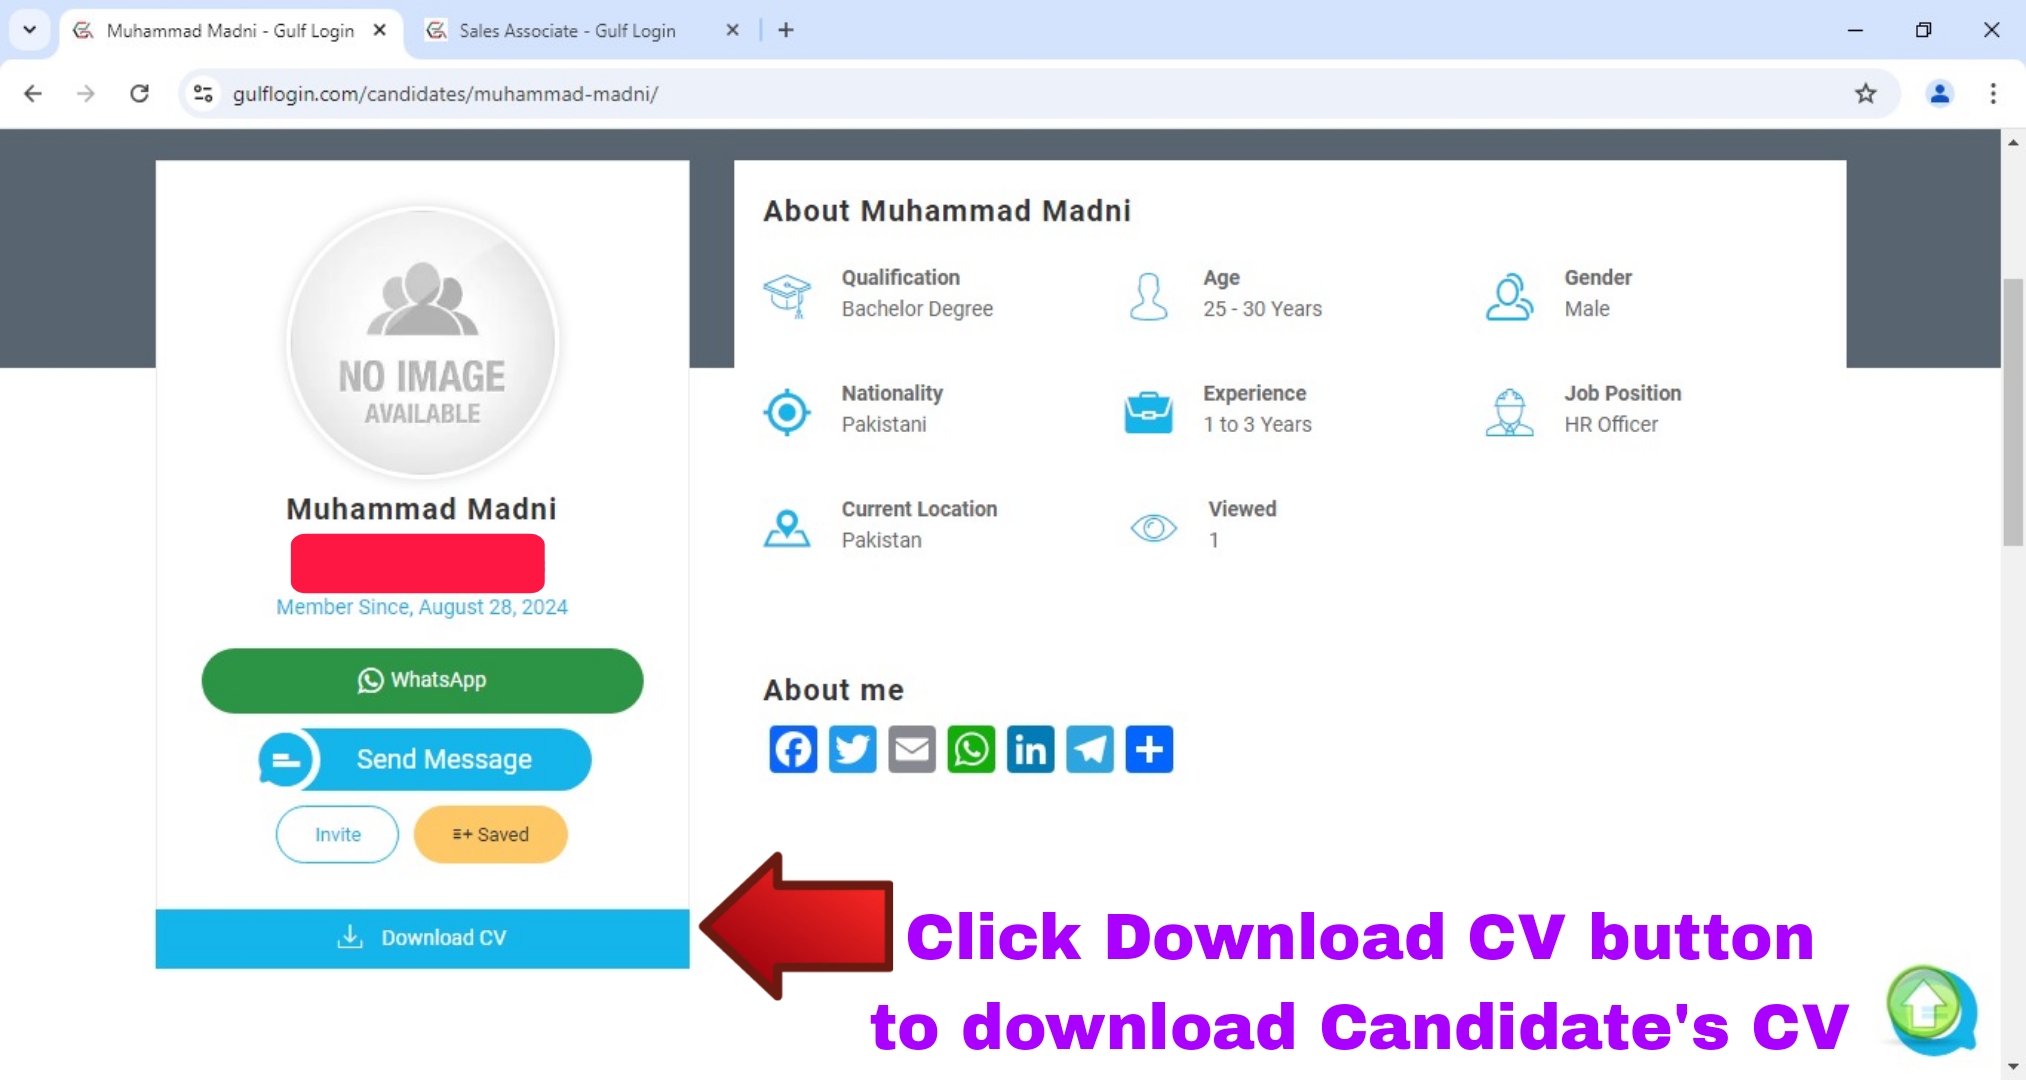
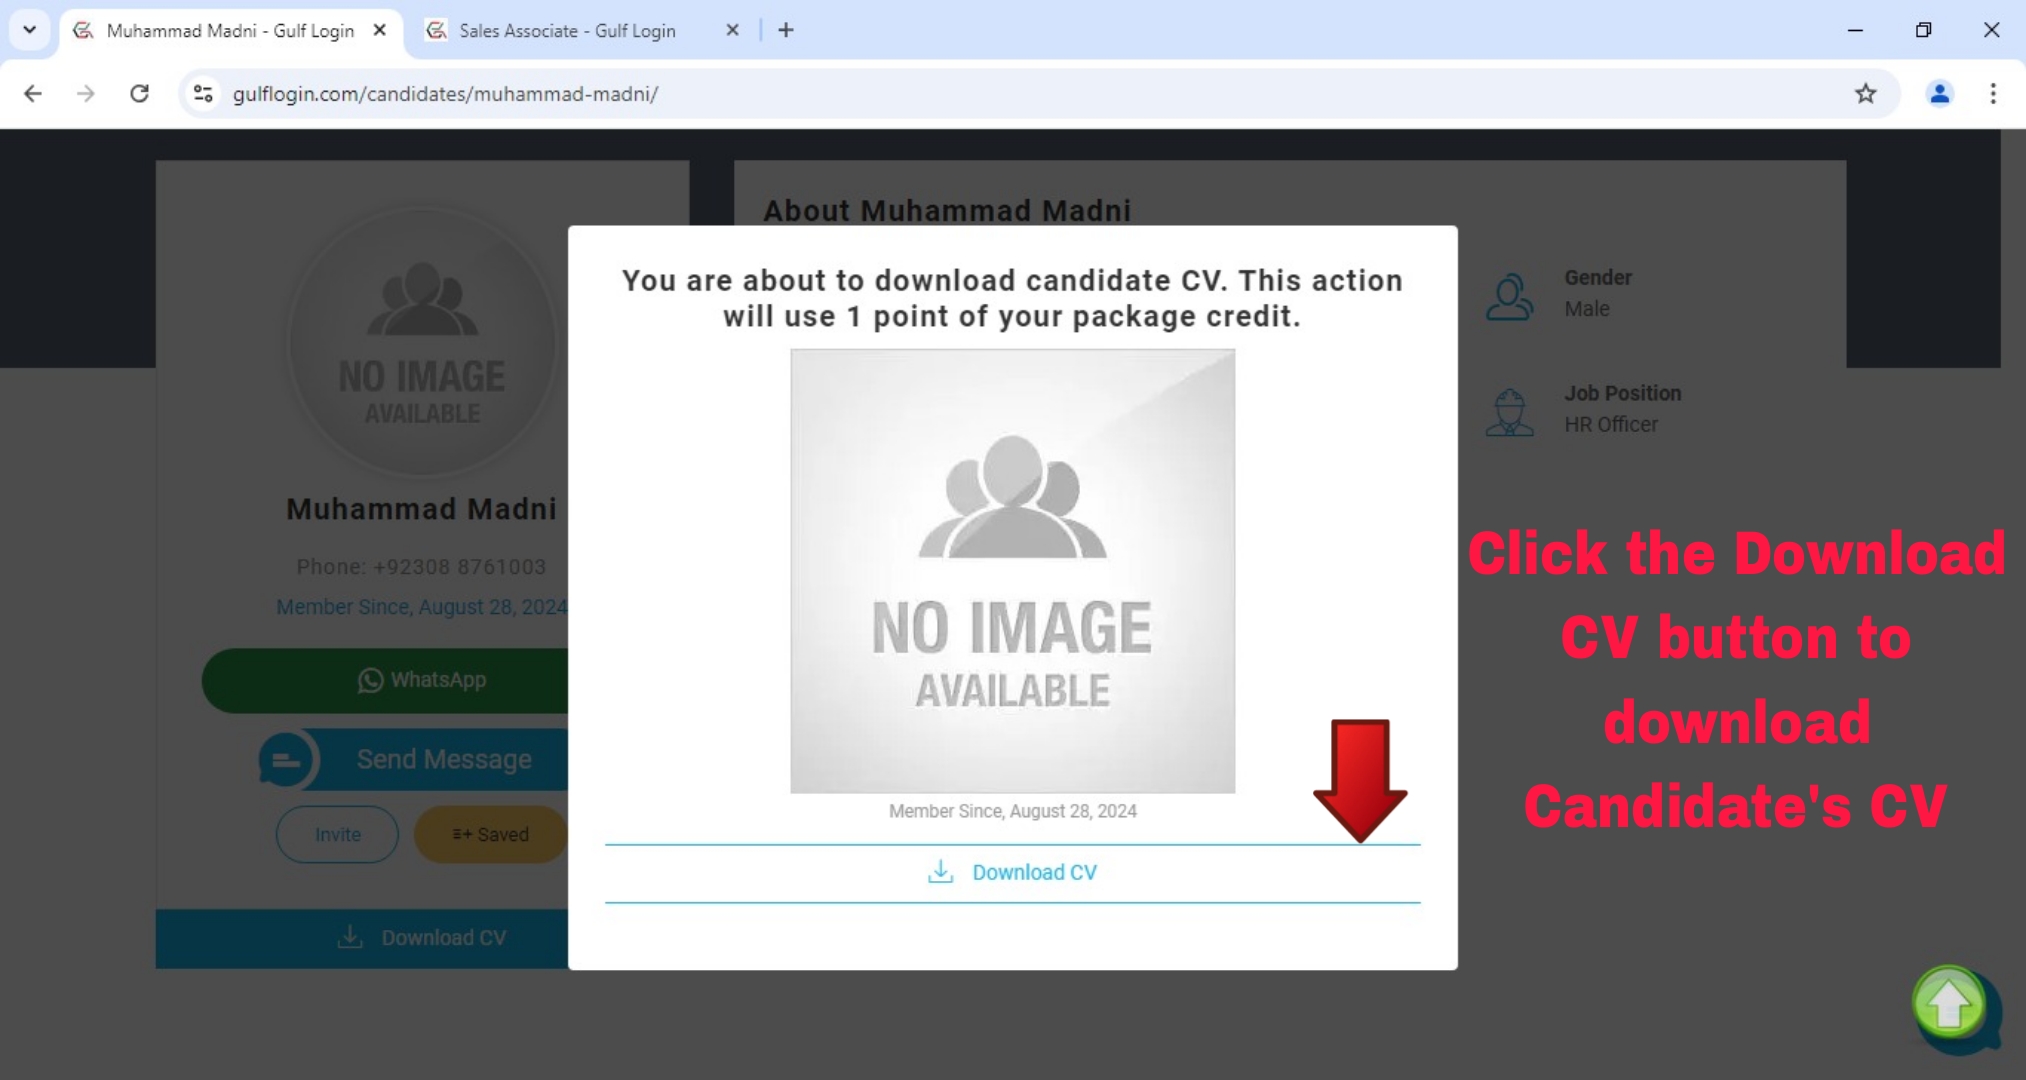
After you clicking a Candidate, it shows that Candidate detailed profile information along with CV. Then, click the Download CV button to download Candidate’s CV.
Important Note : You have now viewed the Candidate’s profile information. So, even if you didn’t download the Candidate’s CV, it will automatically deduct CV download count as 1 in your package subscription.
Step 25 : Click the Download CV button to download Candidate’s CV.
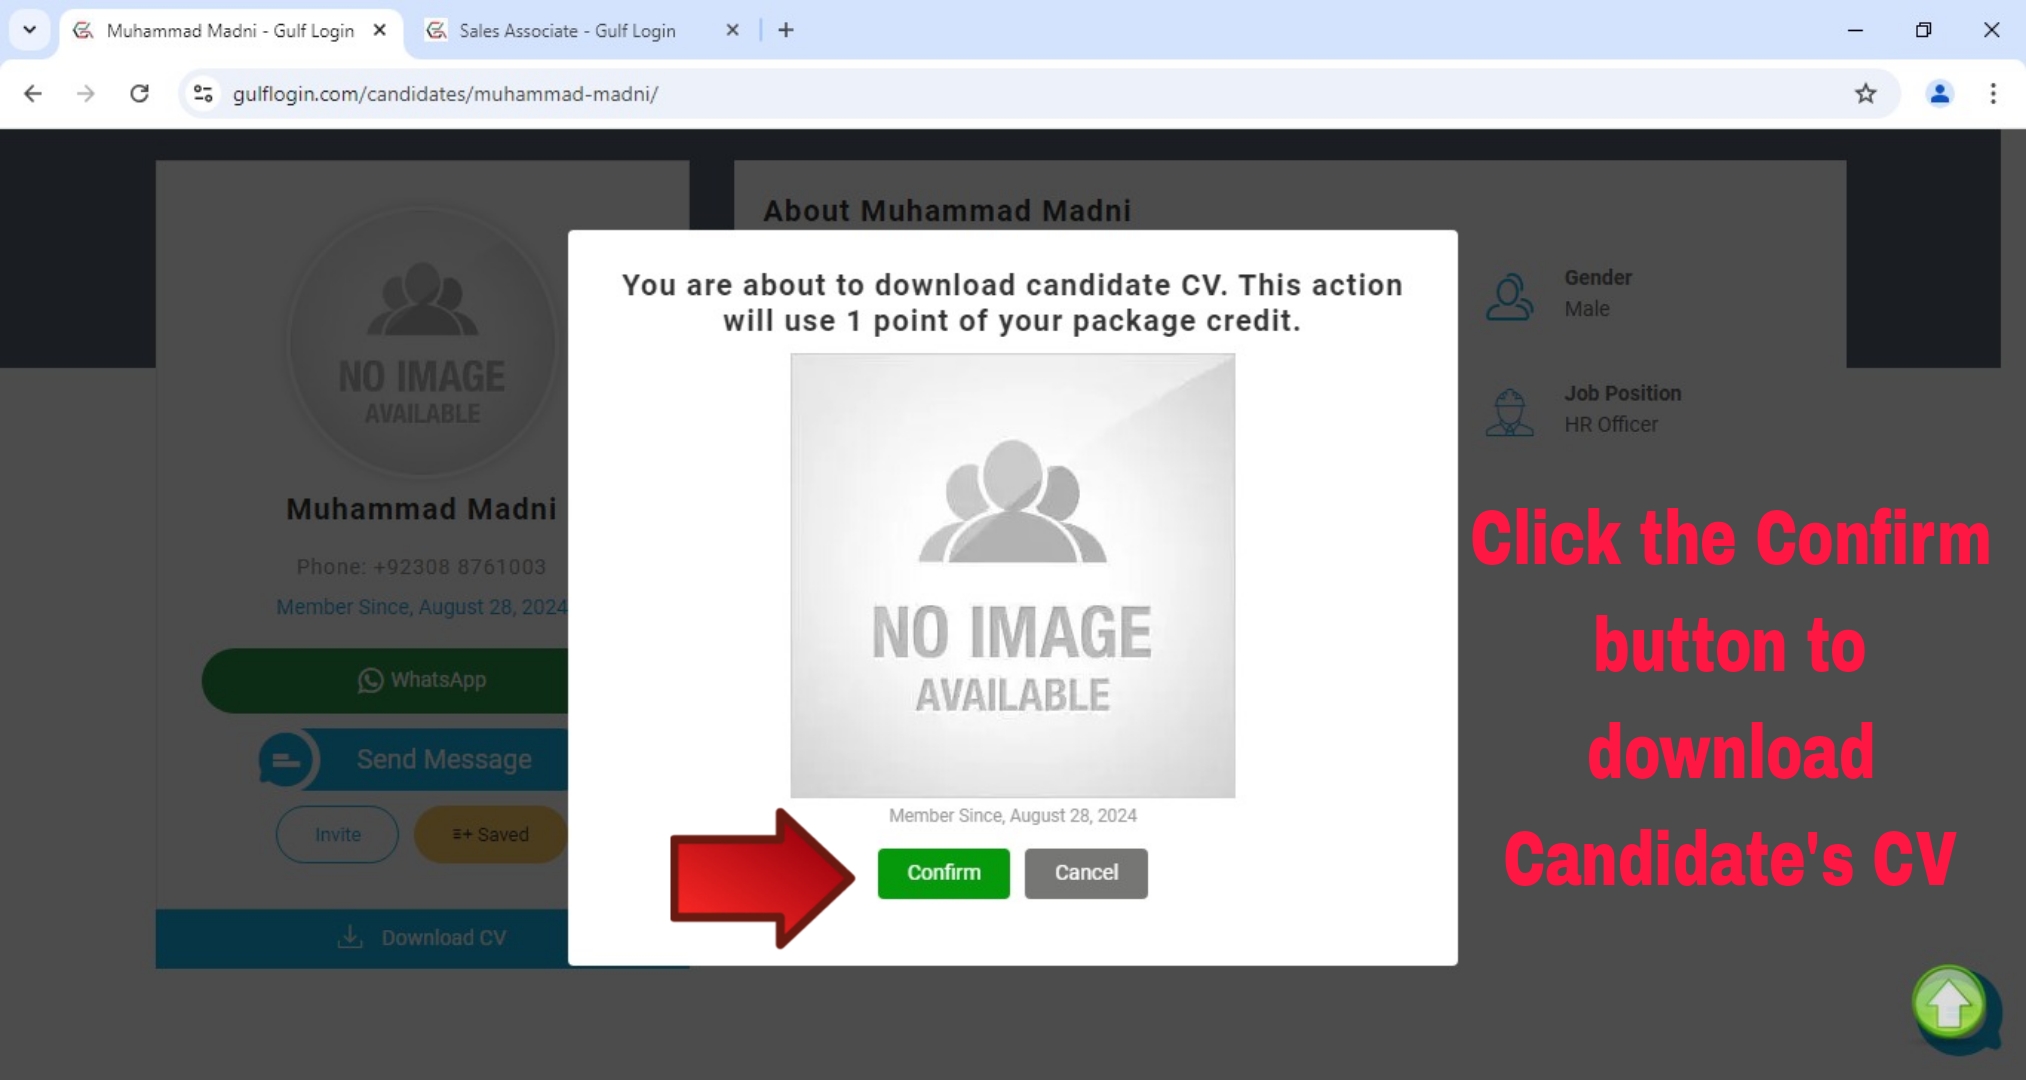
After you clicking the Download CV button, then click a Confirm button to download the Candidate’s CV.
After you clicking a Confirm button, then click the Download CV button to download that Candidate CV.
After you clicking the Download CV button, Now you are successfully download that Candidate CV. So, You can check their CV in your browser Downloads page.
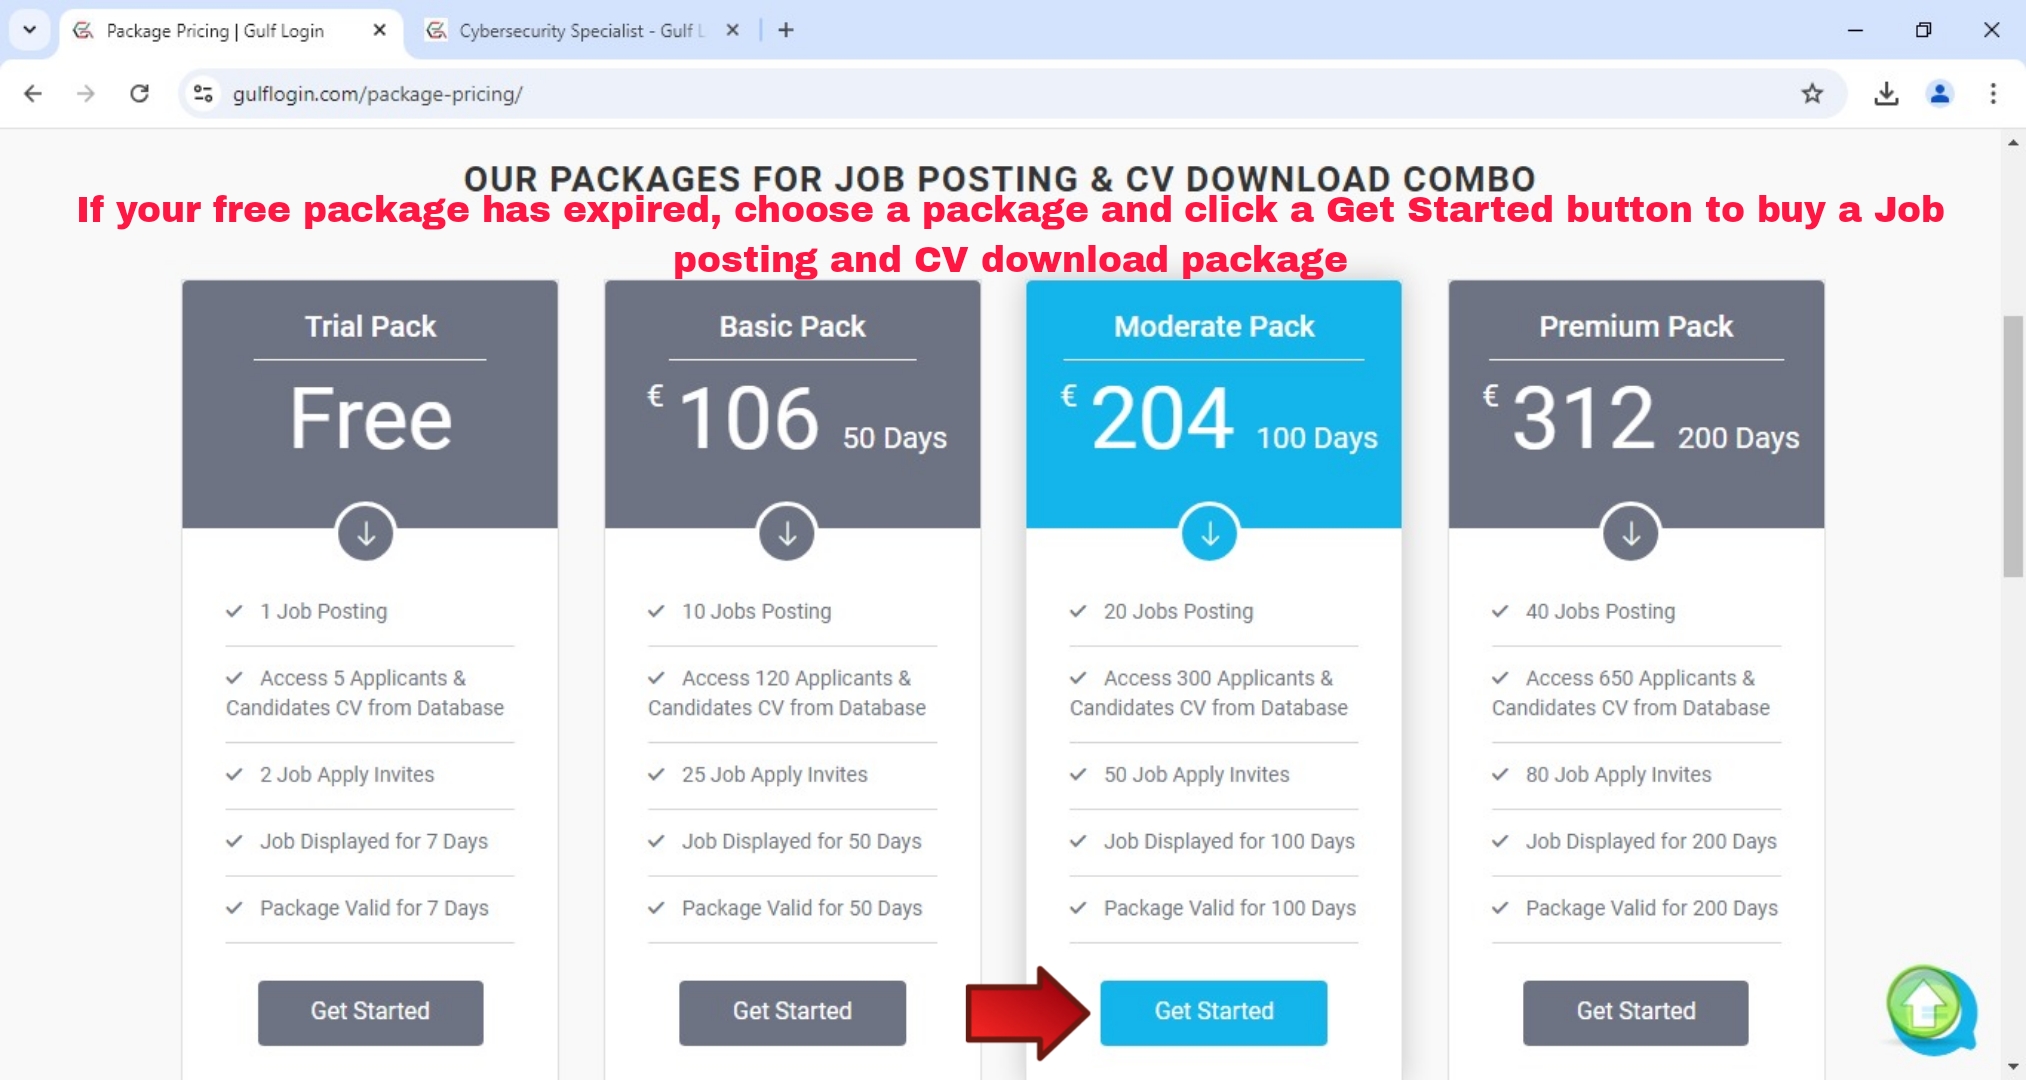
If your free subscription Package has expired, then click the Package Pricing link to view our Package pricing details.
Step 27 : Choose a Package and click a Get Started button to buy it.
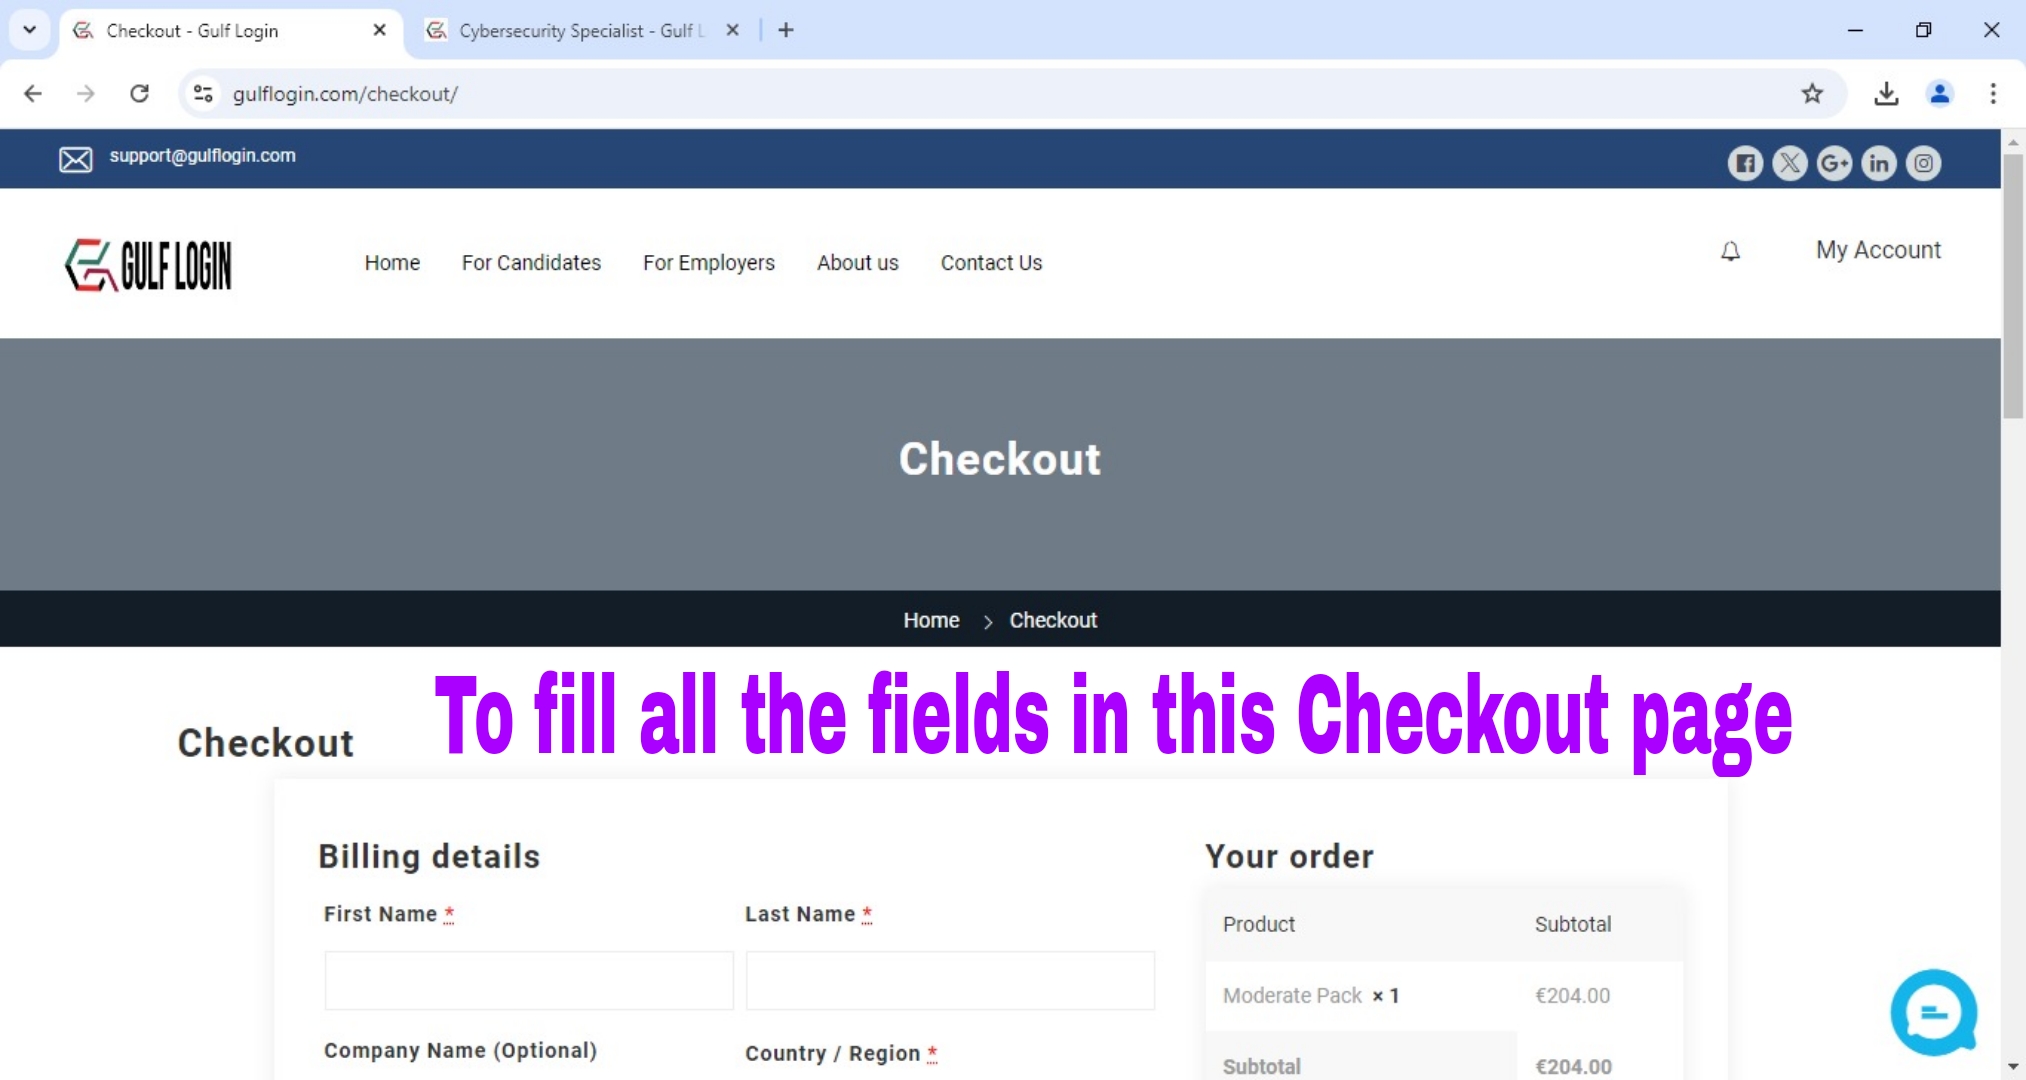
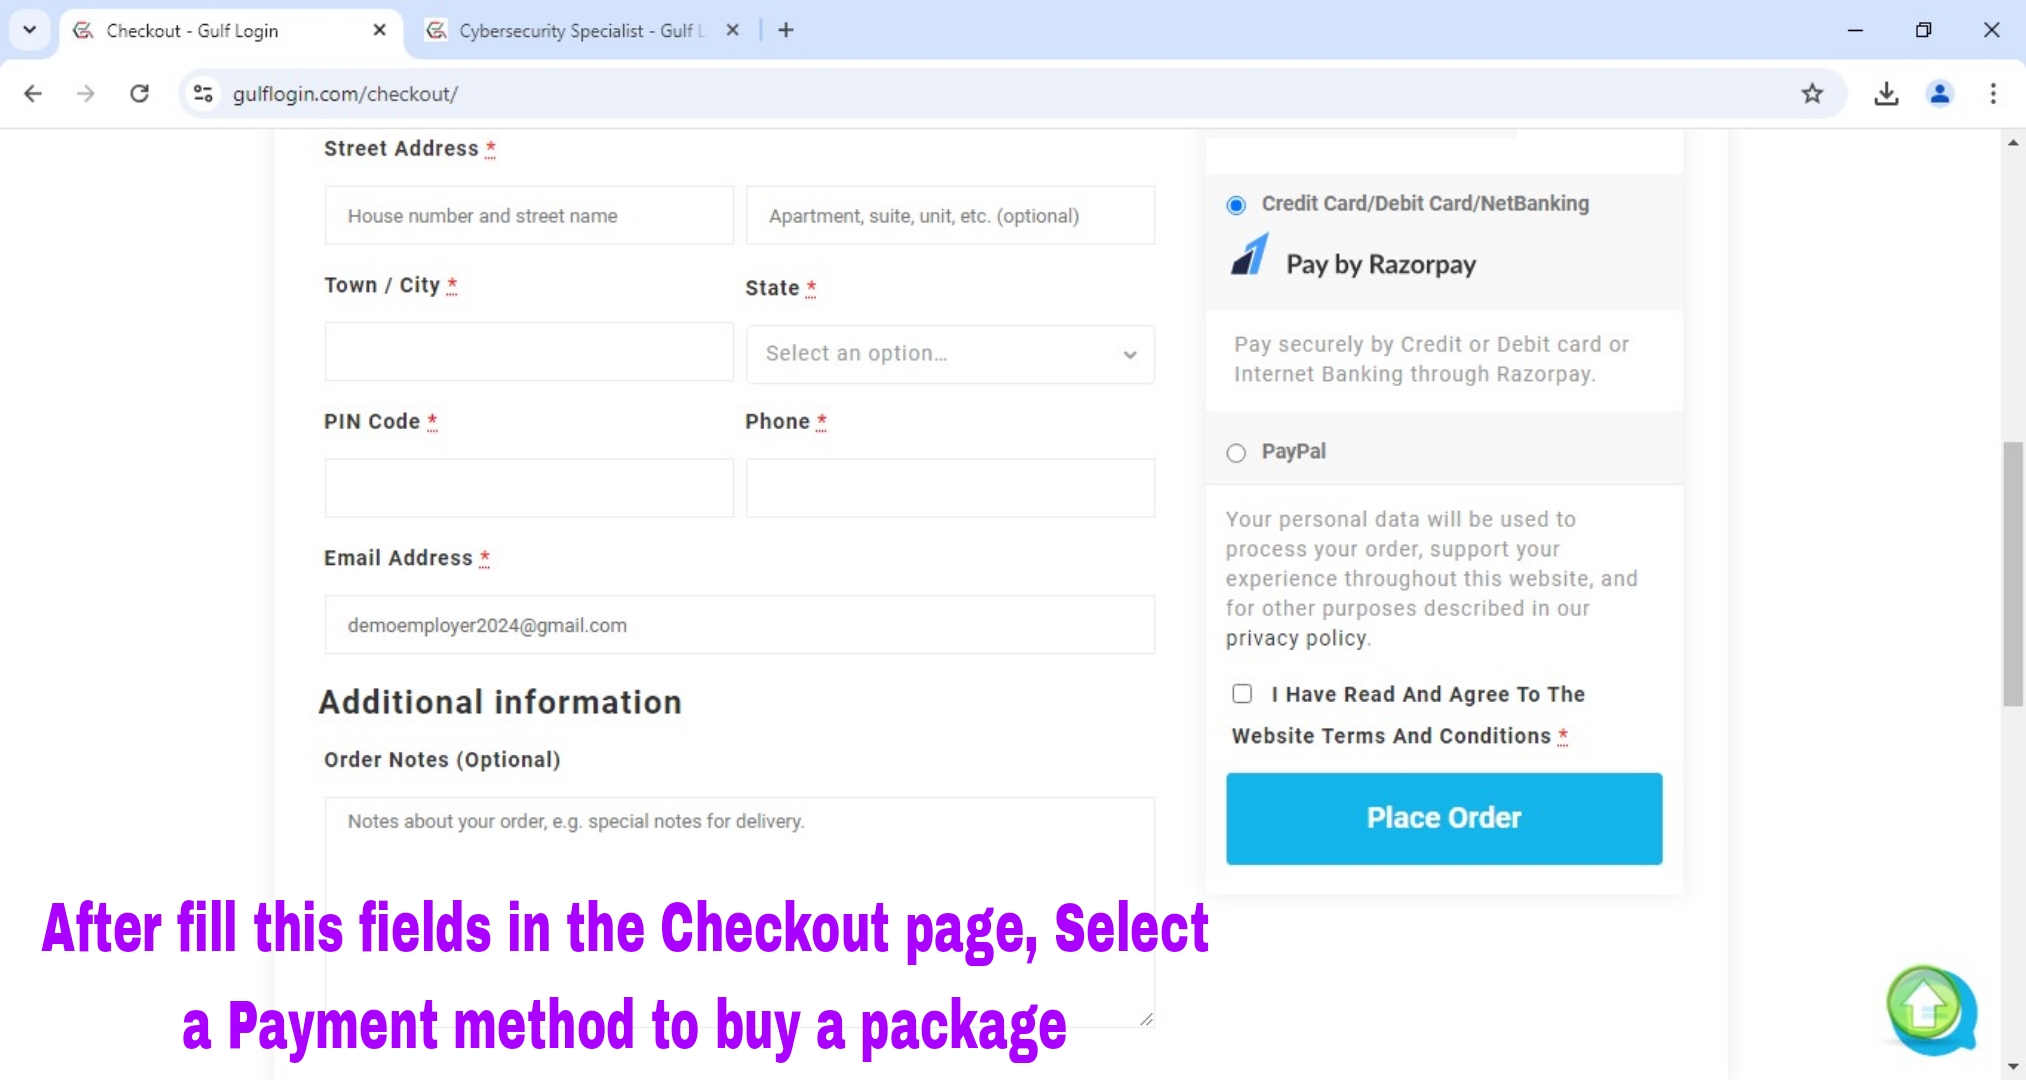
After you clicking a Get Started button, then you are redirected to our Checkout page. So, Now you should fill all the fields in this Checkout page to buy our subscription package.
After you have filled all the fields in this Checkout page, then select a Payment method to buy our Subscription Package.
Important Note :
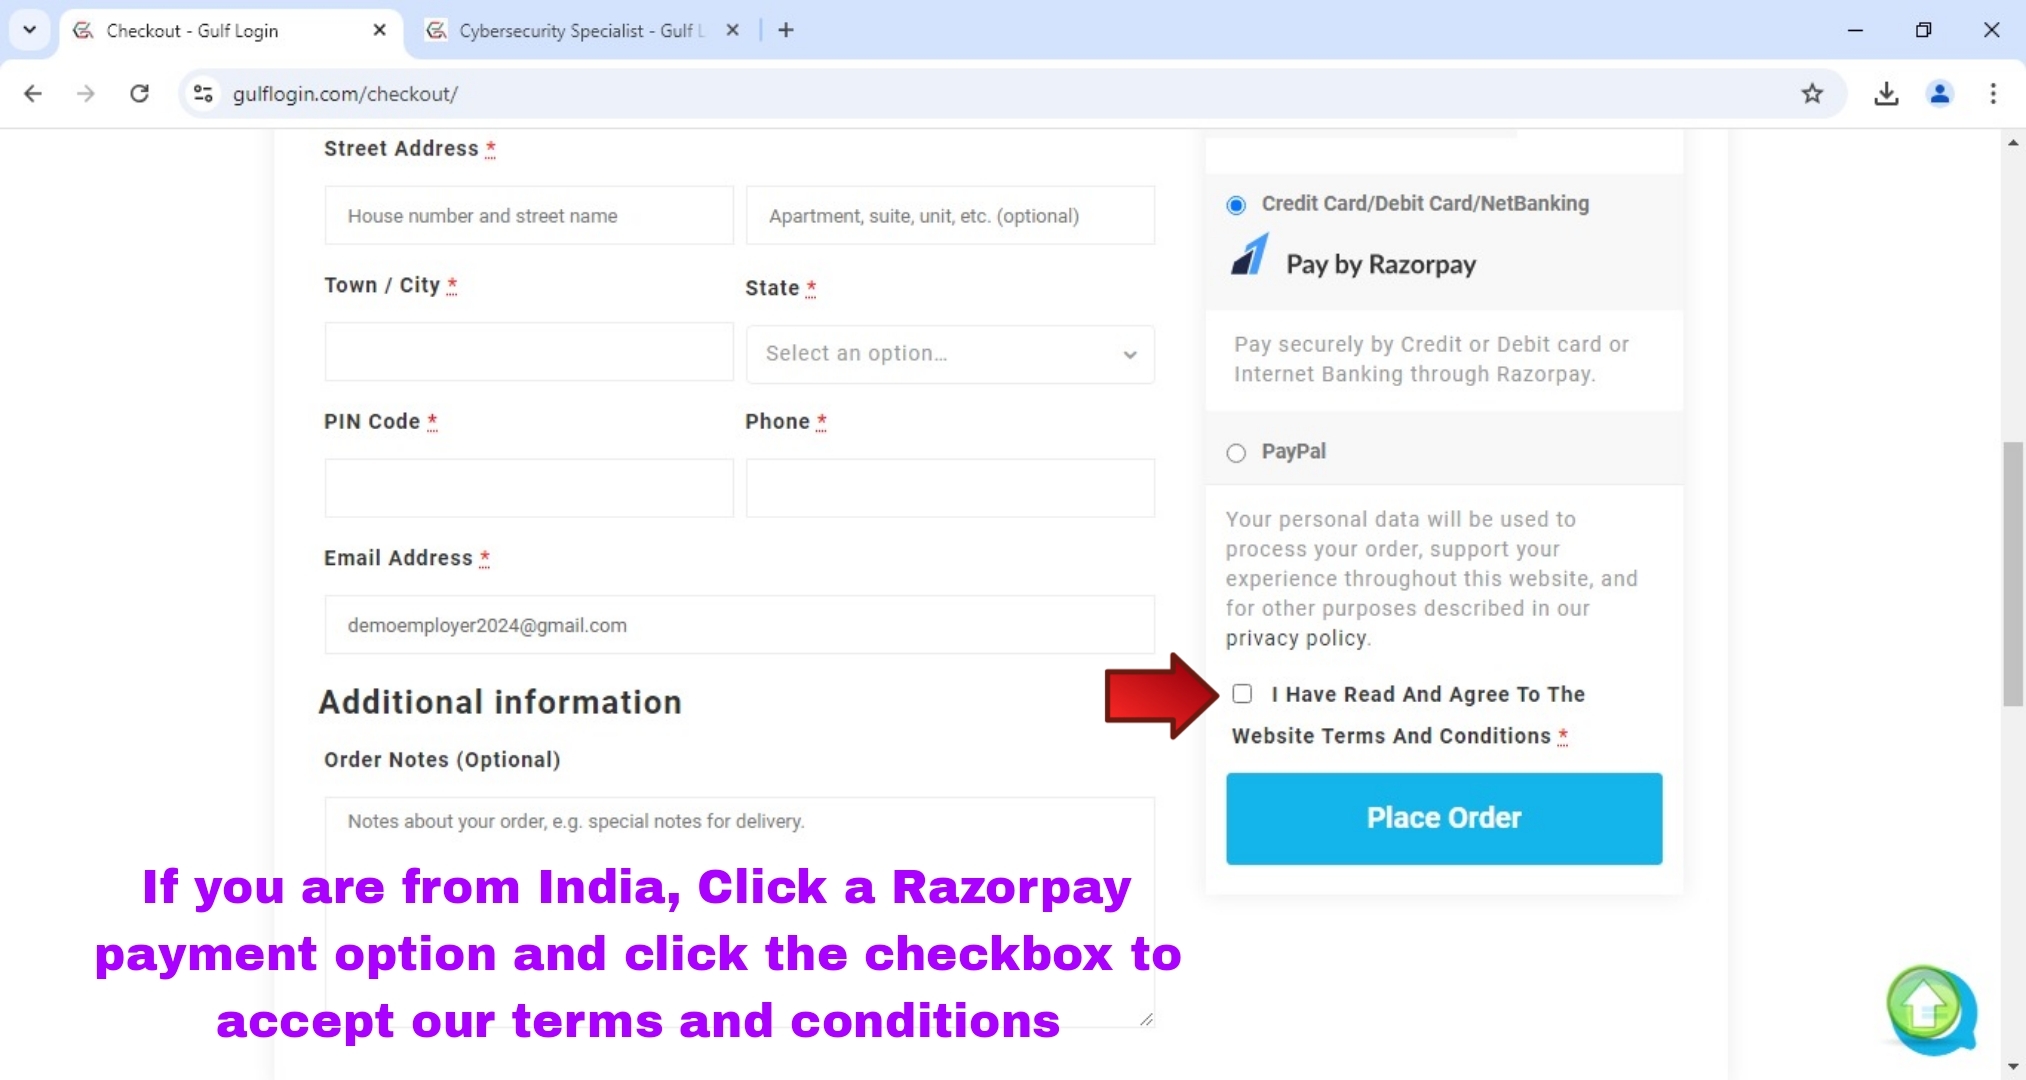
1. If you are from India, then select a Razorpay payment option to buy our subscription package.
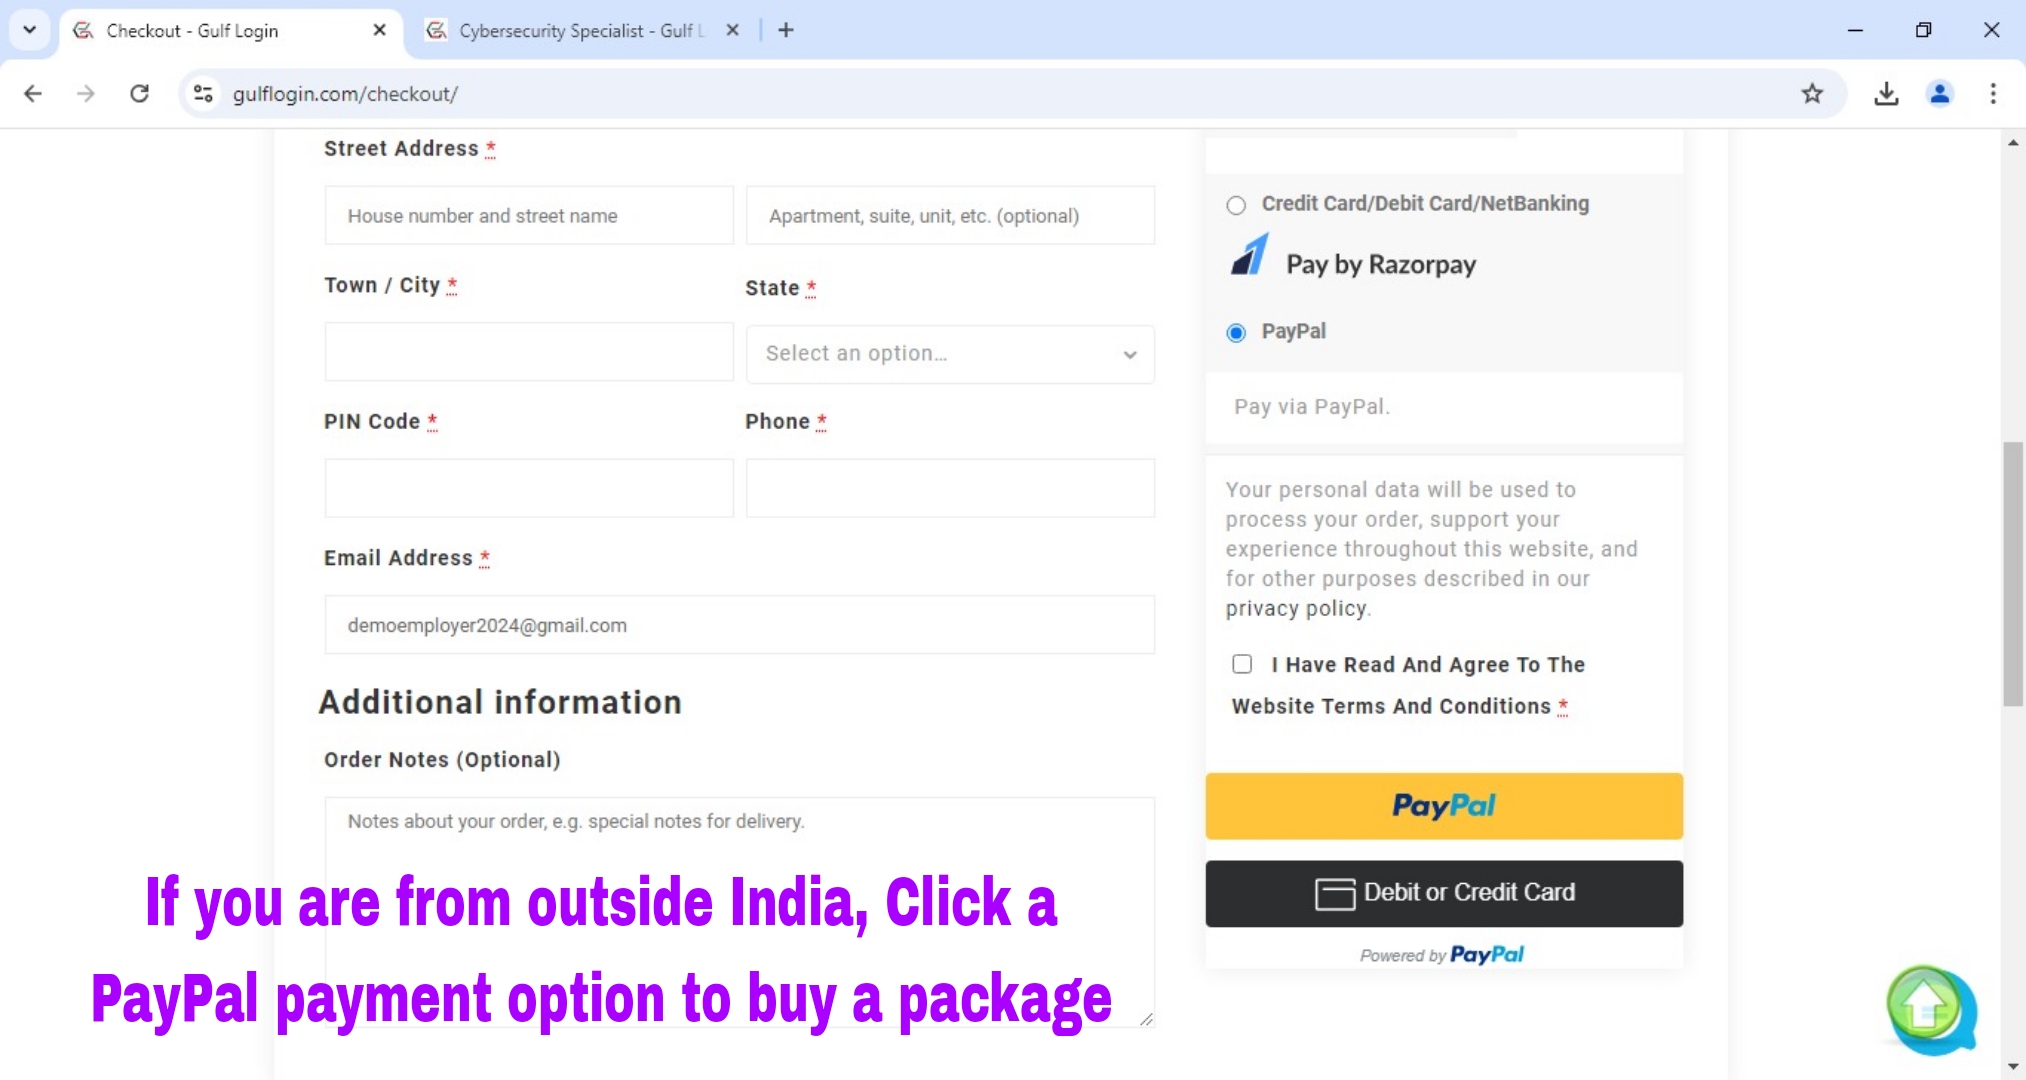
2. If you are from outside India, then select a Paypal payment option to buy our subscription package.
Step 28 : Select a Razorpay Payment method to buy our Subscription Package. (For Indian Users)
After you selecting a Razorpay Payment method, then click the checkbox to accept our Terms and Conditions.
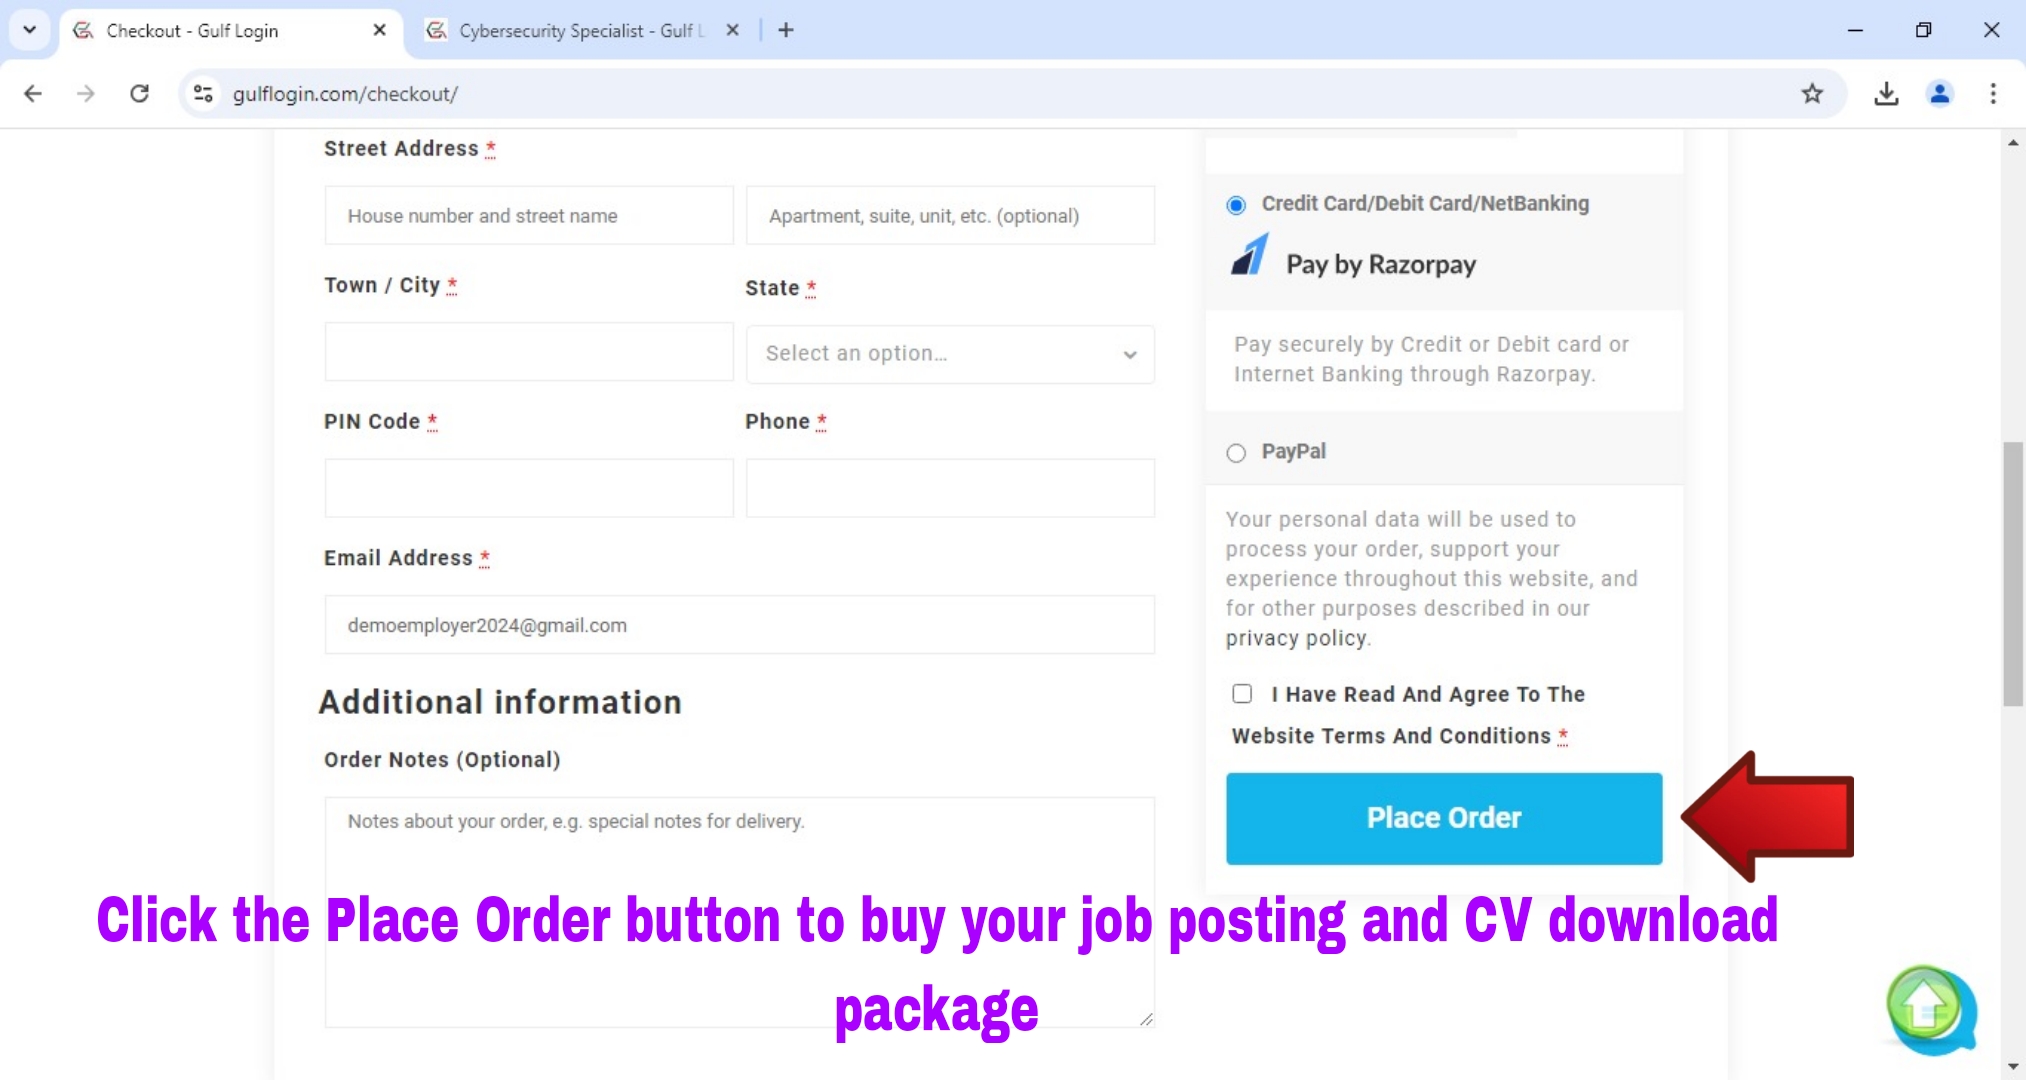
After you clicking the checkbox to accept our Terms and Conditions, then click the Place Order button to buy our Job Posting and CV Download Subscription Package.
After you clicking the Place Order button, then you are redirected to Razorpay payment window to pay for your Subscription Package. Once, your payment has done then your Subscription package is activated successfully.
Now, you can check your Subscription Package details in Employer dashboard Package tab.
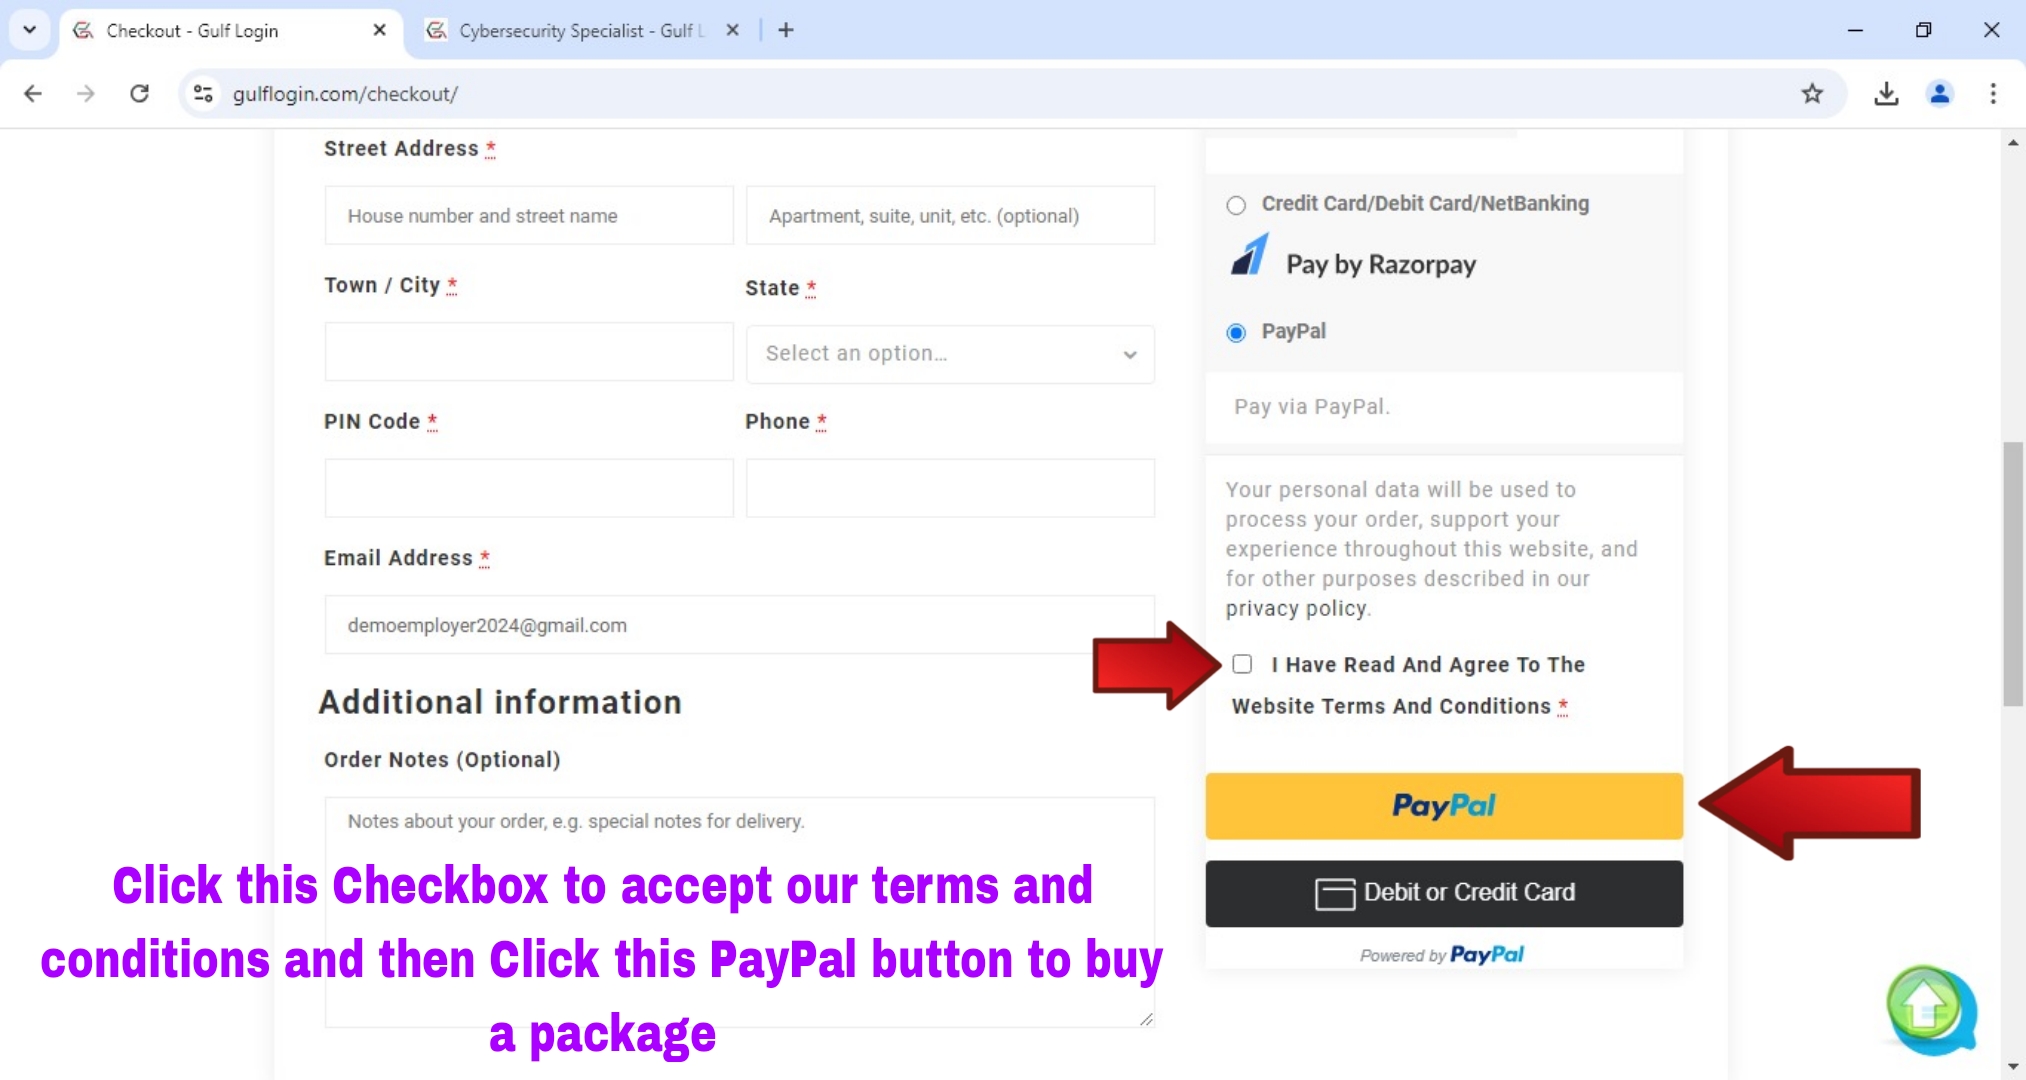
Step 29 : Select a Paypal Payment method to buy our Subscription Package. (For Other Countries Users)
After you selecting a Paypal Payment method, then click the checkbox to accept our Terms and Conditions and click this Paypal button to buy your Subscription Package.
After you clicking the Paypal button, then you are redirected to Paypal payment window to pay for your Subscription Package. Once, your payment has done then your Subscription package is activated successfully.
Now, you can check your Subscription Package details in Employer dashboard Package tab.
Happy Hiring:)
If you have any queries, Contact us :
Through our support@gulflogin.com mail
Through our Contact Us page
